In the grand tapestry of life, have you ever wondered what sets the movers and shakers apart from the rest? The secret sauce, quite often, is the fire of motivation that burns within.
As humans, we’re somewhat quirky in how we perceive time. We’re often sidetracked by the insignificant, overlooking what genuinely matters. Instead of following our heart’s desires, we find ourselves chasing shadows and living up to others’ expectations.
It’s no surprise then that, as noted by Bronnie Ware in her impactful book The Top Five Regrets of the Dying, one of the most profound regrets people voice on their deathbed is: “I wish I’d had the courage to live a life true to myself, not the life others expected of me.”
Now, here’s where we get it wrong: thinking there’s always another tomorrow, believing we’re masters of every twist and turn.
Take, for instance, putting off that dream vacation, waiting for the ‘right’ time to pursue a passion, or shelving ambitions thinking there’s always more time. But the stark reality? Time’s sands are ever slipping and not everything is within our grasp.
To truly savor the essence of life, we must first recognize our finite nature. Once we accept that our hours and vigor are numbered, we gain a unique perspective—a filter, if you will—that helps us prioritize the truly important.
The most successful among us grasp this concept deeply. They’re clued in on their limited bandwidth and, as a result, they direct their energy only toward pursuits that resonate with their innermost desires. This razor-sharp clarity is their driving force, their inexhaustible well of motivation, propelling them to reach the pinnacles they aspire to.
The Power of Motivation
Here’s a story that’ll make you rethink the power of motivation.
It’s a story about an everyday guy with big dreams and an iron will to make them real….
At the tender age of 15, he left his quaint Japanese village, a vision firmly etched in his mind. Armed only with his dreams and no fancy degree, he set his sights on joining Toyota, the engineering giant.
His love for engineering saw him create a revolutionary piston ring. More than anything, he wanted to see his creation in action on the Toyota assembly line. Nights became days in his workshop. He even sold his wife’s jewels to fund his dream.
But life threw a curveball: Toyota found his design lacking.
Yet here’s the thing about this man: he didn’t give up. He enrolled in a tech school, spent two years refining his design, and emerged with a piston ring Toyota couldn’t refuse.
Now with a contract in hand, another challenge cropped up: no raw materials to build a factory, thanks to wartime scarcity. Rather than wallowing, he pioneered a method to create concrete and began building.
But then, bombs targeted his factory – not once but twice. Instead of cursing his luck, he used discarded gasoline cans to rebuild, fondly referring to them as “gifts from President Truman.”
Yet, fate wasn’t done testing him. An earthquake razed his factory. On the brink of giving up, he sold his production techniques to Toyota, thinking his dream was over.
Then, an energy crisis hit. Remembering his homeland, he fitted a motor to his bicycle, creating a sensation. Despite the odds, he wrote 18,000 heartfelt letters to bicycle stores seeking collaboration. And it paid off. 3,000 saw potential, and together, they ignited his scooter business.
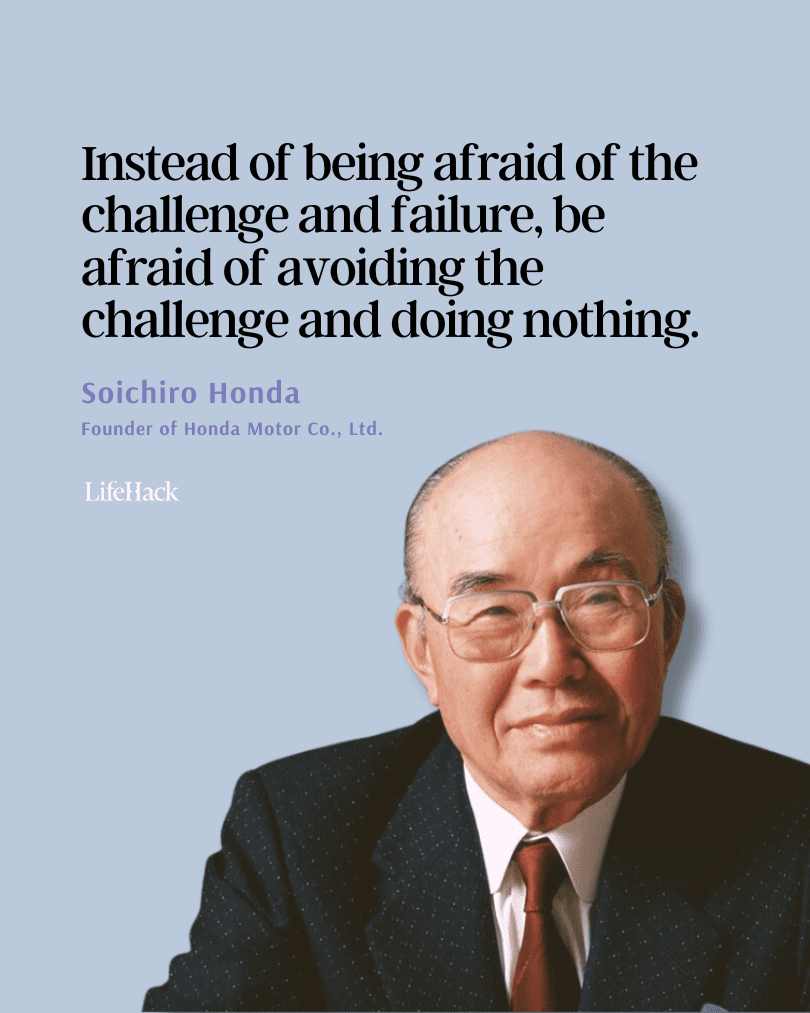
Who was this relentless spirit? Soichiro Honda.
And that fledgling dream? Today, it’s Honda, the reigning monarch of the motorcycle world. They boast over 197,000 global employees and a staggering revenue of over $127.70 billion annually.
All these milestones, achieved through the grit of a man facing astronomical challenges.
Now, do you see the power of motivation?
Motivation: The Catalyst for Change.
Why is motivation such a big deal? Simply put, it’s the nudge we often need.
Motivation fuels behavior shifts, sparks creativity, propels goal-setting, cultivates passions, charts our course, sharpens skills, and elevates engagement.
Imagine its role – be it in a workspace pushing employees to greater heights, in sports guiding athletes to the finish line, in homes nurturing children’s growth, in counseling sessions aiding healing, or in classrooms igniting the flame of learning.
Look around. Motivation’s handprints are all over our lives. We live in a world that doesn’t sit still. Every day brings new challenges, shifts, and surprises.
Here’s where motivation sneaks in, helping us tweak our sails, responding to the ever-changing winds. It’s this very drive that helps us adapt, function efficiently, and ensure we’re not just surviving, but truly thriving amidst the ebb and flow of life’s myriad challenges.
Think of motivation as the engine under the hood. It’s what drives us forward, nudging us to overcome hurdles, chase dreams, and paint a brighter, fuller life picture.
This isn’t just pep talk – it’s backed by hard science. A plethora of studies back up the power of intrinsic motivation, showing clear links between it and persistent efforts, heightened psychological well-being, and amped-up performance levels.
So, if you’ve ever pondered on what makes the wheels turn and the lights shine brighter in one’s life journey, it’s that spark of motivation, every single time.
Beyond Ambition: The Tangible Touch of Motivation
How exactly does motivation manifest in our daily lives? Let’s unpack the tangible benefits that come with being motivated. Here’s what happens when we let motivation take the wheel:
1. Boosting Productivity
Consider a dedicated worker. Instead of merely doing his job, he’s actively invested because he sees a clear purpose behind every task.
When an individual is driven by motivation, every action carries intention. This results in a commitment that cuts through distractions and optimizes every minute spent on a task.
2. Achieving Goals
Think about those ambitious New Year resolutions. Why do some fall by the wayside while others become success stories?
The key is motivation. It serves as the inner force that keeps us resilient in the face of challenges, ensuring we remain committed to our goals even when the road gets bumpy.
3. Upping the Game
Reflect on a top-tier athlete. Such individuals don’t merely rely on talent. They harness their motivation to put in extra hours, hone their skills, and push their limits.
Their determination to improve, driven by motivation, often translates into exceptional performance when it matters most.
“Never let your head hang down. Never give up and sit down and grieve. Find another way.” – Satchel Paige, American professional baseball pitcher
4. Staying Positive
We all know someone who, despite facing challenges, manages to maintain an unwavering optimistic outlook. Even in difficult situations, they find a way to highlight the positives and see challenges as opportunities for growth.
Their secret? It’s not just inherent optimism; it’s a deep reservoir of motivation. This motivation acts as a buffer against life’s setbacks, providing the energy to find silver linings and new possibilities in every circumstance.
It’s their motivational mindset that allows them to reframe adversity, viewing obstacles not as setbacks but as stepping stones towards new beginnings.
5. Breaking the Mold
Innovation often arises from a burning desire to solve problems. That eagerness to explore uncharted territory is motivation pushing us to challenge the status quo and venture beyond the conventional, leading to groundbreaking solutions.
Think about Elon Musk, whose profound motivation wasn’t just to innovate but to reshape humanity’s future. Whether it’s through electric vehicles with Tesla or aiming for Mars colonization with SpaceX, Musk’s endeavors aren’t solely business ventures. They stem from an intrinsic motivation to address planetary challenges and progress humanity.
It’s this motivation that pushes him to defy norms and pave the way for groundbreaking solutions.
6. Prioritizing Health
Those who consistently choose the gym over the couch or a salad over a burger are often motivated by a bigger picture – be it longevity, fitness goals, or overall wellness.
Their consistent healthy choices are driven by motivation, guiding them to prioritize their well-being, even when temptation lurks.
7. Gaining Confidence
Every challenge we overcome, every fear we face, and every milestone we achieve builds our confidence.
With motivation as our backbone, these successes remind us of our capabilities, reinforcing our self-worth and encouraging us to tackle even bigger challenges head-on.
8. Building Bonds
Relationships thrive on positive energy. Motivated individuals, with their zest for life and go-getter attitude, often bring an infectious enthusiasm into their interactions. This not only endears them to others but also fosters collaboration and mutual respect.
9. Never-Ending Growth
Lifelong learners often have an insatiable drive. Motivation keeps them curious, urging them to seek new knowledge, master new skills, and step out of their comfort zones.
This constant quest for improvement ensures they remain relevant and adaptable in a rapidly changing world.
10. Bouncing Back
Resilience isn’t just about getting back up; it’s about maintaining focus and drive after a setback.
Motivated individuals use failures as lessons, ensuring that every stumble is merely a stepping stone towards their ultimate objective.
11. Feeling Complete
Ticking off a personal goal isn’t just about the achievement itself. It’s about the journey, the growth, and the fulfillment that ensues.
Motivation ensures we remain connected to our aspirations, and when we achieve them, it grants us a profound sense of satisfaction, enriching our life experiences.
Final Thoughts
There’s no magic pill, no shortcut, and no secret formula. At the heart of any meaningful change, achievement, or innovation is motivation.
It’s the quiet yet powerful force that drives us to challenge, create, and conquer. It’s the difference between the status quo and the extraordinary.
So, the next time you find yourself at a crossroads or facing an uphill battle, remember that it’s not just about the resources, skills, or opportunities at hand, but the fire within.
Harness your motivation, and there’s no limit to what you can achieve. Embrace it, and you won’t just live – you’ll truly thrive.