The Sézane Spring Edit – The Anna Edit

…and why I’m adding the Wills Jacket in suede to my wardrobe.

This post contains ad affiliate links (denoted by a ‘*’) & gifted items (denoted by ‘ad – gifted). You can read my full disclaimer here.

*This post contains a collaboration with Sezane & gifted products

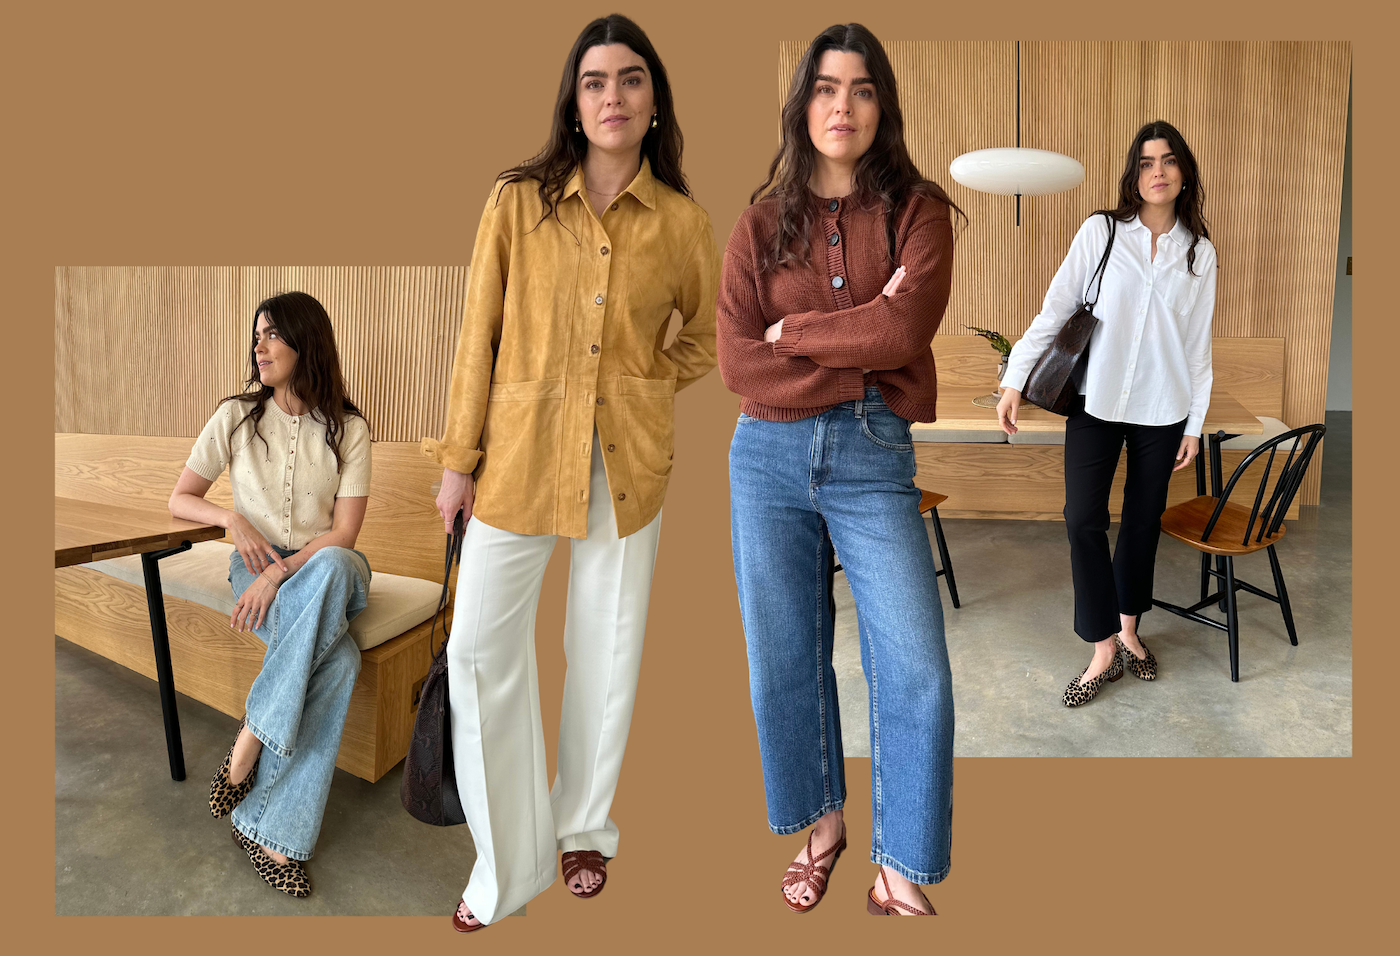
I have really taken my colour anaylsis on board and I’m trying to find a way to tranisition my ‘rich, deep and muted‘ colour brief into spring in a way that still feels like me but gives a nod to current season. Mustard yellow! Deep chocolates! And of course a sprinkling of animal print. You’ll find it all here in my latest edit. Sézane is such a good place to head for a spring refresh because whilst they have all the floaty silhouettes and floral fits, they also have a great range of muted colours that can ease even the most neutral loving amoung us into embracing just a bit of colour. So here I’ve put together an edit of my favourites from their new-in page and the standout pieces that I’d recommend adding to your shopping list…

SHOP THE SÉZANE SPRING EDIT

THE SPRING ESSENTIALS

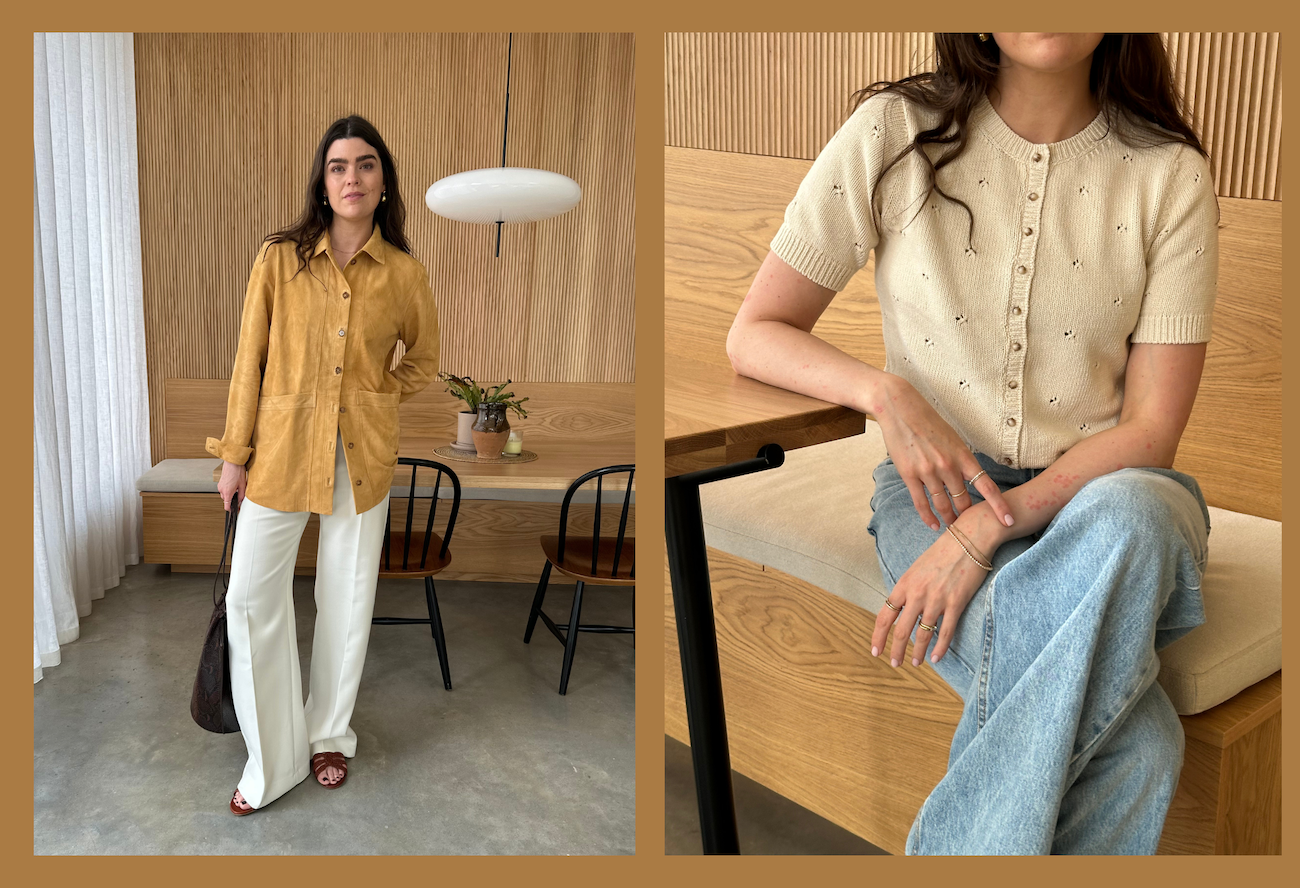
Will Jacket* – I’d been banging on about this jacket since I saw it online in two new suede colourways. I’ve been a fan of the original jacket in washed black denim for a while, but the suede is where it shines. Wear it buttoned up as your shirt or over the top of thinner layers. It was a toss-up for me between the khaki and the mustard, but the buttercream yellow just edged ahead for the fact that I don’t own anything like it in my wardrobe. If you’re like me and love a neutral, this is a good way to ease yourself into colour because the tone is muted and rich it feels neutral-adjacent plus it looks so classic with a cream trouser or light-wash denim. I’d recommend going a size up from your usual for a more jacket-like fit, or go for your normal size if you want to wear it as more of a shirt.

Mateo Trousers* – Another area where I’ve been lacking in my wardrobe is in the trouser department. I don’t like anything with too much volume on the front as I feel like they swamp me, but sometimes it’s nice to have a more formal trouser to turn to. Sézane do this genre of trouser SO WELL. If you’re in need of a bottom-half option that could work in an office, or for a nice evening event, but could be thrown on with flip-flops and an oversized jumper at the weekend then look no further. And I cannot even begin to tell you how perfectly they fit (I went with the sizing advice on the website to size down and they were so right!). I really like the formula of wearing them with something more casual on top like the Will Jacket. OBSESSED with this combination.

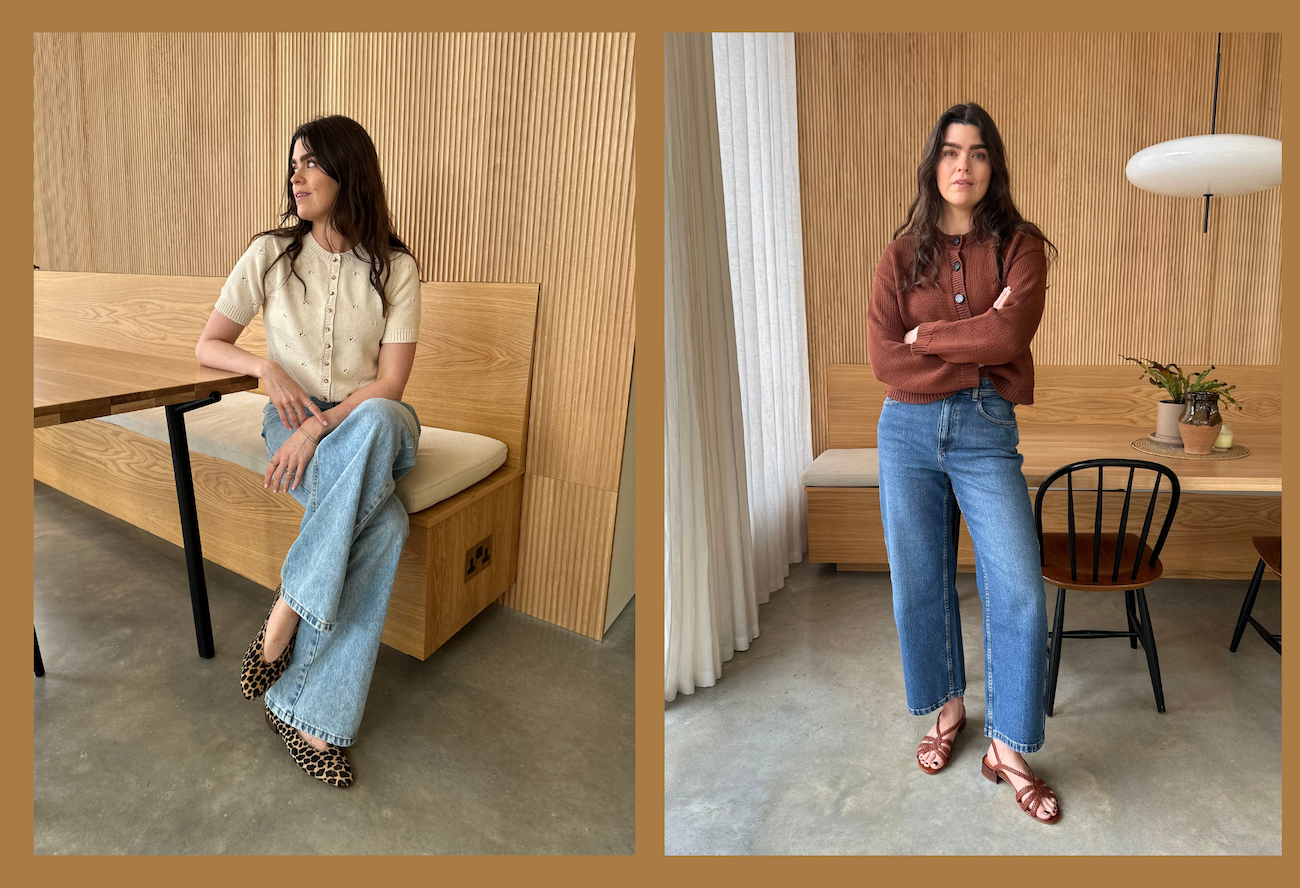
Ciara Trousers* – If you’re a Substack girlie then you would have seen all the flared cropped trouser discourse, and these are such a great option if you’re in the market. The fit is close but the fabric has a nice amount of stretch to it, whilst still being thick making them another good work option. But they are also comfy enough for a working-from-home day too. I love the Audery Hepburn feel of them with a ballet flat (why not make it fun with these leopard print ones*?) and an oversized shirt. But I can seriously vouch for just how comfy they are, and that we love to see.

Kyle Cardigan* – How cute is this!? Sometimes it’s just nice to have something with a bit of feminine flair for spring, especially when you don’t fancy doing the whole floral thing. I’ve worn it buttoned-up here, but on the Sézane site it’s styled in a more relaxed way, unbuttoned with baggy trousers, and it looks just as cute. I could see me wearing this well into the warmer summer months, unbuttoned a little, but with a pair of linen wide leg trousers with the Romie bag thrown over my shoulder (see below!).

Romie Basket* – Now this bag isn’t pictured here as I spotted it after I’d shot everything, BUT, I’m a big fan of the original Romie bag (seen below in the snakeprint), and now it comes in natural raffia?! Sign me up. I love a bag in a structured shape with a loose and summery texture, and this just ticks all those boxes. And don’t just reserve it for the height of summer. Wear it now with a navy trench, white jumper and jeans. The contrast of something heavier and more wintery, with the lightweight feel of the bag creates a beautiful balance. I’ve loved wearing my more classic ‘summer’ bags all through winter. It helps to spice up your hefty coats once you start to get bored of them, so think of this as a more year-round purchase.


SHOP THE POST


Photos by Mark Newton


Source link

Fabric Options For My Desk Chair (These Are The Swatches I’ve Ordered)

For about an hour last night, I seriously considered purchasing another desk chair for my studio. And because I’ve searched high and low for a green velvet high back desk chair with no success, I knew my only option was to purchase a chair from a place that will allow me to select a fabric.

So my mind automatically went to Ballard Designs. They do have a desk chair that I love, and I’ve looked at it several times in the past. Their Grammercy Desk Chair is beautiful, and I actually found a fabric that I thought would work perfectly in my studio.

But after about an hour of serious contemplation, I came to my senses. (I just can’t justify paying $1100 for a desk chair when (1) I’m perfectly capable of reupholstering a chair, and (2) I have a perfectly good desk chair with a very high back and a shape that I love. Here’s what my current desk chair looks like…

chair makeover - from dining chair to rolling desk chair - 1

I’ve done a lot of upholstering, so while it’s not my favorite thing to do (I’d much rather build than upholster), I just can’t let myself take the easy way out on this one, especially when the cost to do so is so high. Even having someone else reupholster my desk chair isn’t something I’d consider because (1) the wait time for local upholsterers is generally about two months, and (2) the cost for labor would start at about $500 for my chair (it’s a wingback with a separate seat cushion), not including the fabric cost.

So I’m afraid that my only option is to keep my current desk chair, and reupholster it myself. That’s fine. I’m capable. After all, I once built a chair from scratch and then upholstered it myself. Do y’all remember that? 😀 I even matched the patterns and everything. I was so proud of this project!

So I’m now 100% committed to upholstering my own desk chair. I’m going to stop looking for an escape route from this project because I’ve exhausted all other options. There’s no desk chair in existence that fits my criteria. So now, my only goal is to find the perfect fabric for my chair.

Since I did really like the fabric that I selected for the Ballard Designs chair, I decided to go ahead and order a swatch since they sell that fabric by the yard. It’s not velvet, so I’ll have to see what it looks and feels like in person. If my cat can easily get her little claws into this fabric, it won’t work. She’s been using my desk chair as a scratching post since we got her. (And yes, she has three other scratching posts, but she still loves to use my chair.)

From there, I just did a search for “green velvet upholstery fabric” to see what I could find. I did find some velvet options, but I also came across others that I couldn’t resist, like this green and white stripe.

I love the textured look of this one. It’s microfiber, and I’ve heard that it’s good for houses with cat as well, so we’ll see if it’s a good option.

And then I came across this velvet and absolutely could NOT resist. I love this so much!! I have a feeling that the colors will be all wrong, but I still had to see this for myself. The price is a bit hard to swallow, but I think I’ll only need three yards. So it would still be much cheaper than paying someone else to reupholster my chair.

And then I found several solid color green velvets. I’m so anxious to get this sample in my hand and see why in the world it costs $150 per yard. What could make a velvet that special?

I’ve used many P. Kaufmann fabrics in the past, and I’ve always been happy with them. This one is more in the price range I was expecting to pay.

I have a feeling this one will be way too bright. It’s kind of the color that the bases of my work tables were before I repainted them earlier this week. But maybe in person it won’t be quite this bright.

This one is way on the opposite end of the spectrum. I have a feeling it will be too dark, but I still want to see it in person.

If I’m going to go with a solid color, I actually hope this is the one that works the best. This is a happy green, and I’m really hoping it plays nicely with my pink cabinets.

And then I got two more swatches that are called Citron. In all, three swatches I bought are called Citron, and they’re all very different, so it’ll be interesting to see what they actually look like in person.

So let’s review. 😀 The chair will be sitting in front of these cabinets…

I also have an entire wall of cabinets that color on the wall perpendicular to those cabinets…

The wall opposite the desk area looks like this…

And the desk area is right by the back entry, which looks like this…

And these are the swatches I’ve ordered…

I’m hoping one of the first three works. If I had to choose today just based on the pictures, my favorite is the light green straw-look microfiber. I hope I like it as much in person as I do in the picture! And I also hope it’ll stand up against cat claws l like velvet does.


Source link

Fresh as a Daisy: Adorable Spring Sheets & Facebook Marketplace Quincy Bed is finally in our room!

Fresh as a Daisy: Adorable Spring Sheets & Facebook Marketplace Quincy Bed is finally in our room!

Fresh as a daisy! Can you even handle how adorable these daisy sheets are? So delightful for spring —and a match made in heaven on my new-to-me bed! *For a limited time you can save 20% on the purchase of a Garnet Hill gift card, use it for yourself or a gift!

After four weeks leaning against our fireplace in the living room, the Ethan Allen Quincy bed we found on Facebook Marketplace finally made it up the staircase to our room this weekend (thanks to some helpers we hired to bring it up for us).

I couldn’t love it more! When I would get cute new shoes as a kid I would keep them by my bed so I could see them as I drifted off to sleep. Did you do that, too? Now I get drift off to sleep in a cute new bed and wake up happy in my daisy sheets!

Fresh as a Daisy: Adorable Spring Sheets & Facebook Marketplace Quincy Bed is finally in our room!
Sources: Daisy Sheet Set // Daisy Shams // Beaded Chandelier // Blue Chunky Waffle Weave Throw Blanket // Ruffle Blue Ticking Stripe Pillow // Gray Coverlet // Patterned Rug

Even though we now have to make a few unexpected updates like new bedside tables and lamps, repainting walls and probably some other refreshes to make this all work, you can imagine how happy this whole turn of events makes me :).

Some people search for months or years for specific pieces they want, but I found my dream bed immediately on my first search for it. I wasn’t even planning to buy a bed right now, but it was meant to be. Serendipity. I need to start searching more often!

You can read my first post about finding the bed here.

Fresh as a Daisy: Adorable Spring Sheets & Facebook Marketplace Quincy Bed is finally in our room!
Sources: Daisy Sheet Set // Daisy Shams // Blue Chunky Waffle Weave Throw Blanket // Ruffle Blue Ticking Stripe Pillow

Minutes before I thought to look for the bed on FBMP, I was showing my husband this exact bed on Ethan Allen. Crazy, yes? I was making a dream mood board for our home and wanted to include this bed as a part of my overall style “vision.” So I had only shown it to him to ask if he liked it (he did) and which color he thought I should choose (we both agreed the robin’s egg blue felt right).

Suddenly at that very moment I thought to myself, you should search for it on FBMP. I knew it was a long shot, but WHAT IF? Dream big! So I typed in Quincy Bed Ethan Allen and BAM! there it was! My robin’s egg blue Quincy bed. I had wanted this bed for years, so I could hardly believe my eyes!

However, even though we got the message back that we could come get it, I knew it wasn’t going to be easy. This bed was in Canada (we’re on the other side of the border in the US) and we don’t own a truck.

And that was only the beginning of the challenges!

Many of you asked to read the rest of the story and the mishaps we faced, so I’ll share more that I didn’t share in the original post.

So here is the rest of the story — for you, my curious friends. 🙂

Fresh as a Daisy: Adorable Spring Sheets & Facebook Marketplace Quincy Bed is finally in our room!
Sources: Daisy Sheet Set // Daisy Shams // Blue Chunky Waffle Weave Throw Blanket // Ruffle Blue Ticking Stripe Pillow

For some reason we always forget to turn on the “roaming” feature on our phone when we go to Canada.

So I will say that our first challenge would’ve been avoided had we simply remembered to do that :).

Our car is old enough to not have any built in navigation features, but we were in a rented Uhaul that didn’t have one either.

As soon as we crossed into Canada, the map feature on our phone stopped working so we were instantly …. lost. Somehow after running around an outdoor shopping mall we managed to find a bank machine that was supposed to be open for 24 hours — but it was closed.

That meant we couldn’t get the Canadian cash we would need to buy the bed.

Not to be discouraged, we headed toward the the seller’s home (fortunately I had saved step by step directions so it was almost like the old days without a phone or computerized navigation hahah), but we had to go without the cash to buy the bed.

Fresh as a Daisy: Adorable Spring Sheets & Facebook Marketplace Quincy Bed is finally in our room!
Sources: Daisy Sheet Set // Daisy Shams // Blue Chunky Waffle Weave Throw Blanket // Ruffle Blue Ticking Stripe Pillow

The seller didn’t speak much English so we were communicating with her grown daughter over the phone. I had explained on our way to their home that the bank machines were closed. We began trying to find a different way to get her the money, which ended up being more difficult than we expected.

She originally said she didn’t want to use PayPal which would’ve been the simplest way to do this from the beginning, but eventually she agreed to set up her account so we could pay for it that way.

But after looking at the bed, we discovered a new problem. We couldn’t get the bed apart with the tools we brought! I was really starting to worry that we’d have to go home without it. My husband said at least I hadn’t paid for it yet, but I didn’t want to come so far only to go home without it!

So then we had to leave the bed and their home to go to Home Depot to find the right new tools. I’m surprised she trusted us to return. Thankfully she didn’t just sell it to someone else while we were gone!

Fresh as a Daisy: Adorable Spring Sheets & Facebook Marketplace Quincy Bed is finally in our room!
Sources: Daisy Sheet Set // Daisy Shams // Blue Chunky Waffle Weave Throw Blanket // Ruffle Blue Ticking Stripe Pillow

We found the right tools and finally got the bed apart. Now it was time to get the bed downstairs. The headboard was so heavy that the owner kindly offered to help us. She was probably worried we’d drop it down her staircase or crash into a wall, which honestly worried us a little, too ha.

She was a small lady but she stood on one side and I was on the other and my husband at the far end! We’re clearly not as young or buff as we used to be, but we somehow managed to get it down the staircase and into the rented truck.

Finally the daughter’s PayPal account was available so I could transfer the money and we could go home with the bed in the truck. PHEW! Perseverance.

By this point we had been in Canada for about four hours longer than we had planned. After a quick stop at Chipotle we made our way to the border and praise be, crossed over without incident. They did ask why we were in the country, what we bought and why, and they looked in the back of the truck to be sure we weren’t smuggling anything illegal in.

Fresh as a Daisy: Adorable Spring Sheets & Facebook Marketplace Quincy Bed is finally in our room!
Sources: Buffalo Check Curtains (chambray color, more color options) // Acrylic and Brass Rod // Bird Art in Gold Frames

I can’t imagine I would ever again go to this much effort for a Facebook Marketplace find, but all in all, our Quincy bed was worth it. Of course, if I found another great deal on something I loved this much you know I would do it all again! But the real question is, after reading this tale, would anyone in Canada ever sell to me again? Who knows.

My Quincy bed is such a charmer, I am so excited to have a piece I love so much!

And if you’re looking for some adorable, soft, organic cotton sheets, these sheets from Garnet Hill are wonderful! I am obsessed with their quilts too. Sources are below!

Have you ever discovered a dream Facebook Marketplace find? I’d love to hear in the comments!

Fresh as a Daisy: Adorable Spring Sheets & Facebook Marketplace Quincy Bed is finally in our room!

Daisy Sheet Set from Garnet Hill (*For a limited time you can save 20% on the purchase of a Garnet Hill gift card, use it for yourself or a gift!)

Daisy Shams from Garnet Hill (*For a limited time you can save 20% on the purchase of a Garnet Hill gift card, use it for yourself or a gift!)

Beaded Chandelier

Blue Chunky Waffle Weave Throw Blanket (Organic cotton and more color options!) – from Garnet Hill (*For a limited time you can save 20% on the purchase of a Garnet Hill gift card, use it for yourself or a gift!)

Gray Coverlet

Ruffle Blue Ticking Stripe Pillow

 Buffalo Check Curtains (chambray color, more color options)

Acrylic and Brass Curtain Rod

Patterned Rug

Wall color: Bunny Gray Benjamin Moore


Source link

How To Mount And Frame A HUGE Print (My 52″ x 78″ Landscape Design Print), Part 1

I told y’all in a previous post about how a very kind and generous reader offered to print my landscape design plan for me, and she had the capability of printing it HUGE. So I took her up on her very generous offer and had the landscape design printed 52″W x 78″H. I wish y’all could see this thing in person because it is magnificent. But it also presented a dilemma. How in the world was I going to mount and frame a HUGE print like that?

If you’re new around here, this is the landscape design I’m talking about…

Matt (my husband) had bought that landscape design for me about two years ago. I met with a local landscape designer and told him all of my wishes and vision for our one acre lot, and that’s the design he came up with. I think it’s so pretty, so I’ve been wanting to have it printed and hang it on a wall ever since I saw it the first time.

With the print being so big, I though the easiest thing would be to mount the print on plywood, and then frame it and hang it. Super simple, right? So a couple of days ago, I headed to Home Depot to pick up a piece of plywood for this project, and it wasn’t until I had parked and was getting out of the car that it dawned on me…this thing is 52″ x 78″!! A piece of plywood is only 48″ wide!

So then I had to stop and rethink my plan. What I came up with was a plan to basically build a huge cradle wood panel, which is exactly what I used to mount my little resin petri discs on. It’s basically a frame of wood with a solid piece of plywood or MDF attached to the top to create a wood canvas.

Except that instead of it being a tiny 5″ x 5″, I needed it to be about 150 times that size. 😀

And since I always work alone, another consideration I had to work through was whether or not I’d be able to build this massive cradle wood panel and then mount it on the wall by myself. Since I’m only five feet tall, which means that my arm span from fingertip to fingertip is five feet, I seriously doubted my ability to lift a 52″ x 78″ cradle wood panel off the floor and hoist it onto whatever hanger I decided to use. So instead, I decided to build the cradle wood panel directly on the wall.

I started by using my level, framing square, straight edge (i.e., a piece of extra lumber), and a pencil to mark off the placement of the bottom right corner. I wish that I could have built this just above the baseboard, but as you can see, I had to clear the electrical outlet.

Next, I used a stud finder to mark the placement of the wall studs along the bottom horizontal line.

I cut a piece of 2″ x 2″ lumber to 52″ wide, and then used the wall markings to mark the placement of the studs on the lumber. I pre-drilled screw holes, and then used my largest bit to drill about 1/2-inch into the lumber so that I could countersink my screws, and so that they would be long enough to go into the studs.

I attached that horizontal board to the wall along the marked line using 2.5-inch screws. I used my level to double check that the line was level.

Next, I cut and attached the vertical 2″ x 2″ pieces. I didn’t screw these to the wall, and I didn’t make sure they were in studs. Since the weight of these pieces will be held by the bottom horizontal piece, I only needed to be sure that these pieces were firmly attached to the wall and to the bottom piece. I started by using my nail gun and 2-inch 16-gauge nails to nail through the bottom horizontal piece and into the end of the vertical pieces. I used three nails on each side.

With those pieces attached to each other, I then used my framing square to make sure the vertical pieces were perfectly square with the bottom piece, and then nailed the vertical piece on the right to the wall using those same 2-inch 16-gauge nails.

Next, I attached the top piece. This one was screwed into studs just like the bottom piece, and it was also nailed to the vertical piece just like I did on the bottom corners.

And then finally, I finished up by nailing the left vertical piece to the wall and to the top horizontal piece.

To make sure that the vertical pieces stayed firmly against the wall, I also went back and added nails going diagonally from the inside edge of the wood and into the wall. The purpose of that is to create tension. With the nails going through the front of the wood and straight into the wall, and the nails going diagonally from the inside edge of the wood and into the wall, these vertical pieces won’t pull away from the wall.

And again, the vertical pieces don’t really have to carry weight because the weight is resting on the bottom piece, which is screwed into studs, and the top piece is also screwed into studs so that it won’t pull away from the wall.

For the face of the cradle wood panel, I had to use two pieces of plywood because, again, plywood is only 48 inches wide and this panel is 52 inches wide. So I wanted to add a piece of lumber horizontally where the two pieces of plywood would meet so that I could nail the edges of the plywood to this piece. I didn’t want to purchase another piece for this, so I just used a scrap, which was just a few inches shy of the whole width. That’s not a problem as long as it is also firmly attached to the wall. So I attached it in the same way as the vertical pieces, with nails going directly through the front into the wall, and the nails going diagonally through the top and bottom edges and into the wall.

Then I was ready to attach the first piece of plywood. I started with the little piece so that I could more easily hold it into place while nailing it to the wood frame.

And then I did the bigger piece on top so that I could rest the weight of the bigger piece on the bottom piece while I nailed it into place.

You’ll notice that there’s a gap between the pieces that gets bigger towards the right side. I had checked and double checked my frame to be sure the corners were perfectly square, so when the second piece of plywood didn’t line up perfectly with the frame, I knew the issue was the plywood. So I had to straighten it out around the edges, which created that gap between the two pieces. Things like that can happen (and have happened to me many times) when I let Home Depot or Lowe’s cut my plywood for me.

I wasn’t quite sure what to do about that gap. Would it show through the print? Would it create an unsightly ripple? I got the print out and tacked it to the panel to determine how to proceed.

This paper is super thick, but I could still see a difference in color at that gap. And I do plan to paint the whole panel white before mounting the print, so leaving the gap wasn’t really an option.

So then I had to decide how to fill the gap. Caulk didn’t seem like a good option. I needed something that could be sanded smooth. But wood filler didn’t seem like a reasonable option because the gap was too wide. That much wood filler would not only take forever to dry, but would undoubtedly crack, requiring several coats and many hours of waiting.

The option I thought was the best was to use drywall tape and mud.

So that’s where I left the project. It will probably need at least one more coat of drywall mud after I sand what’s there. (I’m not good at all with drywall mud.) And then I’ll prime and paint the panel, then mount the print, and then frame the whole thing.

Of course, I could have just opted to attach the print directly to the wall, and then use picture frame molding to frame it. I came very close to doing that, but in the end, I just felt like that wouldn’t give the print the prominence it deserves. It would make it look more like wallpaper than a separate piece of framed art. And I think this definitely deserves to be a separate piece of framed art, so making sure that it projects from the wall two inches will make it look like it’s mounted on a gallery wrapped canvas. This print deserves that.


Source link

The 2024 Met Gala – Hype Hair

By Trish B.

Every year, the Met Gala red carpet produces some of the most memorable celebrity fashion moments of all time’s affair in New York City—themed “Sleeping Beauties: Reawakening Fashion”—was certainly no different, with a bevy of A-listers hitting the red carpet in custom creations. The night’s very best dressed attendees were those who paid homage to this year’s theme (and “the garden of time” dress code)—doing so in both thoughtful and unexpected ways. Of course, all of the official 2024 Met Gala co-hosts made the best dressed list.

We were taken away as Ke Ke Palmer arrived on the carpet so eloquently in a form fitting gown designed by Marc Jacobs. From her neckline to the sleeves, the gown was embellished with timeless beaded embroidery sequins embracing her silhouette perfectly. Zendaya turned heads in not one but two striking looks—including her custom Margiela look, and a vintage Givenchy dress from the house’s spring 1996 collection. Jennifer Lopez opted for a sparkling Schiaparelli number; while stars like Teyana Taylor wore a red velvet rose applique gown from the archives of The Blonds.


Source link

AstraZeneca gets £3bn boost after withdrawing Covid vaccine

Thanks for joining me today. Traders are ramping up bets that the pound will fall in the coming months amid a growing conviction that the Bank of England will cut interest rates before the US.

The level of wagers placed by investors against sterling has hit a 16-month high, according to data from the US Commodity Futures Trading Commission, first reported by the Financial Times.

Meanwhile, asset managers have not been more pessimistic about the future strength of the pound since March last year, according to State Street, one of the world’s largest custodian banks.

The pound has fallen 1.5pc against the dollar this year, although that has still made it the strongest performer among the G10 group of major currencies.

However, traders expect the Bank of England, which announces its next interest rate decision tomorrow, will cut borrowing costs earlier and faster than the US Federal Reserve.

Derivatives trades indicate that a first interest rate cut will happen in Britain by September at the latest, while money markets suggest it could be as late as November in America.

On Tuesday, Minneapolis Fed President Neel Kashkari, who does not have a vote on rates this year, suggested the Federal Reserve may need to forgo reductions in borrowing costs this year due to stubborn inflation.

5 things to start your day 

1) Relaxing listing rules won’t fix City, warn British investment giants | Pension funds raise concerns over stock market’s call for weaker UK governance standards

2) Saudi oil giant pays out £100bn to fund crown prince’s desert mirror city | Mega project needs more funds as lower oil prices pressure the kingdom’s economy

3) Global debt surges to new record high in blow for world economy | Borrowing by China and India fuels increases

4) Disney to cut production of Marvel films and TV shows amid superhero fatigue | Waning demand for franchise comes as share price slumps and subscriber numbers slow

5) Royal family’s crockery supplier taken to court over unpaid bill | Tax office hits Thomas Goode with winding-up petition after ‘difficult few years’

What happened overnight 

Asian stocks slipped and the dollar climbed as markets assessed mixed signals from US policymakers and economic data on the path for Federal Reserve interest rates.

The yen sank even with the threat of currency intervention from Japanese authorities to support it.

Crude oil wallowed near two-month lows amid signs of easing supply pressure and continued hopes for a Middle East ceasefire.

MSCI’s broadest index of Asia-Pacific shares outside Japan slid 0.4pc, with mainland Chinese blue chips and Hong Kong’s Hang Seng each down about 0.6pc.

Japan’s Nikkei slumped about 1.4pc as traders took profits following the previous session’s 1.6pc surge. The tech-heavy index also succumbed to pressure from a sell-off in US chip stocks on Tuesday.

In America, the Dow Jones Industrial Average of 30 leading US companies edged up 0.1pc to 38,884.26. The broader S&P 500 gained 0.2pc to 5,187.70, while the tech-rich Nasdaq Composite index dipped 0.1pc to 16,332.56.

Minneapolis Fed President Neel Kashkari suggested the Federal Reserve may need to forgo interest rate cuts this year due to stubborn inflation.

The yield on 10-year US Treasury bonds fell to 4.45pc from 4.49pc late on Monday. 


Source link

The Tale of My Dream Bed found on Facebook Marketplace (and a new light fixture!)

The Tale of My Dream Bed found on Facebook Marketplace (and a new light fixture!)
Wood Bead Light Fixture // More Bedroom Sources

I am a believer in making room in our home for serendipitous discoveries. If you keep your eyes and heart open, you never know when you’ll unexpectedly find something more wonderful than you could have planned.

A home should tell our stories. And what better way to add character to a home than to furnish it with serendipitous discoveries?

Today I will share my thoughts on furnishing our home and the tale of unexpectedly discovering my dream bed on Facebook marketplace just a few days ago!

You might recall that I had recently posted about a little spring refresh of our bedroom. In that post I said I was still looking for a new light fixture but other than that I didn’t really have any other immediate plans for updating our room.

Well, things have taken an unexpected but exciting turn. Not only did a find a new light fixture but thanks to a mood board I made and a serendipitous discovery on Facebook Marketplace, I brought a new to me coastal dream bed to our home and now I can’t wait to have it in our little bedroom overlooking the Salish Sea. It was meant to be.

Our Plan for Furniture

In my post about our spring mantel and our thrift store pheasants, I mentioned that I was now open to the possibility of being on the hunt for “new to me” furniture. In downsizing to move here we gave away a lot of furniture! This is a smaller home so not everything we had fit and I didn’t want to feel overwhelmed trying to make decisions right away.

There is no rush. We are happy with our home and I’m always content to use what we have. And I’m still working through trying to pare down and get rid of things we don’t need here! It’s been a process. We bought a few accent chairs here and there to fill out spaces but I decided that if anything we truly love comes along (and on our budget), we’ll happily swap anything else out. That slow process will help us continue to enjoy making this home our own without any pressure or timeline.

But now that our renovation is over, I feel a little more “ready” to begin looking around more and even scrolling FB Marketplace now and then, just in case. It actually seemed like fun to just look so I began looking at FB Marketplace and found a new little console table with a marble top and a darling chair. Those finds ignited my creativity and renewed my excitement over the thrill of the hunt! I will share those pieces in a future post.

So I guess my plan for furnishing our living room was simply to be open to serendipitous discoveries! I have taught my HomeBody Gathering Place decorating community about the value in developing their sense of serendipity as well as how to bring a collected style together to it feels cohesive.

It really is fun to have a home that tells a story! The stories of how our home came together is what helps create a sense of sanctuary. I did originally think that if I bought anything it would be for the living room! Well, that’s what I get for trying to plan! 🙂 Being open to whatever you find can make the stories of your home even more interesting! You don’t know what you’ll find or when. And when you discover something you really love, it feels like it was meant to be so I’ll happily adjust any plans.

The Tale of My Dream Bed found on Facebook Marketplace (and a new light fixture!)

How Creating A Mood Board Led to My Dream Bed

In HomeBody Gathering Place last week we taught how (and why!) to make a mood board. There are SO many reasons I think a mood board can be very useful in home decorating and renovations, but one reason is that they can help you to better visualize and define your own style. That really is important to creating a home you will love.

Over the weekend I was inspired to make a mood board for our bedroom. Now mind you, I wasn’t intending to buy furniture for the bedroom, I just wanted to visualize my style as whole. I wanted to visualize all of the rooms to create our style.

A mood board doesn’t have to turn into a shopping list (although that is another useful reason to make one), it can be just for inspiration!

One decorating principle I teach in the HGP is to start by making a dream board first, and then a reality board can come next. I find creating a dream board to be quite inspiring as it can encourage you to get out of a design rut or save you from always playing it safe instead of listening to your heart is telling you.

Once you can visualize your dream style, you can still incorporate what you already have but also elements of your dream into your reality.

The Tale of My Dream Bed found on Facebook Marketplace (and a new light fixture!)

So that’s what I did. I let myself dream a little! The first thing I put on my board besides a couple of pieces I had was an image of a bed I’ve loved for years. It’s classic, but also feels so whimsical, which I think truly is my style at heart.

I looked at all the colors the bed came in and loved them all, but I landed on robin’s egg blue. This bed has always reminded me of waves at sea and what better color for it than my favorite shade of blue?

The bed was only a dream for me, but it represented something significant about my style. An unexpected bit of whimsy is something I always crave in a home. Even if it’s just in one element, the lightheartedness and unpretentiousness of a whimsical style makes it feel like home to me.

The Serendipitous Discovery – In Another Country!

While there seemed to be no chance of me getting that bed, I reminded myself that if you are really going to be open to serendipitous discoveries, you cannot close off the possibilities before you even start. Don’t pre-determine what you’ll find or decide in advance what is or is not possible. If something speaks to your heart, listen!

So even though it seemed to me to be the most unlikely thing to find on Facebook Marketplace (especially when you don’t live in a big city) I thought I might as well look. Why not? I wasn’t in a hurry or expecting to find this bed. But even if I never found it, maybe I’d find something else that would be of a similar style or mood. There was no hurry or expectations.

This is what I love about creating a home over time. Any pressure of immediate gratification is off when the thrill of the hunt is ON! You never know when the discovery will be made.

Minutes after placing the robin’s egg blue bed on my dream board, I opened FMP and typed in the name of the bed. As I said I really didn’t expect to find it. But I immediately did a double take. Much to my surprise, there it was. My dream bed! Some people call that a “God sighting” — it really did feel like a gift was sitting right there waiting for me.

But that’s also when I went into panic mode. The price was a fraction of the cost of a new bed and no sales taxes, no shipping, so it was a no brainer…but …. there were other roadblocks. We don’t own a truck. And also, this bed was across the border in Canada. It was late Saturday night. We didn’t have any Canadian cash and no banks were open. So many questions but I decided to at least message her.

I didn’t hear back.

I couldn’t sleep a wink all night. That’s when I knew. If this bed made my heart flutter this much, there was no doubt it was meant to be. I didn’t want to accidentally miss a return message so I checked my phone really early in the morning. At 5:30 AM, she asked when we could come get it.

By 10AM we had rented a Uhaul utility truck and were on our way to the border. It turned into a much longer story — involving finding no cash machines open on Sundays, not having the right tool to take the bed apart, our phones did not work while we were in Canada and many other challenges — but we didn’t give up!

The Tale of My Dream Bed found on Facebook Marketplace (and a new light fixture!)

By 6PM Sunday night, my dream bed was in our home.

Dare to dream friends! You never know what might happen. 🙂 I had to use the funds I had set aside for something in the living room, but I can’t imagine a piece of living room furniture I’d love more than my new bed. Right before we found the bed and the day after my last update post on the bedroom, I bought the new light fixture so I guess I’ll be working on the bedroom now :). That’s how you create a collected home over time, it just might turn into an unexpected adventure!

Of course, I also really loved the bed I had (this cane bed) but GOOD NEWS all around my daughter Courtney and her husband wanted a new bed, and now I just happen to have a lovely one to pass along to them. Win win!


Source link

Friday Treat : L’Era Jewellery – New Designs

[unpaid/samples] I first came across L’Era when they got in touch last year – it’s a new, mother & daughter founded jewellery brand whose point of difference is using gold plating that’s ten times thicker than usual vermeil. One of the things I said at the time was that I wear my jewellery – I don’t take it off for baths, showers, sleeping or well, anything really. If you know vermeil, you’ll know it has a tendency to wear off really quickly and before you know it you are suddenly wearing a silver bracelet or necklace.

.L’Era Jewellery – New Designs

They also use lab grown diamonds to create tiny pendants like the one above. It keeps costs down but it looks as spectacular as the real thing. I like fine (as in delicate and small) jewellery – my Indian rings are a recent passion and up until I had those, I was all about the tiny jewels.  Most of my jewellery is very understated – you’ll have seen a variety of fine chain bracelets on my swatching pictures over the years but none in recent months because they went dull or broke. As I say, I don’t treat them with any particular care. So, I was really curious to see how L’Era fared over time – I put the Paperclip bracelet on last October and haven’t taken it off since. The wear is very impressive – it’s still as gold as it was at the beginning.

L’Era Jewellery – New Designs

From bottom to top – a vermeil necklace I bought not so very long ago and it’s completely lost its lustre, my original L’Era Paperclip bracelet, and the new Shimmer Paperclip bracelet, which, like it’s plainer sister, went on my wrist straight away and has stayed there.

L’Era Jewellery – New Designs

There’s also a Shimmer Paperclip necklace (also on straight away!) which will be a summer go-to – it’s a great length being somewhere between short and long so if you’re layering your chains, this is an excellent middle chain.

There’s an anklet in the same design but I am not ready by any means to get my ankles out yet! When I am ready, I’ll wear with trainers.

L’Era Jewellery – New Designs

I love both the bracelet (£45 HERE) and the necklace (from £59 HERE). The mini lock with a lab grown diamond is £59 HERE. The jewellery comes so nicely packaged in a pistachio green wallet inside a box and honestly, it feels like such a treat to have these. I have a code for you – use BRITBEAUTY20 for 20% off (excluding sets) until 31st May 2024. If you have special birthdays to buy for (I think Lucy would love these because she is like me in preferring understated jewellery) or just think it’s time to shine up your spring, I’d genuinely recommend for robust but delicate daily wear.


Transparency Disclosure

All products are sent to me as samples from brands and agencies unless otherwise stated. Affiliate links may be used. Posts are not affiliate driven.


Source link

The Studio Punch List – Addicted 2 Decorating®

When it comes to the my studio, I’m starting to feel like I’m trapped in Groundhog Day, repeating the same work day after day after day with only some slight variations and with no end in sight. But after I stopped working last night, I took some time to take inventory of what I still have to do, and I am actually making progress. I’m so ready to be done with this room! There’s still quite a bit to do, but I’m going to make every effort to have this room finished by the end of this month so that I can move on.

When I talk about finishing this room, I’m not including the studio bathroom. That will be a separate project, and I do plan to work on that as soon as the studio is finished. But there’s no way I can get the studio and the bathroom done by the end of this month. That much I now for sure. But I do think it’s possible that I can get the studio finished by the end of the month.

Over the last couple of work days, I’ve been trying to get the rest of the ceiling painted. It’s a much bigger job than I had anticipated, even with the scaffolding. I had to do quite a bit of cleaning and rearranging before I could get started, and I’m still having to work around a lot of big items. So far, I have most of the ceiling painted, with just this strip of blue ceiling on the mural side of the room that still needs to be painted.

Once I get the ceiling finished, painting the rest of the walls will be a breeze. This ceiling is a bear, though. I came *this close* to hiring it out, but I guess I just needed to prove to myself that I could do it.

I also have some trim to finish — baseboards and door casing around two doors. The door to the right of the office area cabinets (which is currently covered up) still needs to be trimmed out, and those areas still need baseboards.

And then the long empty wall has a door that still needs to be trimmed out, and it also needs baseboards.

And then both of those doors need to be painted.

The bases on my two work tables need to be painted. They’re going from this bright green to eggplant.

And then my desk needs a makeover, the black on the paint swatch cabinet needs to be painted white, and my desk chair needs to be reupholstered.

The cabinets in the office corner of the studio are finished for the most part, but there are still some finishing details that need attention. I need to install all of the door knobs and drawer pulls, and install the window shade. I’m still waiting for the window shade to be delivered, and I already know that the company forgot to cut the shade to my custom dimensions. But evidently, they won’t do a replacement order until I receive the first one and verify that it won’t fit. *Sigh*

And of course, I still need to make a decision about what to do with the wall around the windows and the backs of the cubbies. Regardless of that decision, I still need to add lights to the cubbies and finish the electrical stuff. I still have four electrical outlets that need to be installed inside the cabinets.

I also have two outlets that need to be installed on the other side of the room, and then there’s the decorative stuff. I’m still trying to work out in my mind how I want to handle the long, blank wall, but I think my plan is coming together. And then I need to print and frame the landscape design to go on the wall next to my desk.

And finally, I need to make the pendant light to go above my desk. I’ve already gotten started on that. After doing some figuring, I determined that the light will require 1300 tasting spoons (that’s 500 more than the gradient pinwheel artwork required!), so I’ve already cut the handles off of all 1300 wood tasting spoons.

But now every single one of those has to be sanded and shaped so that it’s not obvious that they used to have handles. I’ve only sanded this many so far…

…so that is going to be a very time-consuming project. But quite honestly, I love those types of projects. Maybe I’ll sit outside and sand spoons on Monday during the eclipse. There will be 2 hours and 40 minutes from first contact to last contact. I don’t want to miss it, but I’m also not the kind of person who can just sit still for 2 hours and 40 minutes with nothing to do. 😀

I’m sure there will be some other little projects that I’m not thinking of right now. In fact, I’m sure the floor will need some touchups, and some cabinet doors and drawers will need some readjusting. I’m sure there will be other things.

So here’s the punch list:

  • Finish painting the ceiling and walls;
  • Install and paint baseboards;
  • Install and paint door casings on two doors;
  • Paint two doors;
  • Paint bases on work tables;
  • Paint desk and add two drawers;
  • Paint black parts of paint swatch cabinet white;
  • Finish wiring electrical outlets;
  • Add lights to cubbies;
  • Finish trim on office area cabinets;
  • Install window shade;
  • Reupholster desk chair;
  • Make pendant light;
  • Frame and hang landscape design;
  • Decorate long, blank wall;
  • Clean and touchup paint on floor;
  • Finish adjusting doors and drawers;
  • Install drawer pulls and door knobs.

Each individual thing seems so simple, but seeing the whole list makes me wonder if there’s actually any possible way I can get it done by the end of the month. I’ll give it my best shot, though! I’m so ready to be done with this room and move on!


Source link