In this blog, we discuss the reasons why you should pursue a career in accounting and the steps you need to take to become an experienced accountant.
Despite its abundance of opportunities, best aat accounting training can appear to be a challenging field to enter. How much time does it take to become an accountant? And when you become one, what advantages can you anticipate?
This blog looks at the reasons why you should think about becoming an accountant and the steps you need to take to get there.
Choose Your Path Before
beginning your search for a career in accounting, you should decide which level of education is best for you. There are many options, with ACCA and CIMA being two of the most well-known.
The ACCA is widely recognized. It is one of the world’s largest and fastest-growing accounting degrees. If you think you might like to work in a variety of roles, the ACCA certification is a great option.
The ACCA qualification can help you get work in public or private accounting. Alternately, you could start your own accounting firm.
People who want to work as management accountants will do best with the CIMA certification. In particular, pursuing a CIMA certification might be your best option if you want to work for a company.
Know Your Exemptions
The ACCA and CIMA want to give you credit for your previous knowledge and abilities. By allowing you to skip portions of the exams, knowing if you are eligible for exemptions and which ones to look for will help you study more efficiently.
As a result, you will be able to begin your job search and obtain certification more quickly.
Exemptions from the ACCA : The ACCA may grant exemptions to nine Applied Knowledge and Applied Skills exams and Foundation level qualifications. Unfortunately, you will not be eligible for a work-related exemption.
Before claiming an exemption, you should carefully consider your eligibility. After all, the information you acquire through study can assist you in passing the more difficult tests that lie ahead of you.
It might be in your best interest to study for that portion of the test regardless of whether you qualify for an exemption or not.
CIMA Exemptions : You may be exempt from taking the CIMA exams if you have a degree or other qualifications. You can look through a database on their website to see if you qualify.
The majority of qualifications are based on your degree. However, if you are a member of ICMAP or possess another relevant qualification, you may also be eligible for an exemption.
Studying online can help you pass your professional accounting exams. Let’s collaborate to get you qualified quickly!
Select a Program
Prior to beginning your exam preparation, you will need to select a program. You will have a lot of choices, whether you want an online program or a traditional learning environment.
Think about how adaptable your learning needs to be. An online study program might be best for you if you need to study on your own time or have an unpredictable schedule. However, you can benefit from live discussions and social interactions if you are able to attend class on time.
Garden rooms, wooden conservatories, and orangeries; Each of these three distinct kinds of extensions has its own unique characteristics. We’ve made it easy with our expert guide because we know that knowing which one is right for your home can be difficult.
We are frequently asked to explain the distinction between an orangery and a conservatory. By creating a bright and airy interior and establishing a coherent connection between your house and your garden, a glazed extension instantly transforms the space you live in and brings the outside inside.
However, what distinguishes an orangery from a garden room and what distinguishes a conservatory from an orangery? How can you determine which is best for your house? Basically they can be in every way classed as ‘garden room augmentations’, yet they are at last characterized by the extents of coating, lumber, and workmanship materials utilized in the building plan.
Let’s go over the various kinds of extensions in greater detail: what exactly is a conservatory
During the 1980s, conservatories were a very common type of glazed extension. They are usually made of uPVC and rattan furniture, and their walls and roof are usually made of glass and set on a brick foundation. The idea of easily adding more space to their homes, which could be used as a bright, spacious formal lounge or dining room with close-up views of their gardens, was welcomed by homeowners.
A conservatory’s extensive space can be filled with as much natural light as possible because it is mostly made of glass. Unfortunately, traditional conservatories have developed a bad reputation for being cold in the winter and hot and stuffy in the summer.
Additionally, the uPVC had a propensity to age and turn yellow; not exactly an appealing appearance. Conservatories started to go out of style as people realized that their expensive investments could only be used for half the year when the weather was nice.
This is regrettable because a high-quality conservatory made of wood can be a beautiful addition to any home. Underfloor heating, solar control glazing, and roof vents that help to improve circulation, as well as solar control glazing that limits the amount of heat coming in from the sun, are all solutions to the common temperature issues.
What is an orangery or orangerie
Orangeries were a symbol of wealth and prestige among the elite in the 17th century. Traditionally, orangeries were used to shield imported citrus plants from the harsh British winters. With their elegant architectural lines and timeless style, the aristocracy thought these beautiful rooms gave their mansions a sense of splendor and opulence.
Since the conservatory has become less popular, more and more people are choosing modern garden rooms and orangeries with timber frames. A garden room or orangery extension is still the pinnacle of luxury and exudes an air of opulent elegance because it combines perfectly balanced design with flawless functionality.
No matter how many times you’ve moved, there are always challenges to overcome. With experience, it might become easier to manage, but there are many obstacles to overcome. Which plastic storage boxes storage unit to rent, which size moving truck to buy, how many cartons or containers to buy, and how to pack fragile items are just a few examples.
We will concentrate on one aspect: how to select the appropriate size of moving truck. The truck must be packed correctly to avoid damage and accidents. If you choose a truck that is either too big or too small, you could run into a lot of problems. It might put everything you packed inside in danger.
The right-sized truck will make your move easier on your budget and more accessible if you consider its proper functionality. A larger truck is more expensive to rent than a smaller one, so you should also think about your budget. Read on for all the information you need to choose the right size truck for your move.
Bedroom Count Technique
The bedroom count technique is one of the most common methods for determining the appropriate moving truck size. A chart that you can use to see how many bedrooms a moving truck can hold is provided by many moving and storage companies that offer moving services. It’s a fairly simple method!
When deciding where to start, these size estimation charts are helpful. Be that as it may, they are vague assessments, not altogether exact. Some bedrooms are larger and can hold the same amount of furniture and other items as two or three smaller bedrooms.
Additionally, there are a lot of rooms in homes that don’t fit into standard room sizes, such as studios, sitting rooms, work offices, storage rooms, mud closets, and studios. They might not be the right size for the chart, but you can get a general idea of how many people each room can hold. Using the bedroom count method, count the final number of bedrooms to easily select the appropriate moving truck size for your needs.
Determine the Truck’s Cubic Feet
Each moving truck is made to carry a certain number of items, which are typically measured in cubic feet. The dimensions of the vehicle’s interior range from the roof’s size to the total area of the floor. You can stack and distribute all of your boxes evenly, according to their weight and length, to make good use of it.
However, you might need the entire floor as opposed to the length from the floor of the truck to the ceiling, which might be more practical for you. One way or the other, except if you are moving and pressing specialists, you will require help to productively occupy the whole room. Therefore, if some items require more space than anticipated, selecting a truck that is slightly larger than your requirements is safer and preferable.
Keep in mind that this method is more accurate and reliable than the bedroom count method. Calculating the dimensions and placing the boxes in the truck in the right order might take more time. Nevertheless, it counts the total cubic space of everything you intend to store in the vehicle, which is more consistent.
Rather than measuring each item individually, pack all of your small and loose items in boxes and measure the size of the parcels. It won’t take much time and will provide a more accurate estimate of size. The total size will be approximately equivalent to the truck’s available space.
With stay-at-home requests lifted the country over, and before summer closes, families are making summer get-away arrangements. Prior to getting together the vehicle and going out to the lake or the forest, it’s brilliant to consider ways of making your home safer. There are a few straightforward and modest things that you can do now which can immeasurably work on your possibilities getting back home to find your home simply the manner in which you left it.
Activity Locksmith Sutton Coldfield has a few hints that can serve you over time, in any event, when you are not holiday.
Try not to report your get-away anticipates virtual entertainment. While your loved ones by and large aren’t a hotspot for concern, you don’t know companions of companions and other people who might approach your web-based entertainment posts. To be protected, save your get-away plans and excursion pictures for posting when you get back.
Secure your entryways and windows
Continuously take your home key off your key chain while valet leaving your vehicle, as an educated hoodlum can make a key to your home by just snapping a photo of your home key.1 Likewise ensure that you briefly eliminate that extra key you have concealed under the mat or a close by rock. On the off chance that you have sliding glass entryways, the most straightforward thing to do is to placed a stick or thick wood dowel in the base track of the sliding entryway. You can purchase slide-locking bars on the web.
You can likewise sustain the entryway by changing out the first entryway locking component with a business locking item that includes a couple of bolt locking framework that connects to the locking point of the entryway and has steel bolts that safe the way to the frame.2 Window stops, which keep windows from opening more than a few inches, are likewise smart. This is a somewhat reasonable item that can be seen as on the web.
Scene to safeguard your home
It is generally smart, regardless of the time, to ensure that shrubberies and trees don’t conceal your windows, entryways and other passageways to your home. Congested hedges can permit thieves a spot to stow away while getting to your home and discourage your neighbors from seeing a break-in. Certain individuals decide to establish prickly shrubberies under window passages as a hindrance. Scene lighting and movement actuated lighting are additionally wise ventures with regards to ruining would-be hoodlums. 3
Managing skin inflammation can appear to be a daunting struggle you won’t ever win. Certain individuals battle with skin inflammation breakouts more than others, yet the something normal among a great many people is they need to dispose of it anyway conceivable.
Over-the-counter treatments might be powerful for minor cases, yet those actually are never an assurance. A typical misguided judgment is you must have extreme skin break out scarring to fit the bill for an expert skin inflammation scar correction treatment.
That is basically not the situation, since laser hair removal in birmingham skin inflammation scar treatments can assist with even minor skin break out scars. Here are a portion of the circumstances where you ought to think about an expert treatment.
Forestall OR Change Skin break out SCARRING
Some skin inflammation is bound to make scars than others. With laser skin break out scar treatments, you can forestall skin break out scars from happening in any case by killing microorganisms around the impacted region, which could prompt more skin break out breakouts.
Yet, on the off chance that you’ve proactively experienced scarring of any seriousness, the most effective way to reexamine them is by looking for a treatment from a respectable clinical expert.
Skin inflammation is adequately troublesome to manage all alone, however when it prompts scarring, it’s not difficult to turn out to be much more reluctant. In the event that you want to conceal your skin or not associate however much you used to on the grounds that you’re humiliated in your own skin, then now is the ideal time to look for proficient laser skin break out scar treatments.
The treatments can be finished in less than 60 minutes, generally speaking, and results should be visible in just multi week. Nobody ought to must be hesitant in their skin, and an expert skin inflammation update treatment is your most ideal choice to guarantee you feel more sure with your skin.
While CONTROLLING Skin inflammation BREAKOUTS BECOME Incomprehensible
Skin inflammation breakouts can now and again happen at the absolute worst minutes. Once in a while an expert compound strip for skin inflammation could be a possibility for controlling these breakouts.
Contingent upon the guidance from your clinical expert, attempting a substance strip for skin break out could be the principal proficient treatment to attempt prior to going through laser treatments.
There are substance strips you can buy over-the-counter, yet not exclusively are these generally insufficient, they could be perilous on the off chance that not managed accurately by an expert with broad experience.
This Post May Contain Affiliate Links. Please Read Our Disclosure Policy here
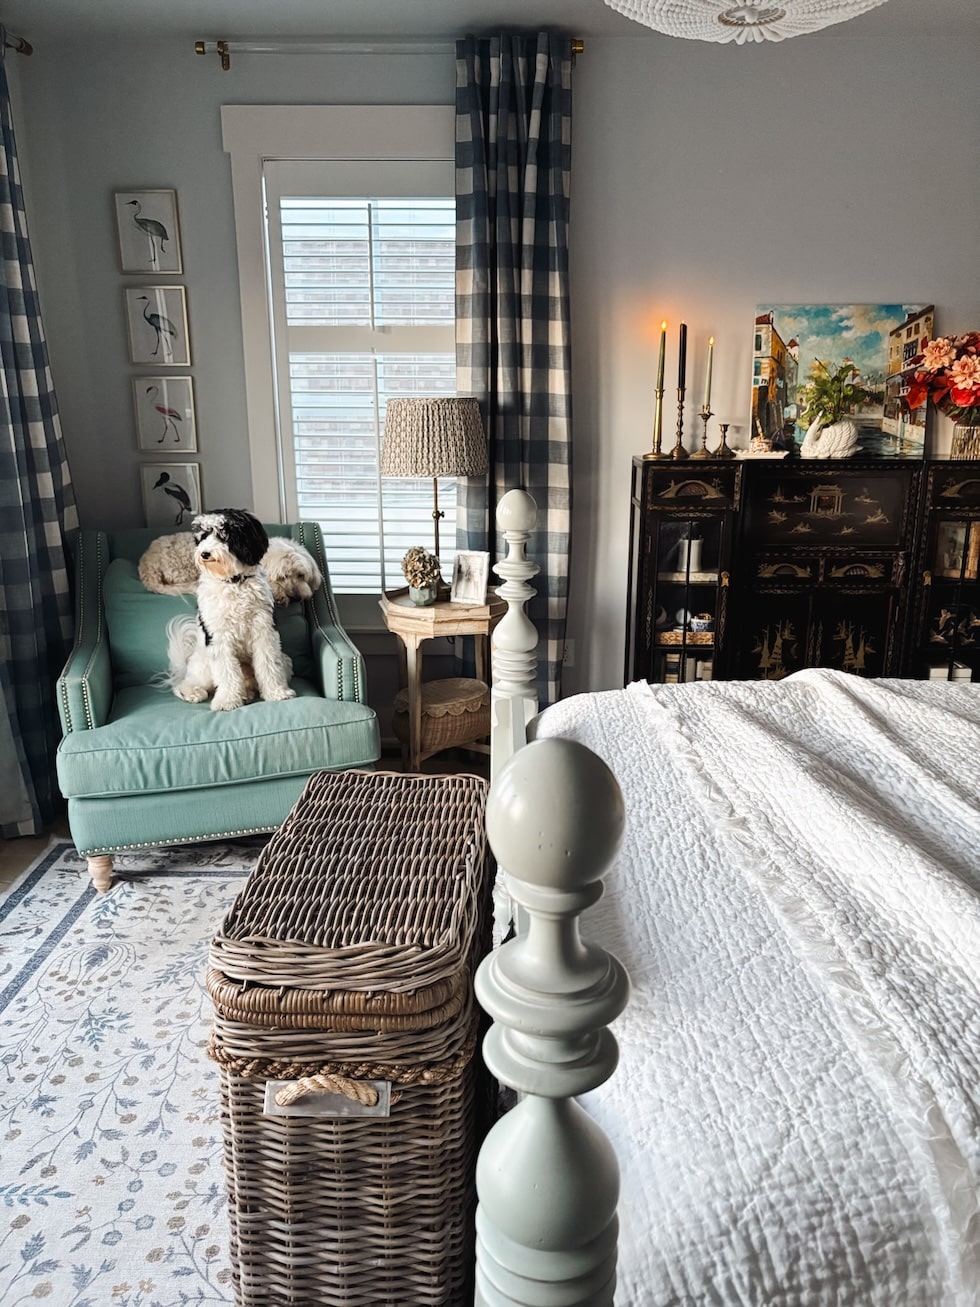
Today I’ll share five ways we’ve created a bedroom sanctuary, along with some pictures of a peaceful spring evening in our bedroom, a bedding refresh (side note: you’ll want to get in on this sale through tomorrow!) and a few of the ways we’ve updated this room over time (and how we are avoiding regrets and mistakes along the way).
Since moving to our coastal cottage three and a half years ago, making our bedroom a cozy, comforting space has become a home rhythm I really look forward to.
It’s refreshing to create a place where your soul exhales.
While we haven’t been working on major decorating projects in this room (other than installing a new light fixture and new floors nearly two years ago now–can you believe it? My how time flies!) when you’re intentionally creating a sanctuary in every season, layer by layer, the room transforms—not just in how it looks, but in how it cares for you.
This was the room as it was staged for sale when we looked at it. Such a pretty and serene room to begin with — and the VIEW! — it sold us on the house! Slowly this room is becoming a reflection of us and beginning to tell our story. To me decorating involves learning about yourself, too. YOU need to feel your best in that space. This is really a peaceful and soulful way of decorating!
I teach a rhythm for decorating in my Room Recipe course (it is included with your HomeBody monthly or yearly membership). It’s a step-by-step method to decorate and create a sense of sanctuary. It helps cut down on design decision fatigue and decorating regrets as well as encouraging an ongoing rhythm of care for you and your home.
This evening felt especially peaceful, so I took a few moments to bring spring to our room by giving the bed a little refresh—new patterned linen sheets and a darling ruffled white quilt with matching shams and a pretty throw all from Garnet Hill, one of my favorite places for bedding. It’s all on sale through tomorrow!
Our secondhand bed really has become the focal point of our room and has set the tone for our future decorating decisions!
Last year, we serendipitously found this dream bed on Facebook Marketplace. That’s one of the best gifts of slow decorating—every piece can have a story and you don’t have to spend a fortune!
More than just a room with a bed and a nightstand—you can build a more meaningful emotional connection to the space over time.
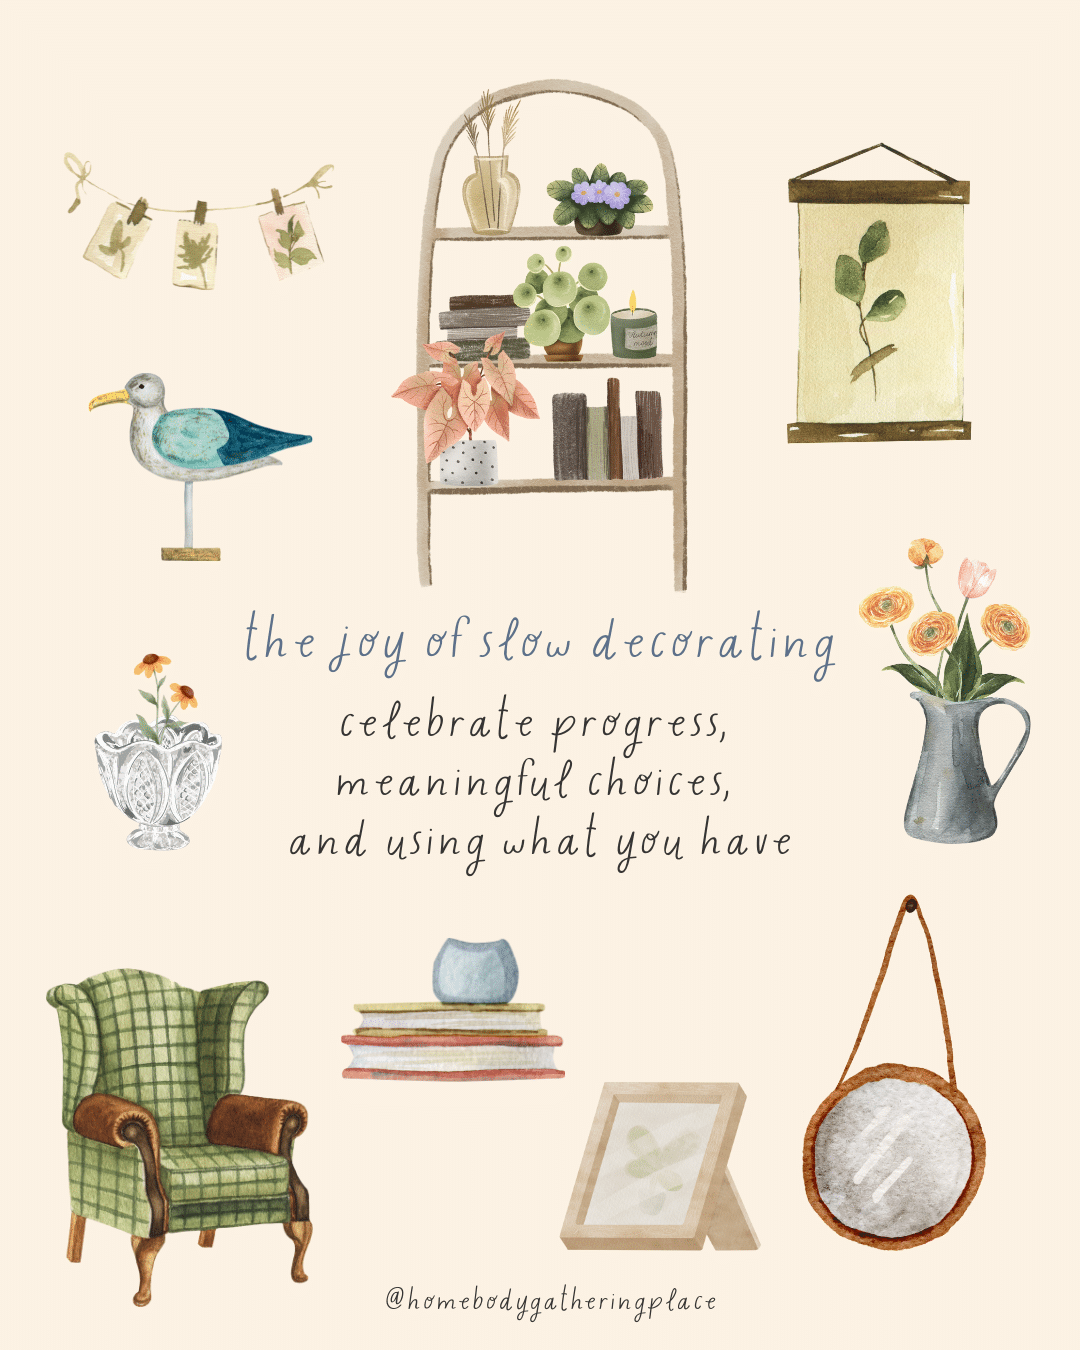
One of the common concerns surrounding “slow decorating” or waiting for things you love is the frustration of living in a room you think will never be finished. It doesn’t have to be that way (unless you’re renovating — then you have to wait a little longer than you want but the results will be worth it!).
I’ve been chatting with my HomeBody community lately about what it really means to “finish” a room.
When you’re creating a sanctuary, finishing isn’t always about being done forever—it’s about being at peace. It’s about creating a home that serves people along the way.
The truth is a sanctuary can feel finished many times over — even when it’s not yet where you want it to be.
A few months ago, we swapped cabinets between rooms to make each area more functional. I save so much money by experimenting! I can’t believe I didn’t try arrangement sooner, it solved several space and organizing problems at once! But when you know how to make the right decisions for you, you will make far fewer regrettable purchases and enjoy the process more.
By the way, if you fear that by decorating with things you already have is “settling” — it doesn’t have to be that way. A slow rhythm of decorating over time, using pieces you have and gathering new ones, really can create a more meaningful home.
If you worry that decorating with what you love will end up feeling like a hodgepodge of things that don’t go together–there is a method to making it all feel like it “goes together” without having to decorating in a “matching” way.
My Room Recipe Method (a series of beautiful magazine style guides in my decorating course) will help you with a jumpstart to decorating on the right path and style for you! This method guides you through the process and offers you formulas for key decisions early on so you enjoy the results now and don’t regret your choices later.
4. Layering Linens to Create a Cozy Feeling
I recently hung another curtain panel to soften the corner. While I love the clean fresh look of more invisible window treatments, the layers make it feel cozier and more like “us.”
It has always been my dream to have a lovely stack of pretty quilts to enjoy and use as I make beds for our family. Bedding can be an investment but to me it’s worth collecting what we really love so we do it over time — it really inspires us to love where we live and it sets the tone for how we want to feel in our every day lives.
5. A slow rhythm of care
I love how any space can evolve with simple shifts—seasonal refreshes and those little moments of inspiration that strike when you’re not even planning on a major change.
Caring for your home isn’t just about chores. Home Rhythms are the gentle, recurring patterns of care HomeBodies learn to embrace—small routines and rituals that bring order, beauty, and well-being into our daily lives.
A slow but steady rhythm of creating beauty in your home brings a sense contentment with what you have and helps you to design a sanctuary that serves you better in every season.
Savannah Marshall could yet secure a rematch with arch-rival Claressa Shields, believes trainer Peter Fury.
Marshall holds an amateur win over Shields and the long-time foes met in a blockbuster world title fight in 2022.
Shields was victorious and has subsequently moved up in weight, becoming an undisputed champion at heavyweight.
Spreaker
This content is provided by Spreaker, which may be using cookies and other technologies.
To show you this content, we need your permission to use cookies.
You can use the buttons below to amend your preferences to enable Spreaker cookies or to allow those cookies just once.
You can change your settings at any time via the Privacy Options.
Unfortunately we have been unable to verify if you have consented to Spreaker cookies.
To view this content you can use the button below to allow Spreaker cookies for this session only.
Marshall herself won the undisputed title at super-middleweight in 2023 and has also changed sports to compete in MMA with PFL.
The Briton will return to boxing next, after signing a deal with Jake Paul’s promotional company MVP.
Her trainer Peter Fury told the Toe2Toe podcast: “I think it’s great news for Savannah.
“She’s in the gym, she’s training hard every day and she’s got a big announcement next week.”
Please use Chrome browser for a more accessible video player
Claressa Shields sent a chilling message to rival Savannah Marshall saying that the she wouldn’t be able to beat ‘The GWOAT’ in MMA, boxing or ping pong!
Marshall is entering a new phase of her boxing career with an American promoter and Fury believes she could still eventually get a rematch with Shields.
“I’m optimistic because I don’t think there’s anybody else. I think them two are at the top,” Fury said.
“Savannah’s made some serious adjustments since the first fight so I’m really looking forward to if they can get it on again.”
Marshall is not the only UK fighter to join MVP recently. Chantelle Cameron, the former undisputed super-lightweight champion and current WBC Interim titlist, has signed for the company which is staging Katie Tayor’s next fight.
Holm returns to boxing
Image: Holly Holm believes she can be successful in boxing (AP Photo/John Locher)
At the age of 43 UFC star Holly Holm, who famously knocked out Ronda Rousey, will return to boxing.
She will fight Yolanda Vega on the undercard of Jake Paul’s bout with Julio Cesar Chavez Jr on June 28.
“This new chapter is going to be an exciting journey, and I’m looking forward to the challenge,” Holm said. “Coming full circle back to boxing – I’ve spent most of my MMA career at 135lbs, and now I have the opportunity to make my boxing debut at that weight.
“With boxing titles in three higher weight classes under my belt, I’m eager to pursue a fourth title in a new division.”
Watch the Manchester Box Cup live on Sky Sports‘ digital platforms on May 25
Aluminum windows are sleek and modern but very poorly insulated from heat and cold.
Fiberglass windows can cost slightly more upfront but provide great energy savings and a versatile look.
Both types are highly durable, long-lasting, and low-maintenance.
Aluminum or metal frames are very strong, light, and almost maintenance-free, according to the U.S. Department of Energy. However, they conduct heat easily and offer poor insulation unless designed with a thermal break. Fiberglass frames are dimensionally stable with air cavities that can be filled with insulation, giving them better thermal performance than both metal and wood.
Pure aluminum frames are rarely used in residential construction due to their poor efficiency, but they may be suited to very modern home designs in mild climates. More commonly, homeowners choose aluminum-clad windows, which have a wood interior and aluminum exterior. These cost $400–$850 per window, on average. Fiberglass frames offer superior energy savings for a slightly higher cost of $500–$1,000, on average.
For most homeowners, fiberglass windows offer better insulation and long-term value, with a minimal price difference. Below, we break down some other key differences between these two window materials, such as maintenance and appearance, to help you decide which is best for your home.
Aluminum Vs. Fiberglass Windows: What’s the Difference?
The biggest difference between aluminum and fiberglass frames is their energy efficiency. Aluminum frames are rarely used without modification due to their lack of efficiency, while fiberglass frames offer much better insulation.
It’s worth noting that aluminum windows differ from aluminum-clad windows. The former are typically all-metal frames used in modern or commercial-style homes, while aluminum-clad windows combine a durable aluminum exterior with a wood interior. Aluminum-clad windows are more common, and usually more affordable, than fiberglass. However, full aluminum frames, especially high-performance thermally broken ones, can be quite pricey — sometimes even more than fiberglass.
The table below shows how common aluminum-clad and fiberglass windows stack up across factors such as maintenance and appearance.
Factors
Aluminum-Clad Windows
Fiberglass Windows
Energy efficiency
Poor efficiency; require the addition of thermal breaks
Well-insulated and highly efficient
Cost
$400–$850
$500–$1,000
Maintenance
Low maintenance; may require anticorrosion coating
Low maintenance in all climates
Lifespan
40–50 years
30–50 years
Appearance
Thinner, modern, industrial
Varies, can mimic other materials
Energy Efficiency
Windows play a key role in a home’s energy efficiency, and the material greatly affects an individual window’s efficiency.
“Aluminum windows are not something you are going to find for new or replacement windows outside of commercial applications due to their lack of energy efficiency,” said Alex Vinet, client services specialist for Custom Exteriors in Berthoud, Colorado. This is because aluminum naturally conducts heat. Modern aluminum frames are often modified to include thermal breaks, which improve their insulation properties but also greatly increase costs.
Aluminum-clad wood windows offer better efficiency than just aluminum because wood is a better insulator. However, fiberglass windows are the most efficient insulators overall due to their low conductivity and ability to incorporate additional insulated pieces as part of the frame.
Cost
Pure aluminum window costs are among the highest for window frame materials, although aluminum-clad windows are in the same ballpark as fiberglass windows. Aluminum-clad windows cost around $400–$850, while fiberglass windows cost $500–$1,000.
“Vinyl is the most cost-effective window material, and I’d say 85% to 90% of the market uses vinyl,” Vinet said. However, vinyl windows aren’t as durable as aluminum or fiberglass windows.
Window Frame Material
Average Cost per Window Installed
Vinyl
$450–$800
Aluminum-clad
$400–$850
Fiberglass
$500–$1,000
Composite
$500–$1,200
Wood
$600–$1,500
Our cost data comes from RSMeans, a price estimator database for contractors. The estimates included in this article cover materials and average installation costs.
Today’s Homeowner Tip
How much you’ll pay for your replacement windows often comes down to the brand, product line, window size, and installation — not just the frame material.
Maintenance
Aluminum and fiberglass are both low-maintenance window frame options. Fiberglass windows don’t require paint or finish and are easy to clean with mild soap and water. They are fade-resistant, but they are susceptible to damage from excessive sun exposure.
“Darker colors will fade and discolor faster in direct sunlight,” Vinet explained. “The more sun exposure fiberglass has, the faster it will break down, leading to possible chipping, fading, or peeling, depending on the manufacturing process and additives the manufacturer has used.”
Aluminum windows are also easy to clean, but they do require some extra care. You need to keep moving parts lubricated, and in coastal areas, they may require an anticorrosion coating for protection from the elements. They don’t do well in extreme temperatures.
Lifespan
Aluminum windows have an average lifespan of about 30 to 50 years, though this depends on how well they’re maintained.
Fiberglass windows have a similar average lifespan of about 30 to 50 years or even longer.
“With proper maintenance, aluminum-clad windows could outlast fiberglass windows,” Vinet said, then added, “I feel that this type of window requires the most maintenance of all window types.”
In either case, you’ll need to regularly clean and maintain your windows according to manufacturer recommendations to maximize how long they last before replacement is required.
Appearance
Completely aluminum windows have a sleek, modern appearance with thin frames that allow for a large glass area. They are often used in commercial or industrial designs. Aluminum-clad wood frames have a much thicker frame depth and height, which creates a bulkier look with less glass space and an overall more traditional appearance.
Fiberglass windows are versatile enough to fit a range of architectural styles, often manufactured to resemble other materials. For example, some fiberglass windows feature a faux wood grain texture.
Advantages and Disadvantages of Aluminum Vs. Fiberglass Windows
Aluminum and fiberglass windows are both low-maintenance options offering long lifespans and great durability. Consider the following pros and cons of fiberglass and aluminum when deciding between them.
Aluminum Windows
Pros
Highly durable
Very strong and light
Low-maintenance
Tend to cost less than fiberglass windows
Cons
Very poor insulator, especially in climates with extreme temperatures
Prone to condensation and corrosion from moisture
Fiberglass Windows
Pros
Highly energy-efficient with air cavities that can be filled with insulation
Offers long-term energy savings
Long-lasting, durable, and low-maintenance
Suited to various climates and weather conditions
Cons
Tend to cost more than aluminum-clad windows
Relatively few design options for customization
Are Aluminum or Fiberglass Windows Best for You?
In many homes, fiberglass windows are a better option than aluminum windows. Aluminum is a poor insulator in most climates. Fiberglass is far more versatile and among the most efficient windows, offering better energy savings. It’s well-suited to nearly any climate and architectural style. We recommend fiberglass windows for energy-conscious homeowners who want lower heating and cooling costs over time.
Today’s Homeowner Tip
The best type of window frame for your project will also depend on factors such as brand, series, and installation quality.
You may prefer aluminum-clad windows if you enjoy their style or want to save a bit on your window replacement project and still get a durable, low-maintenance window.
Next Steps
If you’re considering new windows for your home, talk to a local window supplier or general contractor specializing in exteriors. They’ll be able to assess your home and advise you on the best material for your unique project. Gather quotes from multiple contractors so you can compare their costs, services, and reputation from past work.
If cost is your primary concern, vinyl windows may make an even better budget window replacement. Vinyl offers a good balance between efficiency and affordability.
FAQs About Aluminum Vs. Fiberglass Windows
Do aluminum or fiberglass windows have better resale value?
Both aluminum-clad and fiberglass windows are considered premium options and can improve home resale value — especially if they enhance curb appeal and energy efficiency.
Fiberglass windows may offer a slight edge due to their long-term performance and growing popularity among energy-conscious buyers. However, well-maintained aluminum-clad wood windows can also make a strong impression, particularly in traditional or Craftsman-style homes.
What should I look for when buying windows?
When buying windows, you should look for dimensions that specifically match your accurately measured window opening. A professional window specialist can take the most accurate measurements of a window’s width and height from the home’s exterior. Mistakes and mismeasures can be costly, since you cannot return most window orders once removed from the packaging.
Which company is the best for windows?
The best window brands include Renewal by Anderson, Pella, Marvin, Champion Windows, Window Nation, Universal Windows, Window World, and Castle Windows. Many companies partner with specific brands, so talk to multiple suppliers in your area to find one with the types of products you’re looking for at a price within your budget.
For example, if you’re looking for aluminum-clad windows, Pella and Marvin are both options. However, Pella’s aluminum-clad windows are more expensive.
Rihanna sent shockwaves through the fashion world once more, revealing she’s expecting her third child with A\$AP Rocky at the 2025 Met Gala. Dressed in a striking custom Marc Jacobs pinstripe suit and dramatic cravat, the fashion icon cradled her growing bump while making her signature fashionably late entrance. Already mom to sons RZA and Riot Rose, Rihanna proved once again that no one announces a pregnancy quite like she does. Stylish, bold, and on the world’s biggest fashion stage.
This essay is adapted from the nineteenth chapter of my book Figuring.
In the first autumn of her thirties, Emily Dickinson wrote to her confidante and eventual editor Thomas Wentworth Higginson:
I had a terror — since September — I could tell to none, and so I sing, as the Boy does by the Burying Ground — because I am afraid.
Not a “fright,” not a “shock,” but a terror. What lay behind this enormity implied by a woman who measured her words so meticulously? Generations of biographers have filled pages with conjectures of varying persuasiveness — a death, some unrecorded heartbreak in her volcanic relationship with Susan, the first attack of epilepsy — but the most intriguing theory came nearly a century after the poet encrypted these words.
In 1951, after years of research and travel to various archives, the scholar Rebecca Patterson proposed a wholly novel candidate for the “terror” of 1861: Kate Scott Anthon — a newly widowed young woman Susan had befriended during their studies at the Utica Female Academy and then introduced to Emily, who fell into an intense romantic and possibly physical affair with the enticing newcomer before Kate severed the relationship without explanation, dealing a blow Emily would experience as deathly and furnishing the raw material for much of her mournful poetry.
Their story is a mosaic assembled from various surviving documents, as direct as Emily’s letters and as oblique as the marginalia in Kate’s favorite books.
Unauthenticated daguerreotype of (most scholars believe) Emily Dickinson and Kate Scott Anthon
In the late winter of 1859, Kate descended a sleigh in her fashionable black hat and widow’s veil in front of her former classmate’s home in Amherst. Almost immediately, Susan introduced her to the beloved auburn-haired friend who lived across the hedge in the brick house painted deep red and who had been hearing of her for nearly a decade. When Emily, wrapped in a merino shawl, met the tall, handsome woman with the penetrating dark eyes, musical voice, and lively passion for literature and astronomy, she was instantly entranced.
During the three weeks of Kate’s first stay in Amherst, the two women, both twenty-eight, became inseparable. They took long walks with Emily’s dog, Carlo, read Aurora Leigh aloud to each other, and spent evenings at the piano as Emily improvised — “weird and beautiful melodies, all from her own inspiration,” Kate would remember. As Emily played, Kate towered behind her — “Goliath,” the petite poet would call her.
When Kate left to go home, Emily beckoned her for another visit to Amherst:
I am pleasantly located in the deep sea, but love will row you out, if her hands are strong, and don’t wait till I land, for I’m going ashore on the other side.
Emily’s early letters to Kate pulsate with electricity. Writing weeks after they first met, she tries to disguise with playfulness the push-and-pull of irrepressible, frustrated longing in the code language of botany that was her first poetic tongue:
I never missed a Kate before. . . . Sweet at my door this March night another Candidate — Go Home! We don’t like Katies here! — Stay! My heart votes for you, and what am I indeed to dispute her ballot –? What are your qualifications? Dare you dwell in the East where we dwell? Are you afraid of the Sun? — When you hear the new violet sucking her way among the sods, shall you be resolute?… Will you still come?… Kate gathered in March! It is a small bouquet, dear — but what it lacks in size, it gains in fadelessness, — Many can boast a hollyhock, but few can bear a rose! … So I rise, wearing her — so I sleep, holding, — Sleep at last with her fast in my hand and wake bearing my flower. —
In the late winter of 1860, they spent a night together in Emily’s bedroom — unrecorded, inarticulable, except perhaps in verse:
Her sweet Weight on my Heart a Night Had scarcely deigned to lie — When, stirring, for Belief’s delight, My Bride had slipped away —
If ’twas a Dream — made solid — just The Heaven to confirm — Or if Myself were dreamed of Her — The power to presume —
Several weeks after that momentous night, Emily would channel this precious perishability in a letter to Kate:
Finding is slow, facilities for losing so frequent, in a world like this, I hold with extreme caution. A prudence so astute may seem unnecessary, but plenty moves those most, dear, who have been in want… Were you ever poor? I have been a Beggar.
Whatever took place between them, they never addressed it overtly — it is always impossible to articulate the possibility between two people, but especially in a time and place that confined the possible to such narrow parameters for permissible love. Feeling the impossibility of it all, Emily shuddered with anticipatory loss:
Kate, Distinctly sweet your face stands in its phantom niche — I touch your hand — my cheek your cheek — I stroke your vanished hair, Why did you enter, sister, since you must depart? Had not its heart been torn enough but you must send your shred?… There is a subject, dear, on which we never touch.
Little is known of Kate’s side of the experience. None of her letters to Emily survive. (The poet had instructed her sister that all letters be burned after her death — a request which Lavinia Dickinson promptly obliged before discovering the trove of poems that made her realize her sister’s correspondence might have immense literary value.) But Kate — who signed many of her surviving letters to other correspondents “Thomas” or “Tommy” — did have an unambiguous and lifelong proclivity for romantic attachment to women, culminating later in life with a longtime relationship with a young Englishwoman.
Perhaps at twenty-eight, she was simply not ready to so radically dismantle the superstructure of her life as she knew it. In April 1861, she severed the relationship with Emily. There is no record of what was said, but the devastation was complete and lifelong. Many years later, Emily would write to Higginson:
If ever you lost a friend… you remember you could not begin again because there was no world —
A breathless Death is not so cold as a Death that breathes.
In the immediacy of the loss, she interpolated between hope and despair, as we all do when discomposed by a sudden abandonment. A month after her “terror,” which might just be her painful acceptance that Kate was gone, her friend Samuel Bowles — whose newspaper had printed one of the only four poems published in her lifetime — came to Amherst. She refused to see him. Most of her letters from that period were burned, but Samuel was one of her most intimate friends — it is likely that she had confided in him the intensity of her heartbreak, if not its source. “We tell a Hurt to cool it,” she would write in a poem. Among his own letters is one from that summer to a recipient whose name has been scrubbed — an extraordinary letter of consolation to somebody anguishing with unrequited love, somebody who may well have been Emily:
My dear — :
… You must give if you expect to receive — give happiness, friendship, love, joy, and you will find them floating back to you. Sometimes you will give more than you receive. We all do that in some of our relations, but it is as true a pleasure often to give without return as life can afford us. We must not make bargains with the heart, as we would with the butcher for his meat. Our business is to give what we have to give — what we can get to give. The return we have nothing to do with… One will not give us what we give them — others will more than we can or do give them — and so the accounts will balance themselves. It is so with my loves and friendships — it is so with everybody’s.
Emily was not ready to let go of the love she had given, of the hope that it might one day be returned, though alchemised and transmuted into a different form. She wrote to Kate plaintively:
How many years, I wonder, will sow the moss upon them, before we bind again, a little altered, it may be, elder a little it will be, and yet the same, as suns which shine between our lives and loss, and violets.
That season, she composed her most famous poem — read here by twenty-first-century children who are yet to have their loves and losses, and animated by artist Olga Ptashnik:
“Hope” is the thing with feathers — That perches in the soul — And sings the tune without the words — And never stops — at all —
And sweetest — in the Gale — is heard — And sore must be the storm — That could abash the little Bird That kept so many warm —
I’ve heard it in the chillest land — And on the strangest Sea — Yet — never — in Extremity, It asked a crumb — of me.
“Life is long,” a poet friend said to me recently as I was reckoning with a similar rupture. But life was not long for Emily Dickinson, who died suddenly in her fifties, not a single grey on her auburn hair in the small white casket cradling her body and a posy of violets. Life is a feather borrowed from the swift wing of time. If she had lived longer, perhaps Kate would have returned to spend her remaining days with Emily and not with her English lover, or perhaps they would have met again in perfect disenchantment, in perfect friendship. “If” is the widest word of all, the immense alternate universe in which all of our possible lives live. Hope is what we call the bridge between this universe and that one.
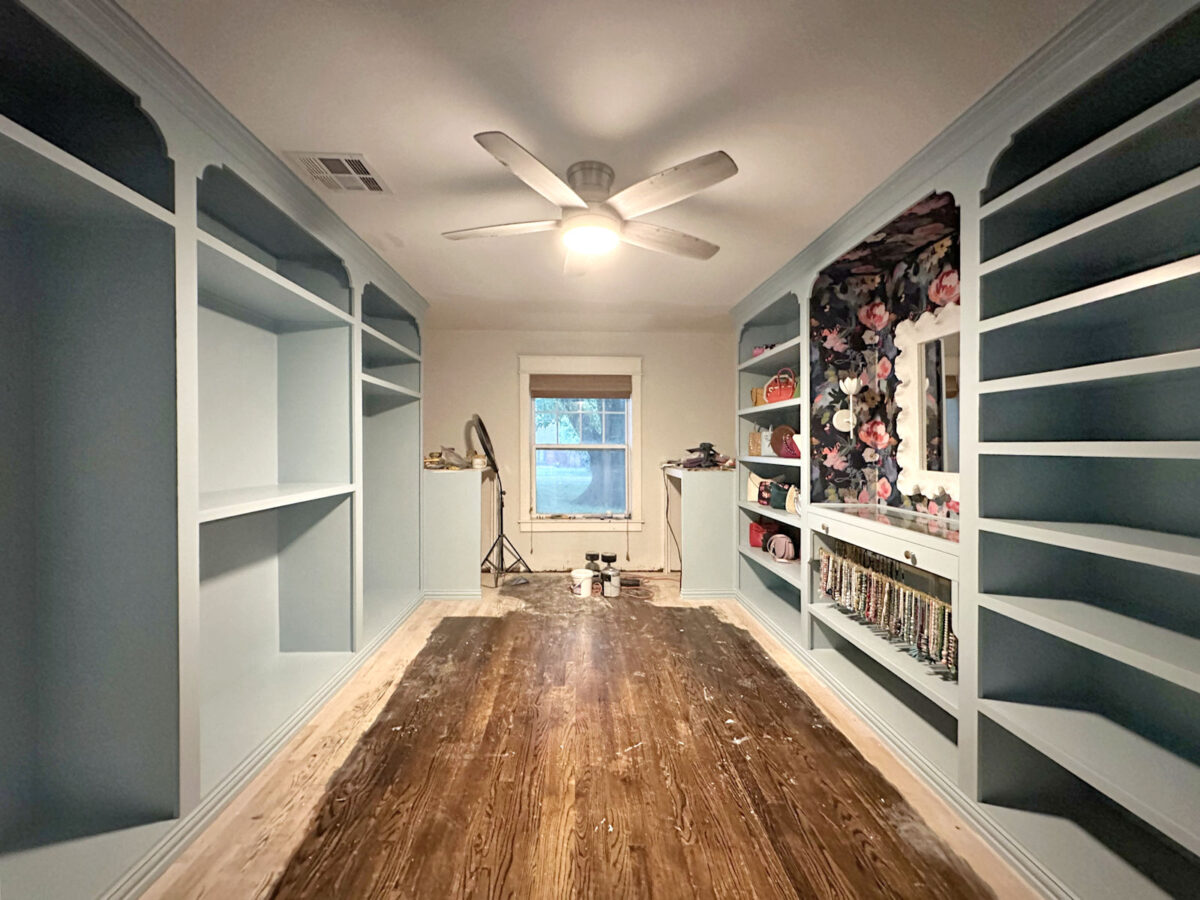
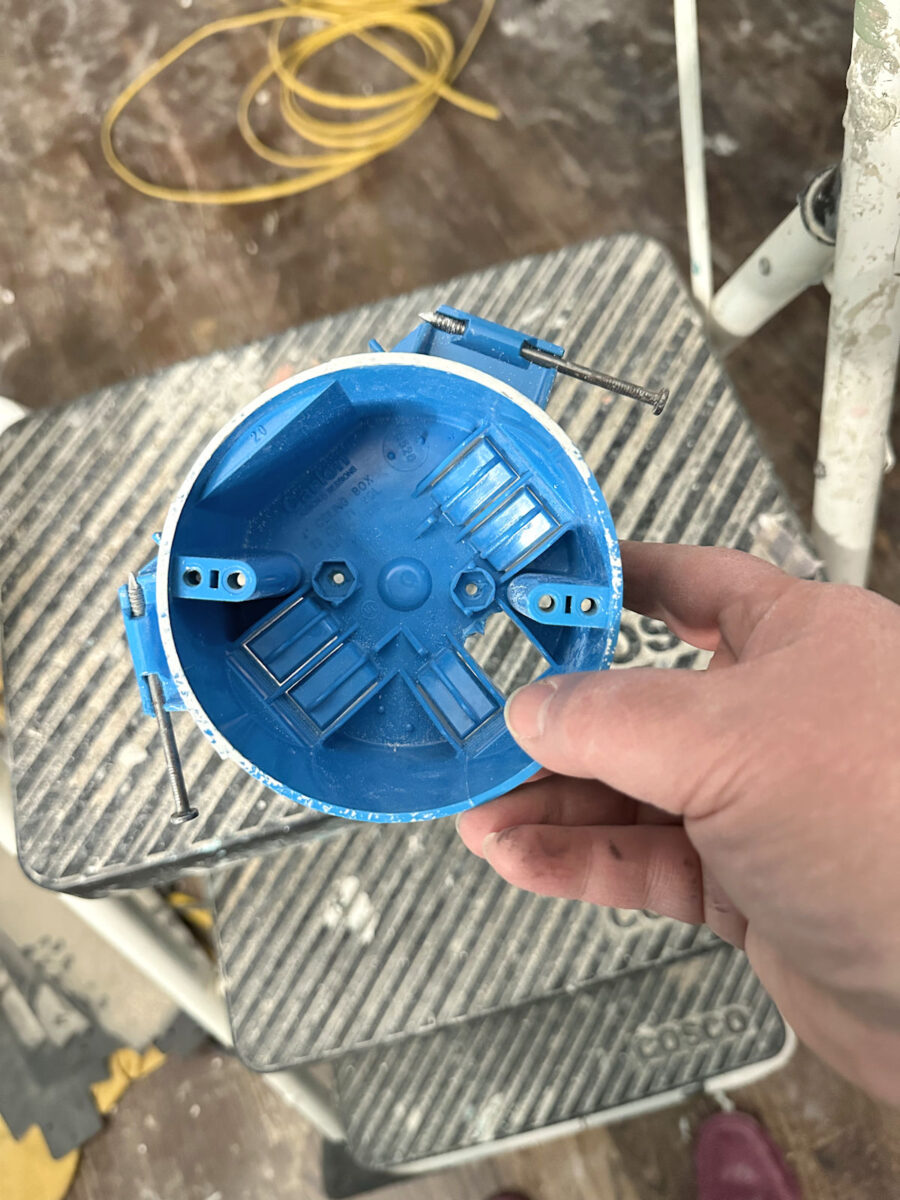
I made quite a bit of progress yesterday on adding the additional lighting to my walk-in closet, but I didn’t get it finished because I ran into a pretty big problem and had to find a workaround for it. Until now, this room has only had one light in the ceiling, and that was the light attached to the ceiling fan. I don’t want a ceiling fan in this closet, so the plan was to remove the fan and replace it with a chandelier and then add several recessed lights to give additional lighting to the room.
Here’s the one single light on the ceiling fan that I’ve been working with until now…
Not only is the lighting insufficient, but it’s also a yellow light, so it makes the cabinet a wallpaper colors look dingy. I can’t stand yellow lighting for that very reason. I love color, and I don’t like my colors to look washed out, so I prefer white lighting.
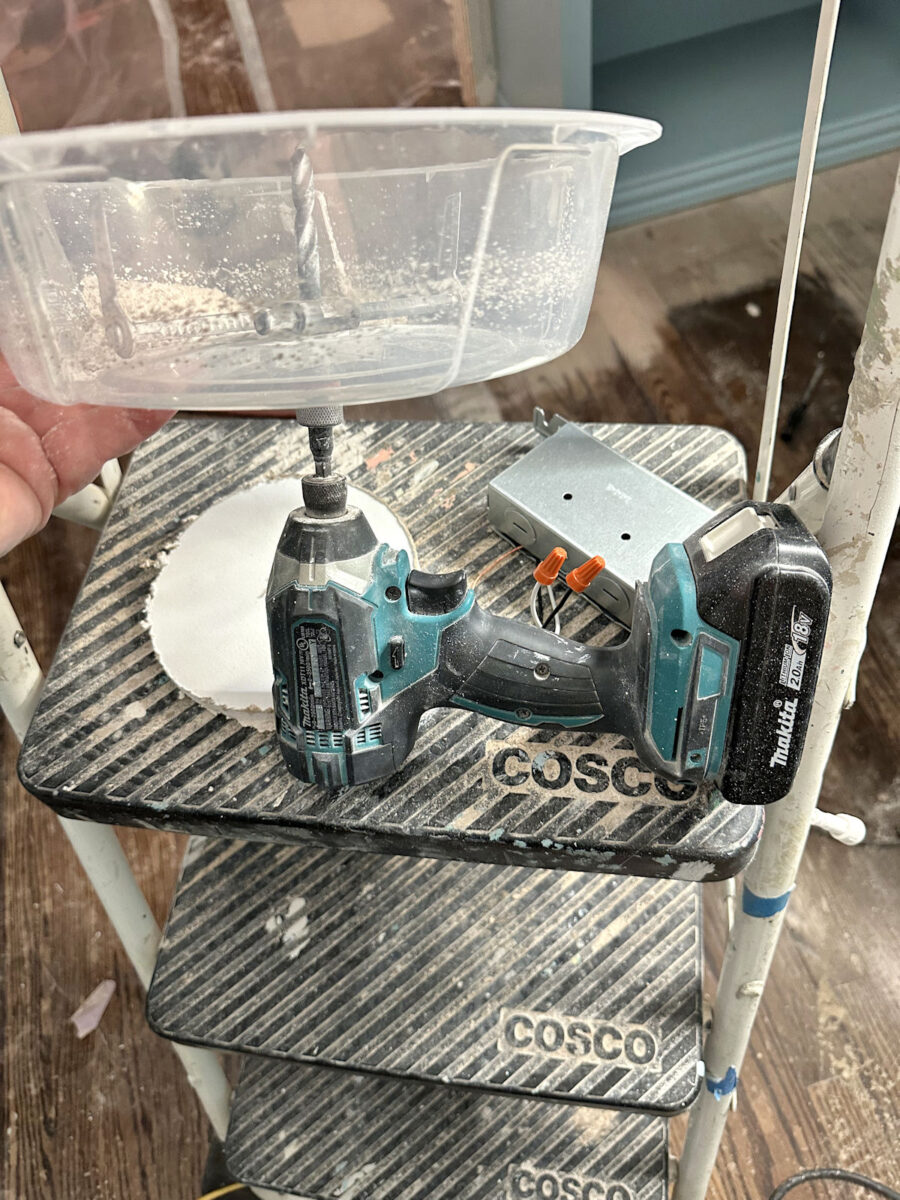
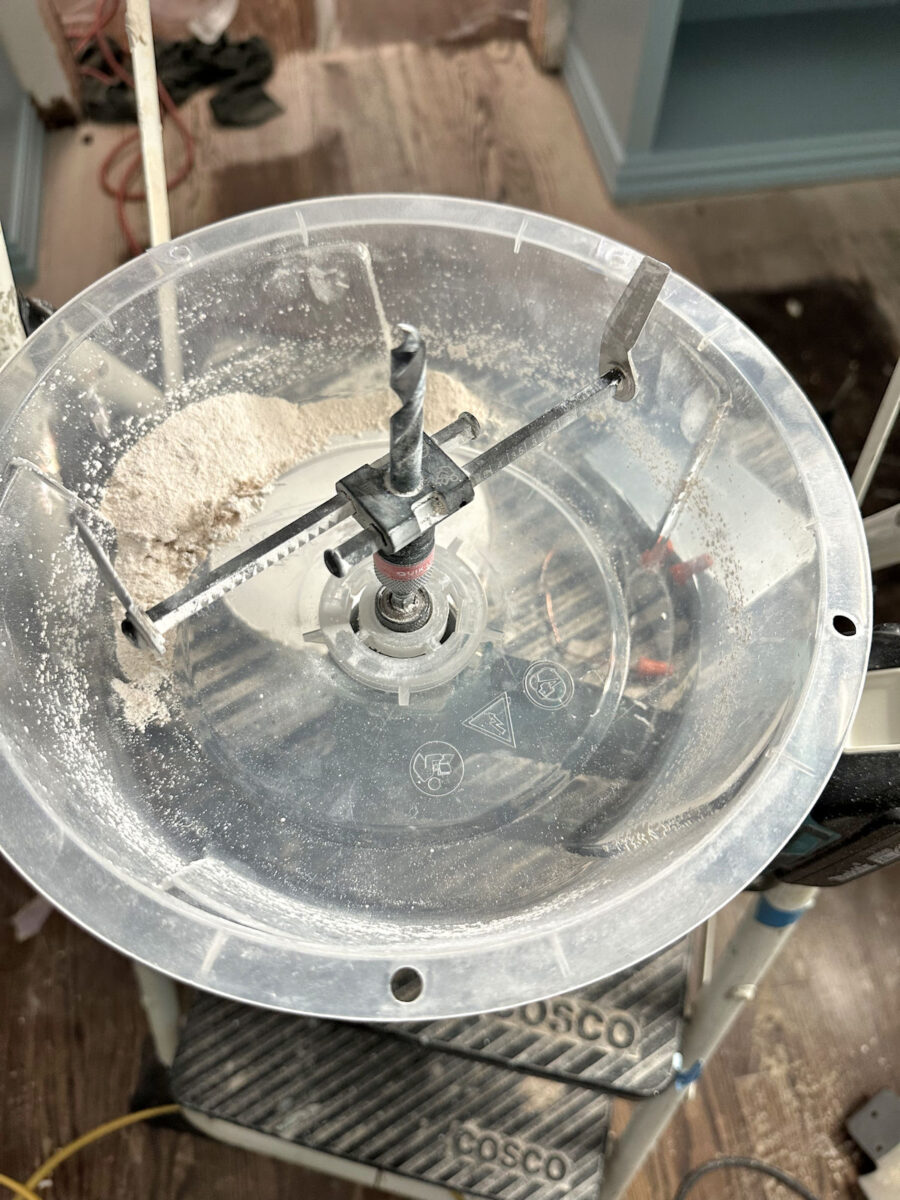
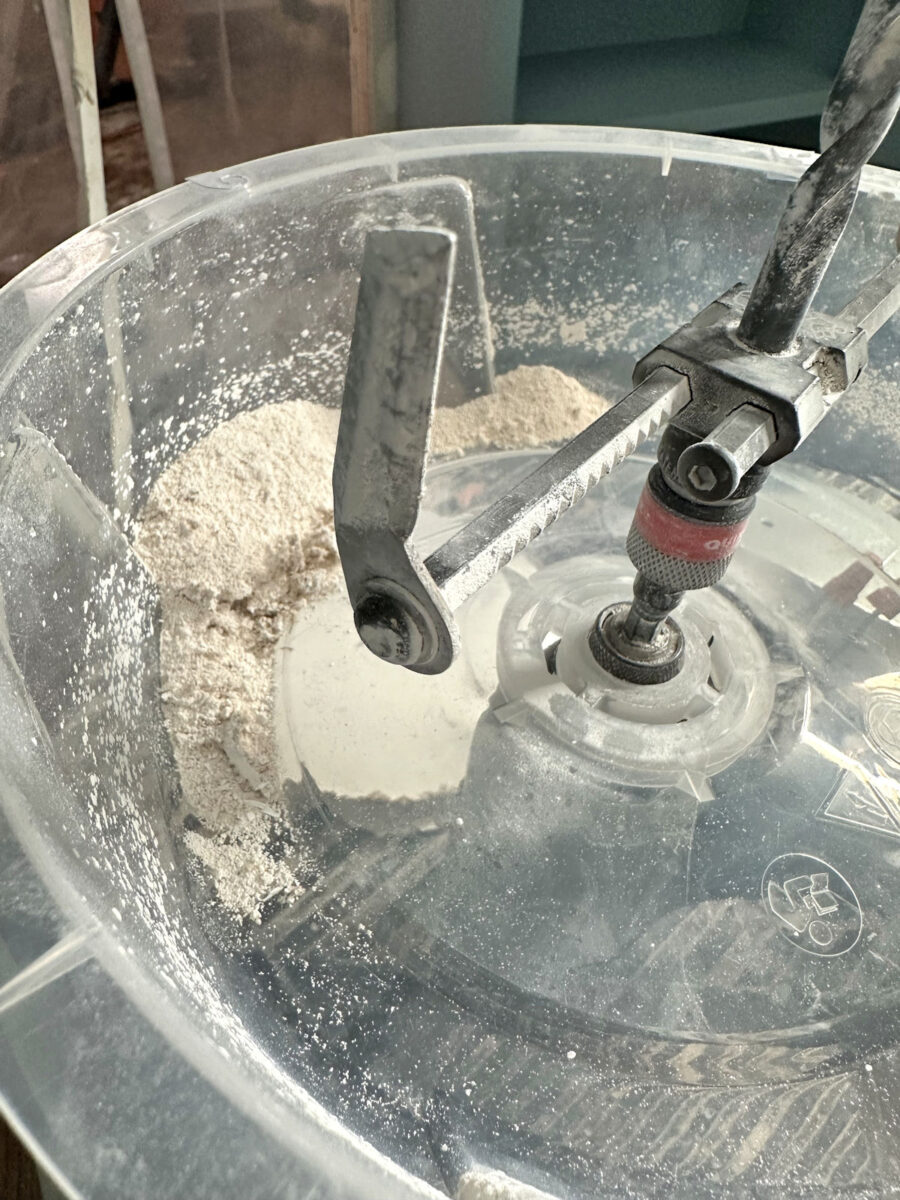
My workday started off smoothly. I had all of the holes cut for the lights by lunchtime.
This was pretty easy to do with this Mikwaukee adjustable hole cutter (affiliate link). It adjusts to cut holes from 2″ to 7″, and it comes with this plastic shield that catches the dust as you cut.
It definitely made the process faster and easier, but if I’m being honest, I’d rate it 4 out of 5 stars. While the plastic shield caught about 95% of the dust, it definitely didn’t catch all of it.
Also, these blades seemed to dull fairly quickly. I was able to cut all of the holes I needed, but after about four holes, the cuts seemed to start getting rougher and rougher with each additional hole. And the blades kept coming loose, so I’d have to use an Allen wrench to tighten the blades after I cut each hole.
I think the tool could use some improvement, but it did the job. And it did it much faster and easier than any other tool or process I’ve used in the past to cut holes for lights.
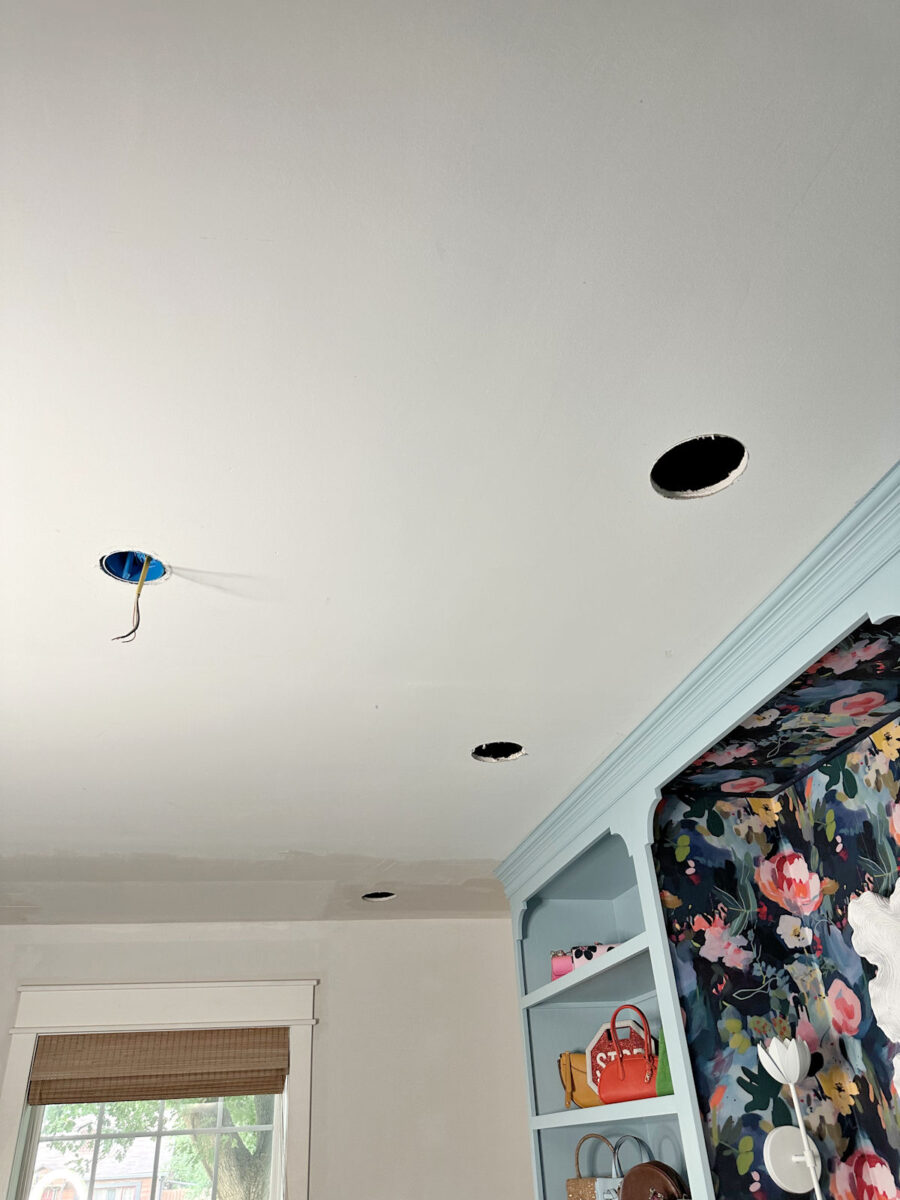
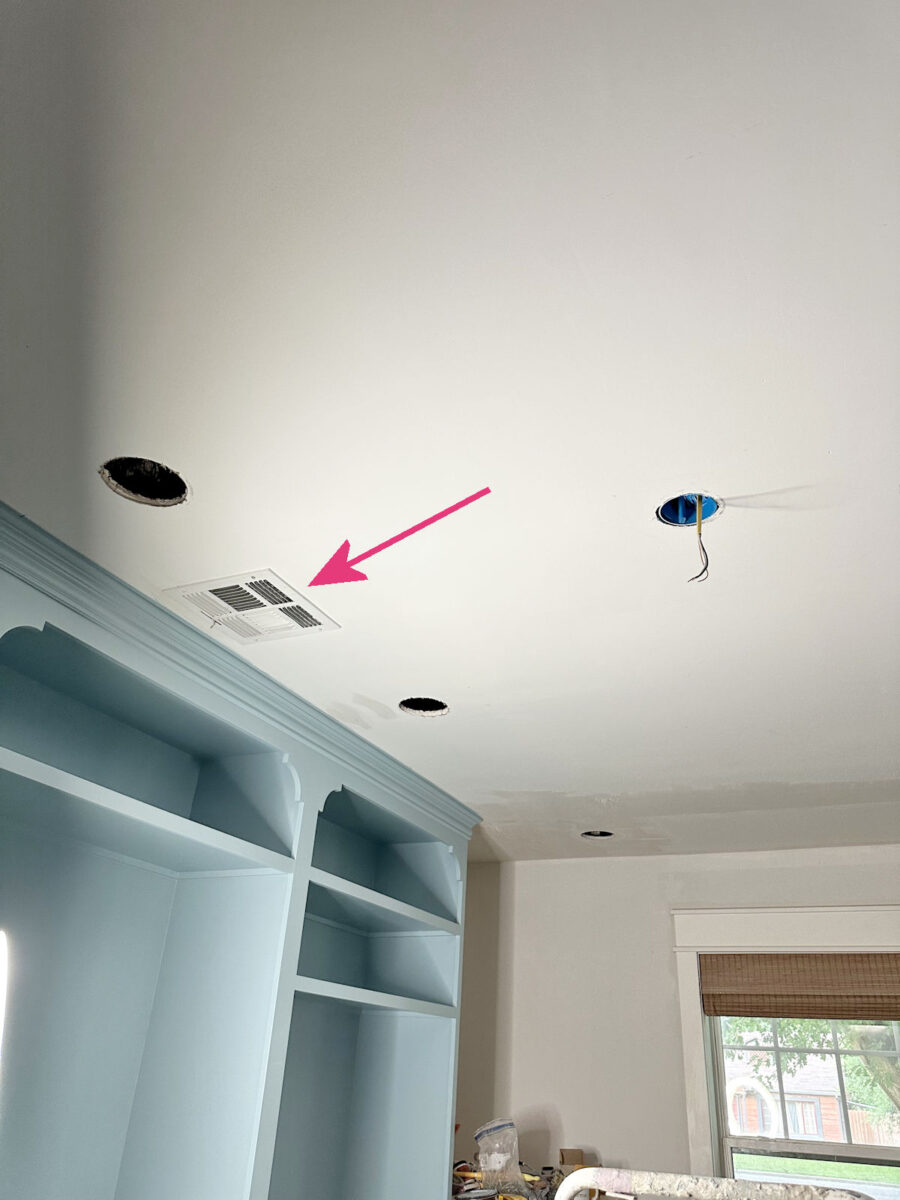
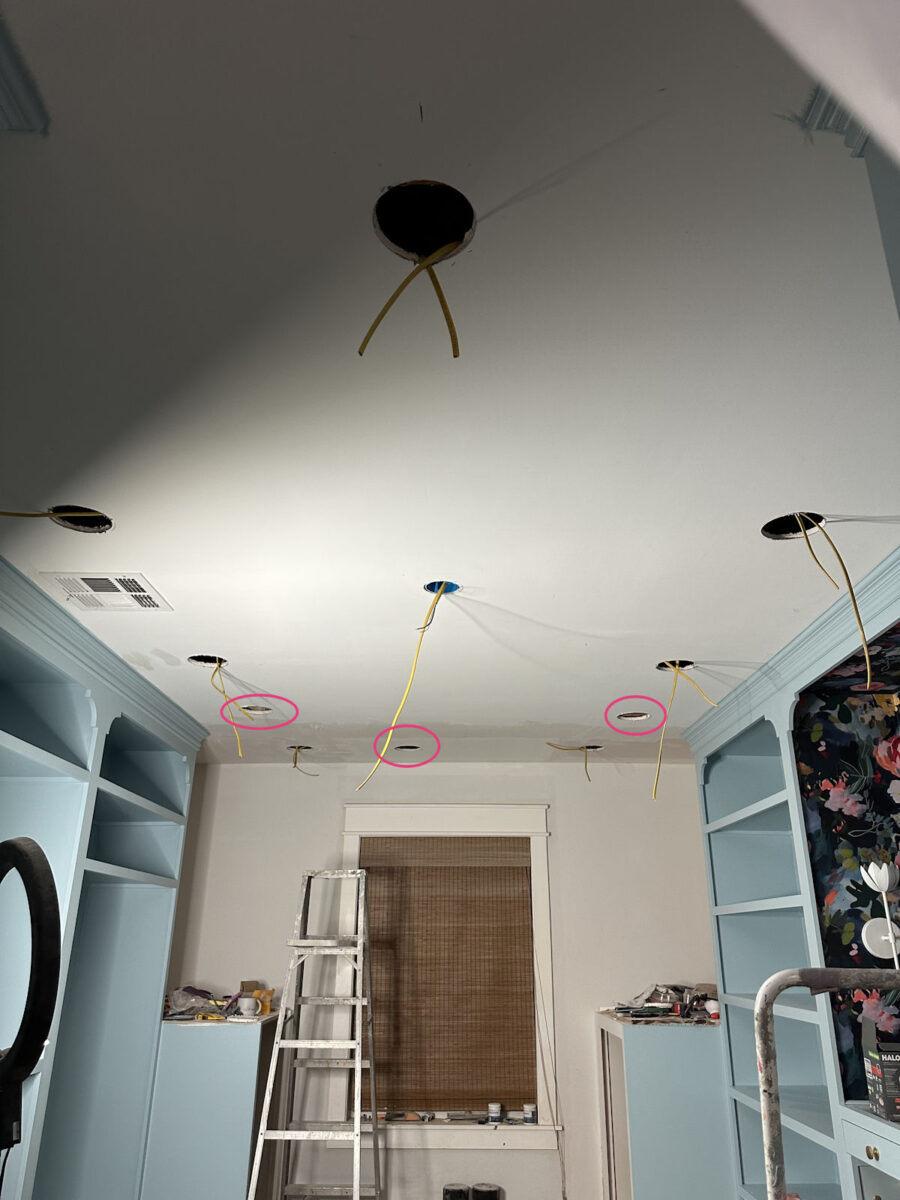
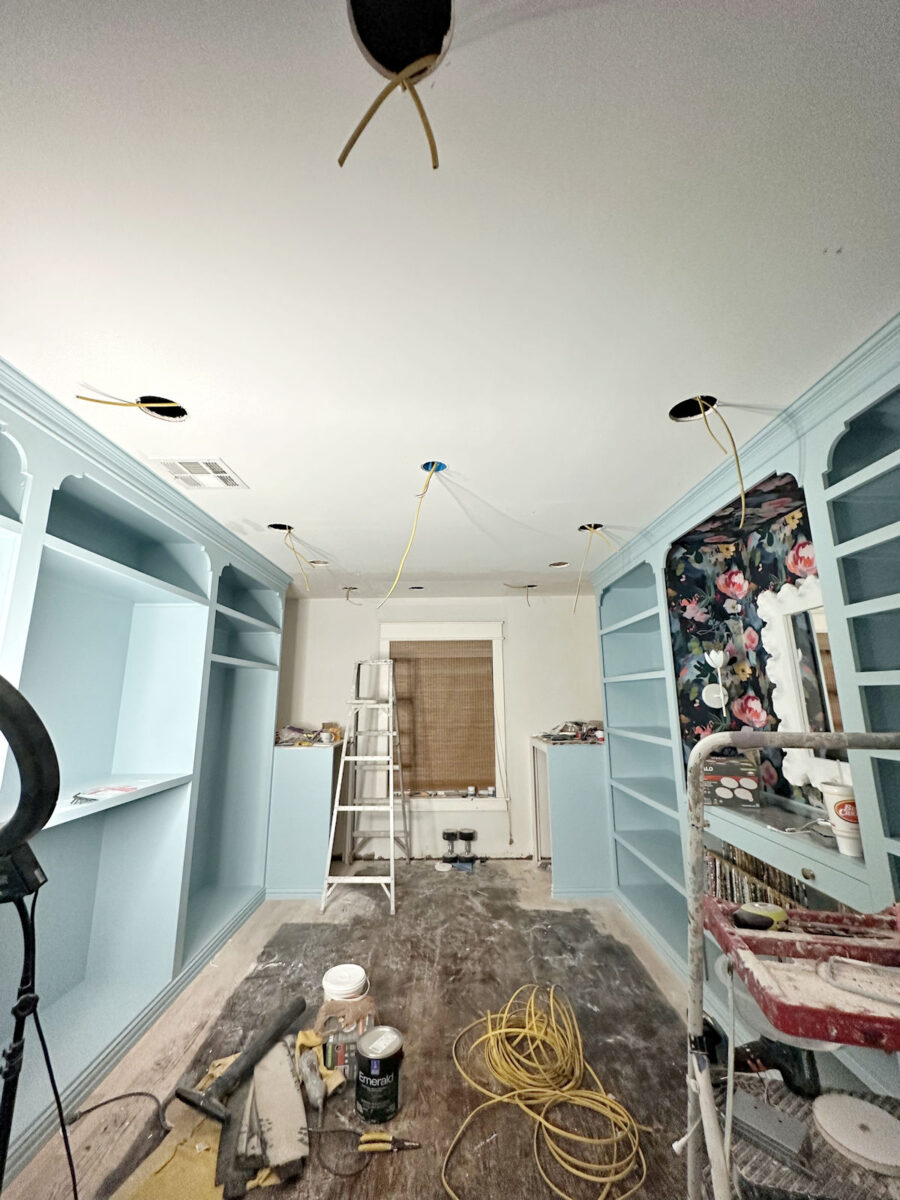
I ended up cutting holes for two lights on each side by the cabinets, and one hole over each appliance.
I had someone ask me why I didn’t plan on adding three lights to each side in the cabinet area. The reason is because of this air conditioner vent on the left side which is right where I would need to put a light if I had added three to each side. And I did not want to move a vent.
But I did add one additional light centered on the doorway. So the closet cabinet area will have five additional lights plus the center chandelier when all is said and done. That will be plenty of light.
Things were going so smoothly at this point that I expected to break for lunch, and then come back and take about 15 minutes to climb up into the attic and run the wiring from each hole to the next. In theory, this step should have been incredibly simple. What I hadn’t realized is that all of the area from the pink line to the window wall was in that area that juts out from the front of the house, and the roof over that area is incredibly low.
I had three wires that I needed to add in that section, but once I got up into the attic, I realized that it wasn’t going to be as easy as I thought. In fact, it took me a while to even find those two holes over the washer and dryer. I couldn’t even see them until I was looking at that area head on. And then I realized that in order to get to them, I’d have to lie on my stomach, shimmy into that area under the super low roof about 10 feet, hoping that I could get all the way to the end while dragging three wires in my hand, and then shimmying back without being able to turn around. And, of course, I’d have to do all of that without putting a foot or knee through the drywall.
Not only did I question the practicality of that and my ability to do it, but in order to do that, I also had to deal with my phobia of enclosed spaces. I sat there in the more open space of the attic staring at that low area for a good five minutes trying to calm myself and make myself do it. But the longer I was up there staring at that area, the more panicked I felt. Mentally, I was going in the opposite direction than I needed to go in order to get this done. By the time I made myself get out of the attic, I felt like I was on the verge of a full-blown panic attack. My fear of small, enclosed spaces is why I’ve never even once crawled under our house. I won’t ever go under there.
I remember years ago when Matt and I used to watch the show Fear Factor. I loved watching people do all of those crazy challenges like eating bugs, putting their heads in clear acrylic boxes that were filled with bugs, etc. But any time a challenge involved a small, enclosed space, I had a hard time watching. And if any challenge included a small, enclosed space with the added element of water, that was a hard no for me. Those would send me into a full-on panic. During those challenges, Matt would always look at me, as I buried my face in my hands, and ask, “You okay? You gonna make it?” He has always made fun of me and joked that I’m the only person he knows who could drown while watching a TV show and without a single drop of water around me. 😀
And while I wasn’t dealing with any water in this situation, I was dealing with other factors that I just couldn’t get past in my mind. Like, what if I got stuck in there, panicking so much that I couldn’t move? Can you imagine me having to call 911 and explaining the situation to them? “I’m stuck in my attic, panicking, and I need someone to come rescue me!” 😀 I just couldn’t do it.
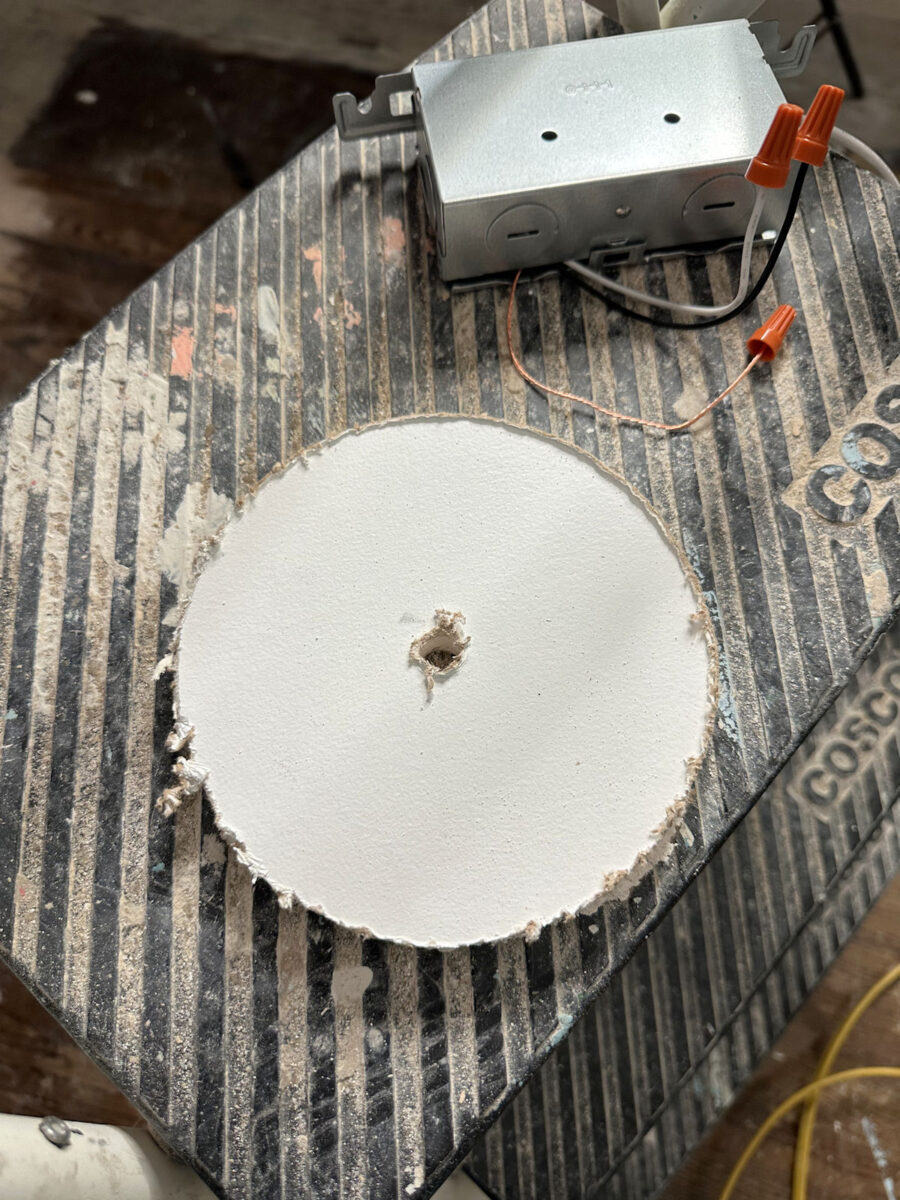
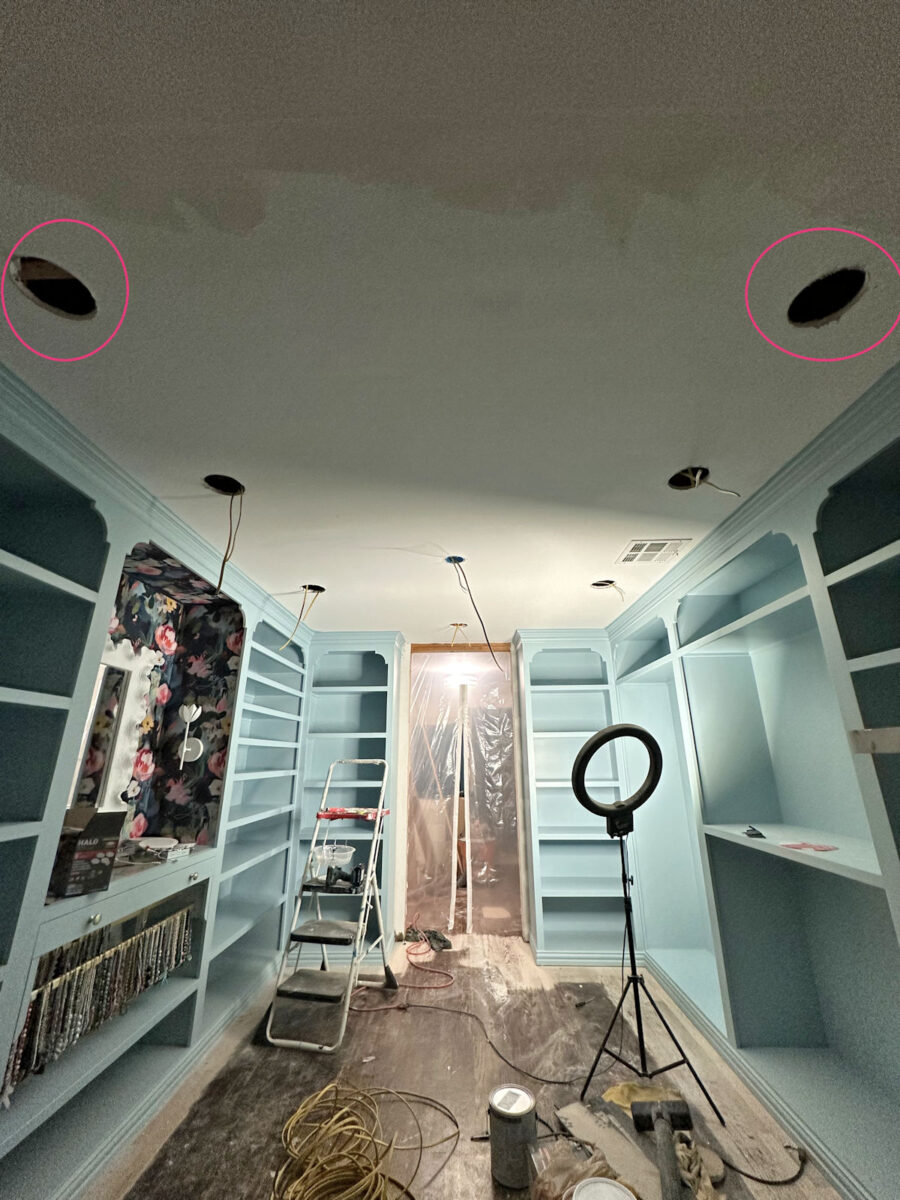
So I ended up reassessing the situation to figure out how to get the wires from hole to hole, around and above all of the ceiling joists and other framing. I finally ended up having to cut three additional holes that will have to be patched.
The good news is that patching those holes will be pretty simple because I have all of these perfect little circles of drywall that I can use to fill them.
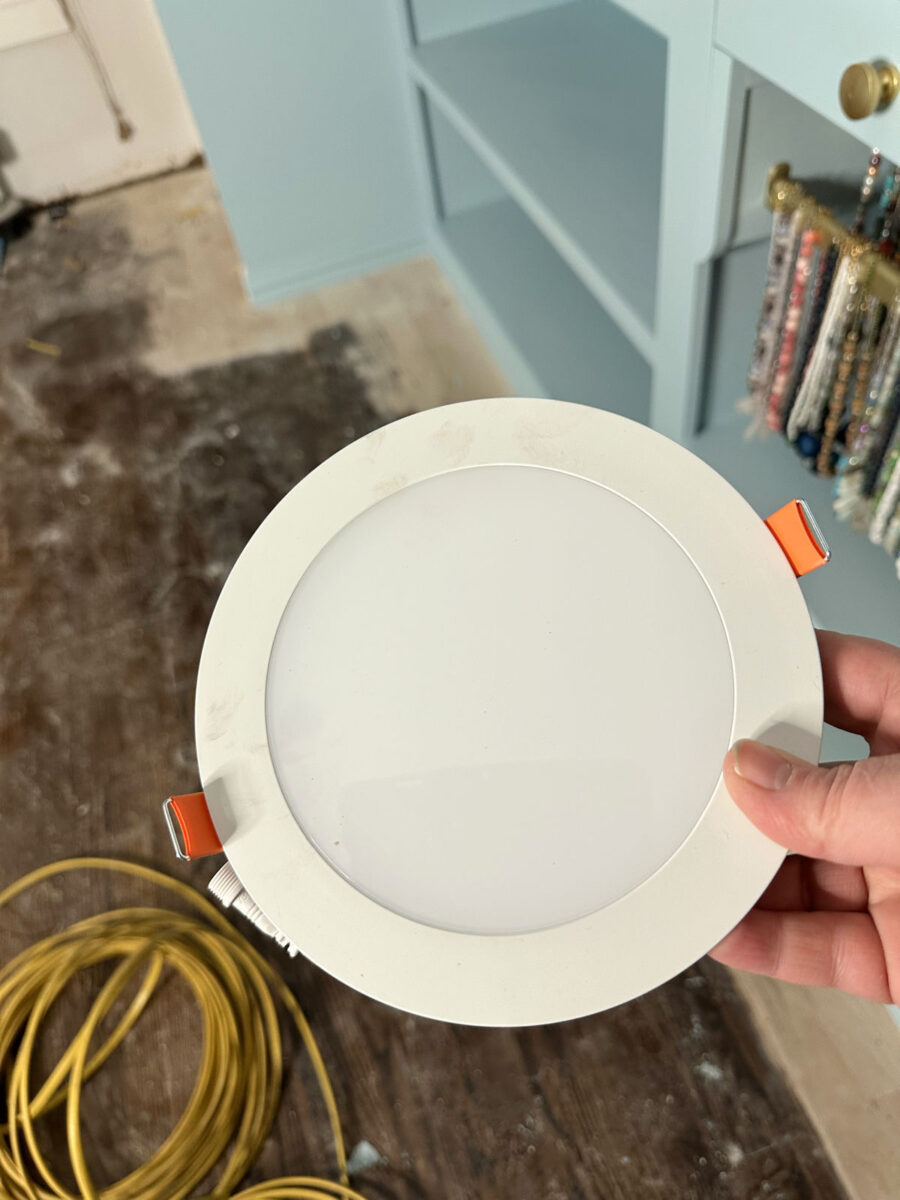
Anyway, these are the lights that I’m going to use. They’re not technically recessed lights. They sit flush to the ceiling.
And since they’re only 1/2-inch thick, and they’re LED so they don’t get hot, you can put them virtually anywhere, even directly under a ceiling joist.
This is the brand I use. They have five different temperature settings, and I always set mine to the 5000K (daylight) setting.
So by the time I got all of that done, I was pretty much wiped out both physically and mentally. You can see the holes that need to be patched here.
Also, by the time I got all of that done, I almost talked myself into leaving the center light right where it is. The challenge here is that the wire that comes from the switch is too short to move that junction box back six inches.
I tried to make myself be okay with it, but about an hour later, after my nerves had calmed a bit, I decided that I’m just not okay with it. You can see how off-center it is with the center sections on the side walls.
So I went ahead and removed the junction box. I thought that would be pretty simple, but it was a bit of a challenge getting it off since it had these side areas that jut out with the nails.
I mangled the drywall a bit getting those out of there.
Fortunately, I’ll be able to cut a six-inch hole and then use one of the circles of drywall that I have to patch that area.
And I’ll need to run a new wire from the switch to this center junction box, which I hadn’t planned on having to do.
So in the end, I’ll have four holes that I need to patched.
But patching four holes in drywall is a small price to pay for avoiding getting stuck on my belly in my attic in a full-blown panic as the low roof closes in on me and having to call 911 to rescue me. 😀
It’s not how I had hoped this project would go, but at least the wires are in place. And I should have all of the lighting installed by the end of the day. It’ll be nice to see what this room looks like with proper lighting.
Addicted 2 Decorating is where I share my DIY and decorating journey as I remodel and decorate the 1948 fixer upper that my husband, Matt, and I bought in 2013. Matt has M.S. and is unable to do physical work, so I do the majority of the work on the house by myself. You can learn more about me here.
Many people ask for tips on how I keep our house and furniture clean with dogs. And most recently the question, how we were able to clean the rug that Finnegan spilled white paint on! What a calamity that was! A home with a puppy is both fun and messy. How to keep a perfectly clean home at all times with a puppy really isn’t a thing I can speak to (there is no housekeeper here except us!). However, there are some tools, systems and “guidelines” we’ve come up for ourselves over our many years of being dog owners (and in raising three children) that have helped us keep our sanity and a sense of sanctuary in our home.
First of all, let me address how we took care of the white paint that Finnegan accidentally pulled off the dining room table! It happened late at night and husband was there to witness it (you can read the whole story here).
This was a brand new rug that we had just laid out in our dining room. I hadn’t yet photographed it for Rifle Paper Co. so my husband knew immediately this was going to be a terrible mistake ha! I was already fast asleep upstairs and he didn’t want to wake me to tell me about it :).
Fortunately he thought immediately to run and grab our handy dandy carpet cleaner. We used this ALL THE TIME when Finnegan first arrived at our home and wasn’t fully potty trained yet, so he was very familiar with how well this tool works. But with spilled paint? He wasn’t sure the rug would be salvageable but this tool worked SO WELL that you can’t even tell the paint was ever there.
I’m a big believer in finding solutions and being prepared to take care of the specific kinds of issues that happen around your house. You know the messes that drive you crazy or happen so often that they make you feel like your house is always a mess? My housekeeping advice is to find a simple solution for each of those problems so you can take care of them quickly and efficiently.
I’ve learned that cleaning the ongoing messes around the house and tidying up has to be a part of the rhythm of my day and I need tools that are convenient to use.
With that said, I don’t buy a lot of gadgets or fancy cleaning tools. I see a lot of speciality cleaning tools promoted on social media promising a solution for every problem. While they can be tempting and I do have a few, I find that less really is more. I really only need a few tools to keep our house clean, so I’ll share those with you.
Here is a list of the cleaning tools that we use regularly in our home and then below I’ll share where we keep them and why they’re convenient.
If you want to feel like your house is clean, focus on the floors! And take care of surface clutter.
On our main floor, we use a robot vacuum. My husband loves it because it can just roam around the house cleaning up the floors while we do other things. It makes cleaning up the daily stuff and dust bunnies so easy. It has a HEPA filter, self empties, and you can even schedule it to go at set times.
We also have an upright vacuum with a hose so you can handle anything that the robot doesn’t do as well with.
The steam cleaner is our solution for quick cleaning of upholstery and rugs. We also prefer furniture with fabrics that are durable and easy to clean.
We avoid harsh chemicals and use Thieves for all kinds of cleaning (including in our steam cleaner).
I also have this spot cleaner which can work miracles as needed, too. We don’t use it as often, but I definitely find that having these solutions on hand and ready to go makes both the every day cleaning easier and prepares us to solve most of the occasional disasters that can happen. I want people and pets to enjoy our home, I know we can clean up just about anything!
This broom and dust pan is our favorite, we have one set in our pantry closet and one upstairs. A quick sweep of the staircase is one of my favorite ways to keep the house feeling clean! Messy stairs are one of my “pet peeves” — with dogs (and a beach nearby) there’s always sand, fluff (and even though our dogs don’t shed) and outdoor elements being tracked in. We loved this particular broom and dust pan so much we got it for our kids for Christmas and now they love it too!
Upstairs I’ve found the easiest and most convenient way for me to keep floors clean is this lightweight vacuum. I love it, I keep it upstairs so it’s really efficient for me to do regular clean ups in the bathroom, bedroom and hallway. It easily takes care of that fluff or hair or sand that ends up on our hardwoods and tidies up rugs so they look fresh again (a quick run through with this vacuum really makes the whole room feel much cleaner!).
Join me in HomeBody Gathering Place! I teach home and self care rhythms that will help you enjoy caring for your home (so it takes better care of you, too.)
[unpaid/affiliate] Well, this will short and sweet but I can’t see anything but good on this MAC offer that gives you £50 of free product with a £60 spend.
If you’re not too busy with Easter plans, take a moment to list out who would like a MacStack Mascara, a Ruby Woo Lipstick or a Glowplay Cushiony Blush (all my favourite MAC things) for their birthdays, stock up early and get a very decent treat for yourself. This gift is a travel bag containing a full sized Glow Play Lip Balm, a sample sized MacStack Mascara (great for travel), a Lip Pencil and a delux Strobe Cream sample. What is not to like here???? Head HERE.
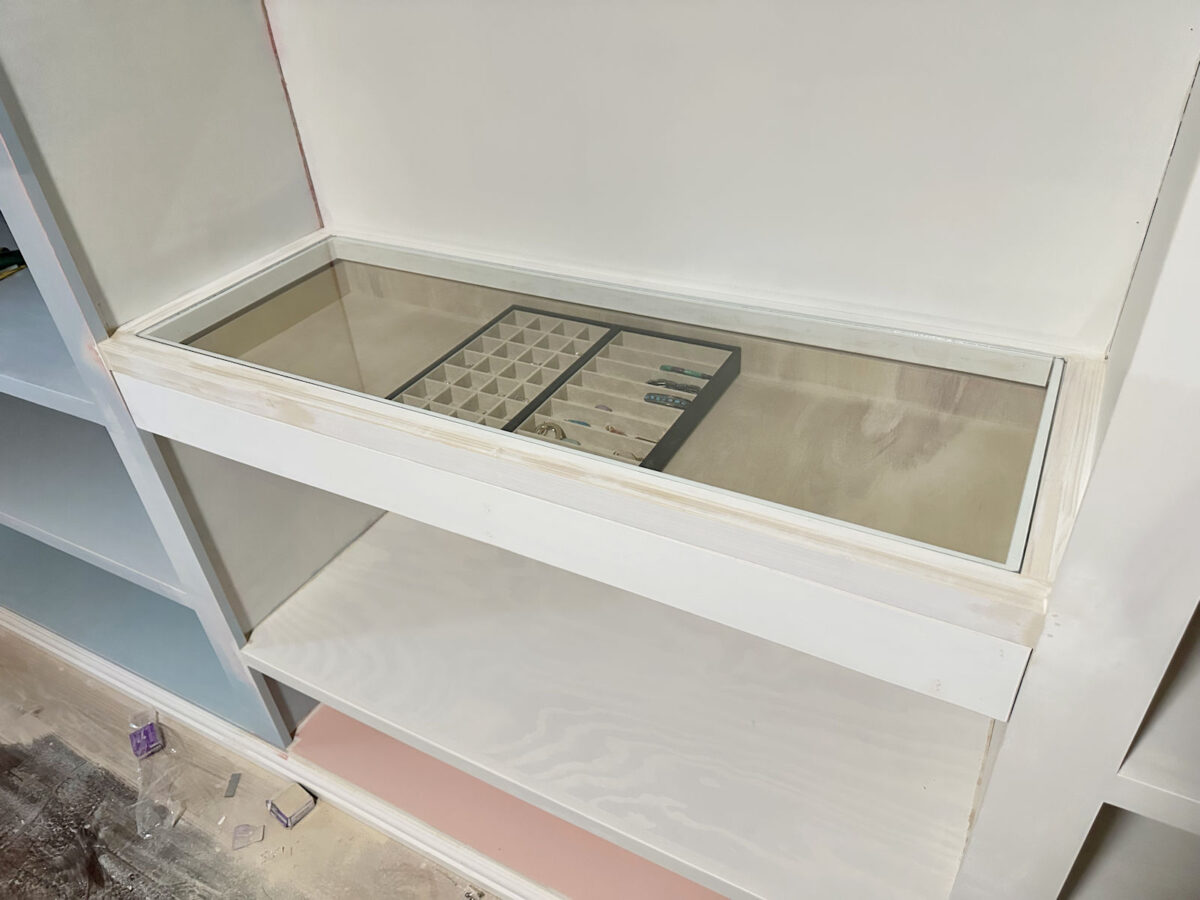
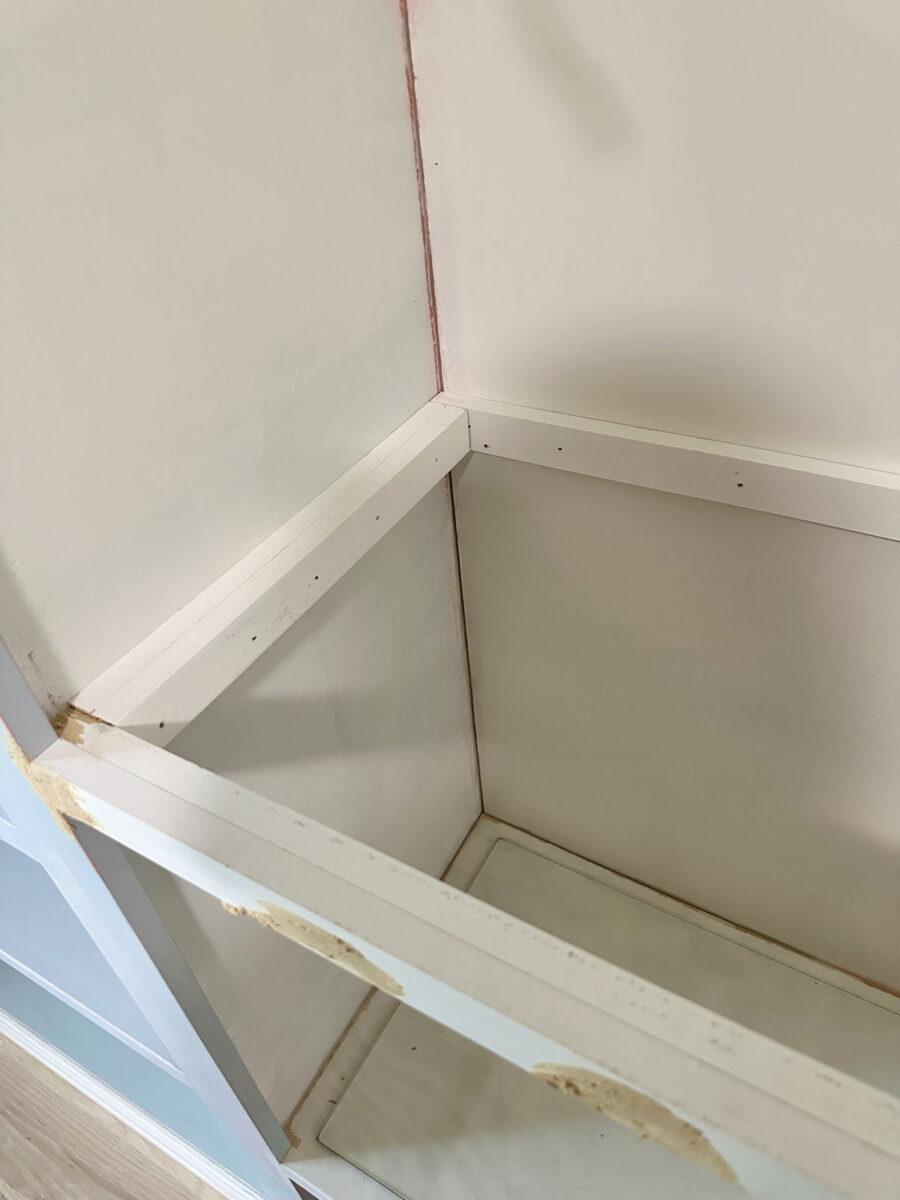
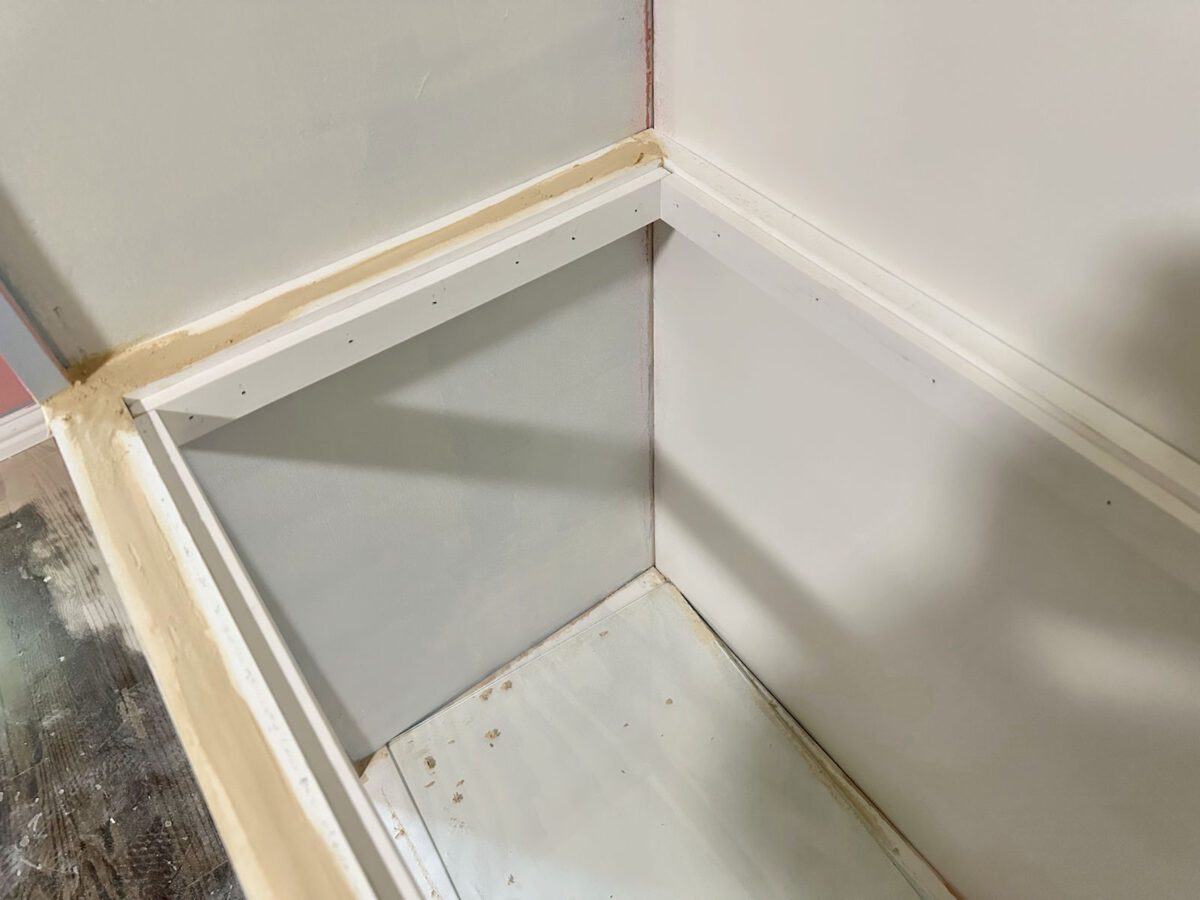
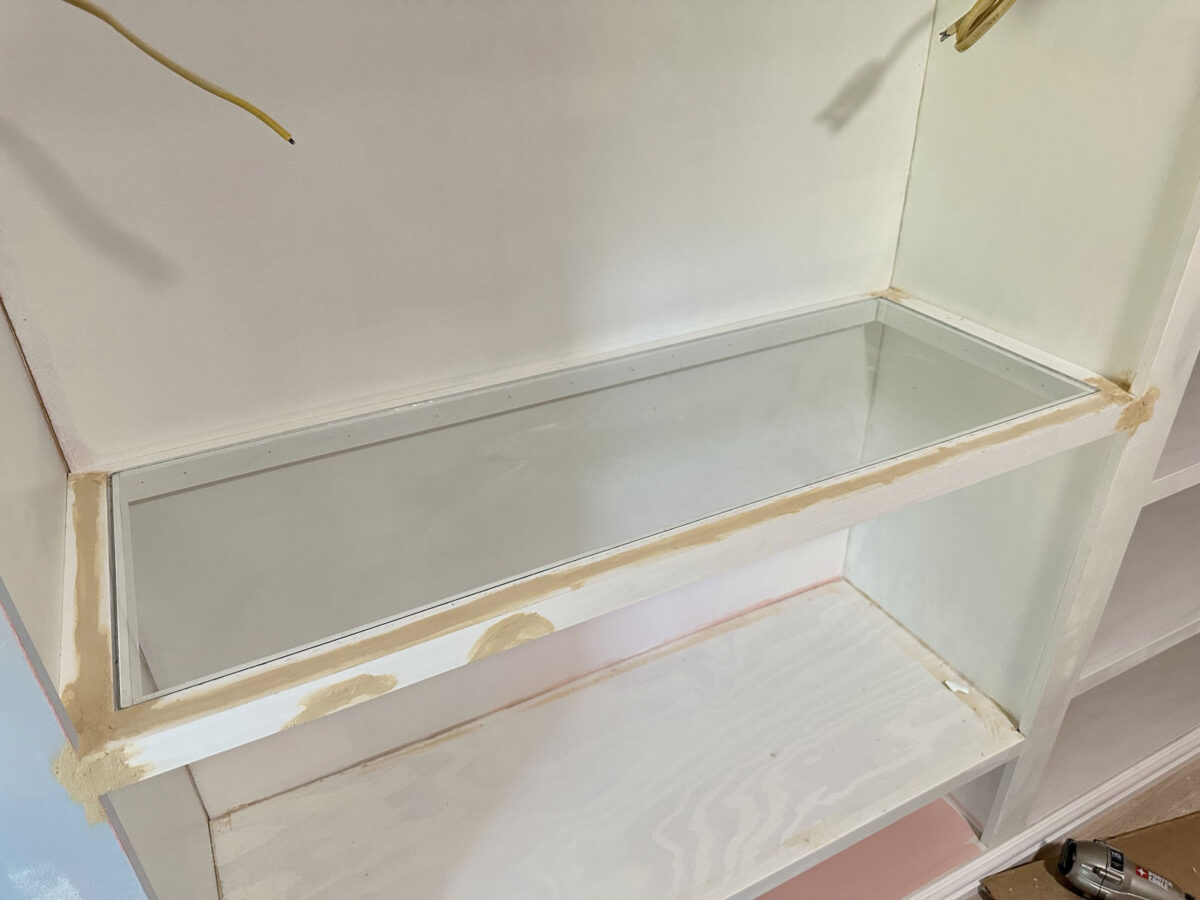
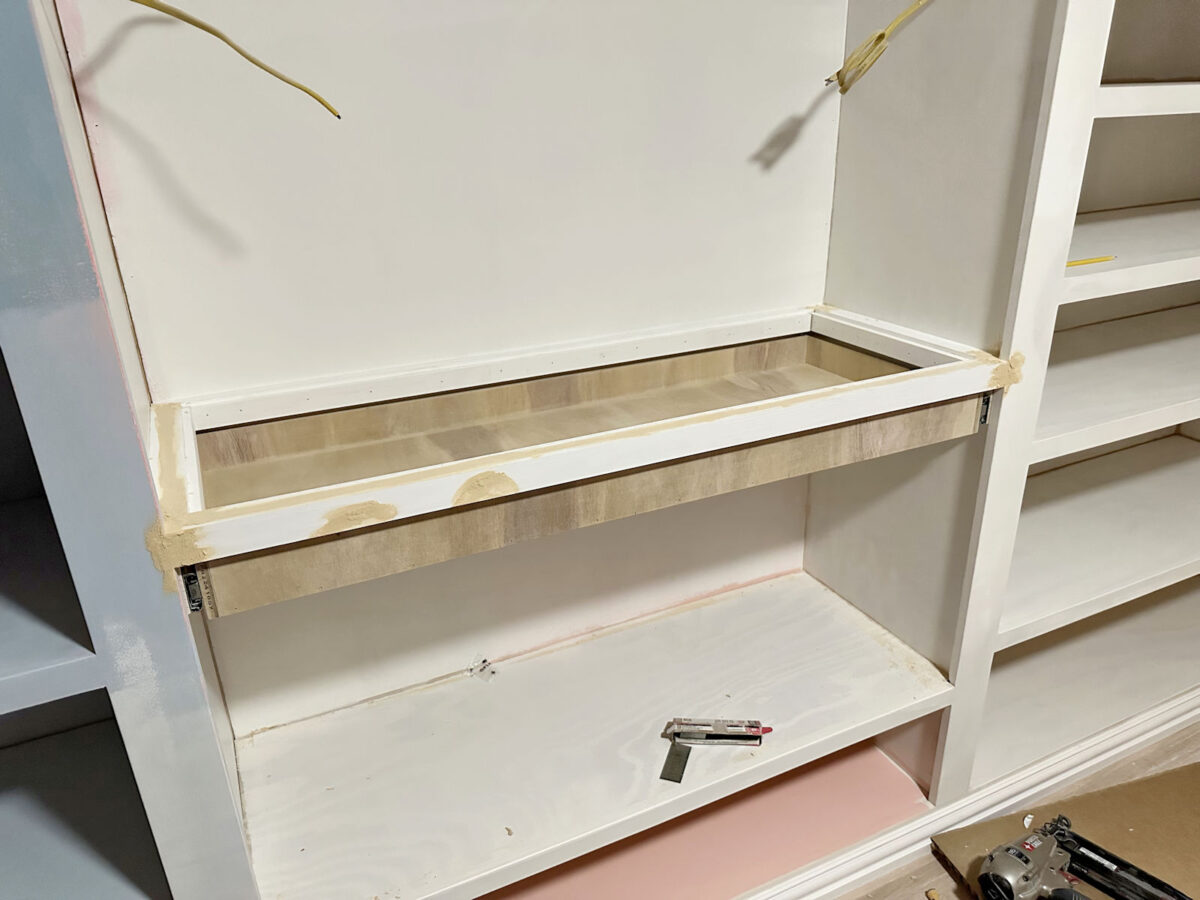
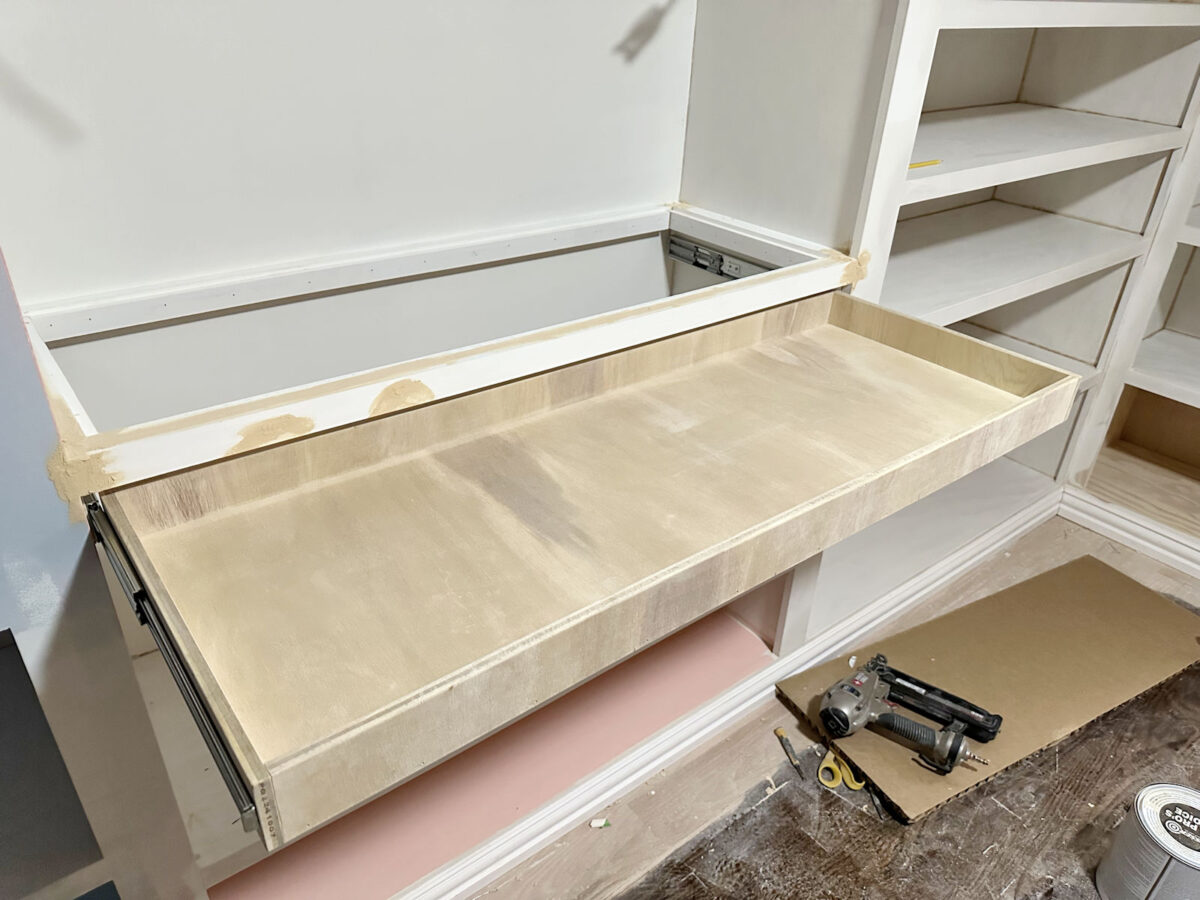
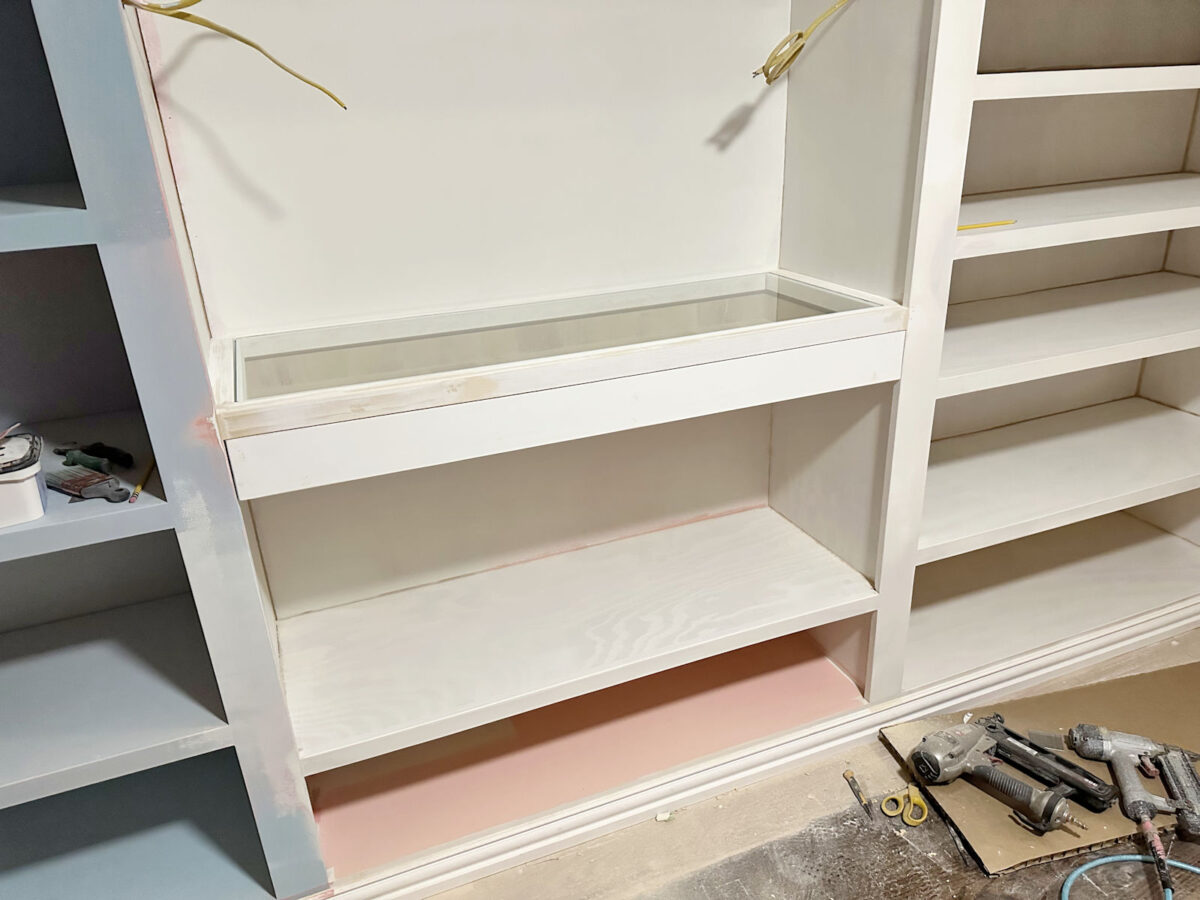
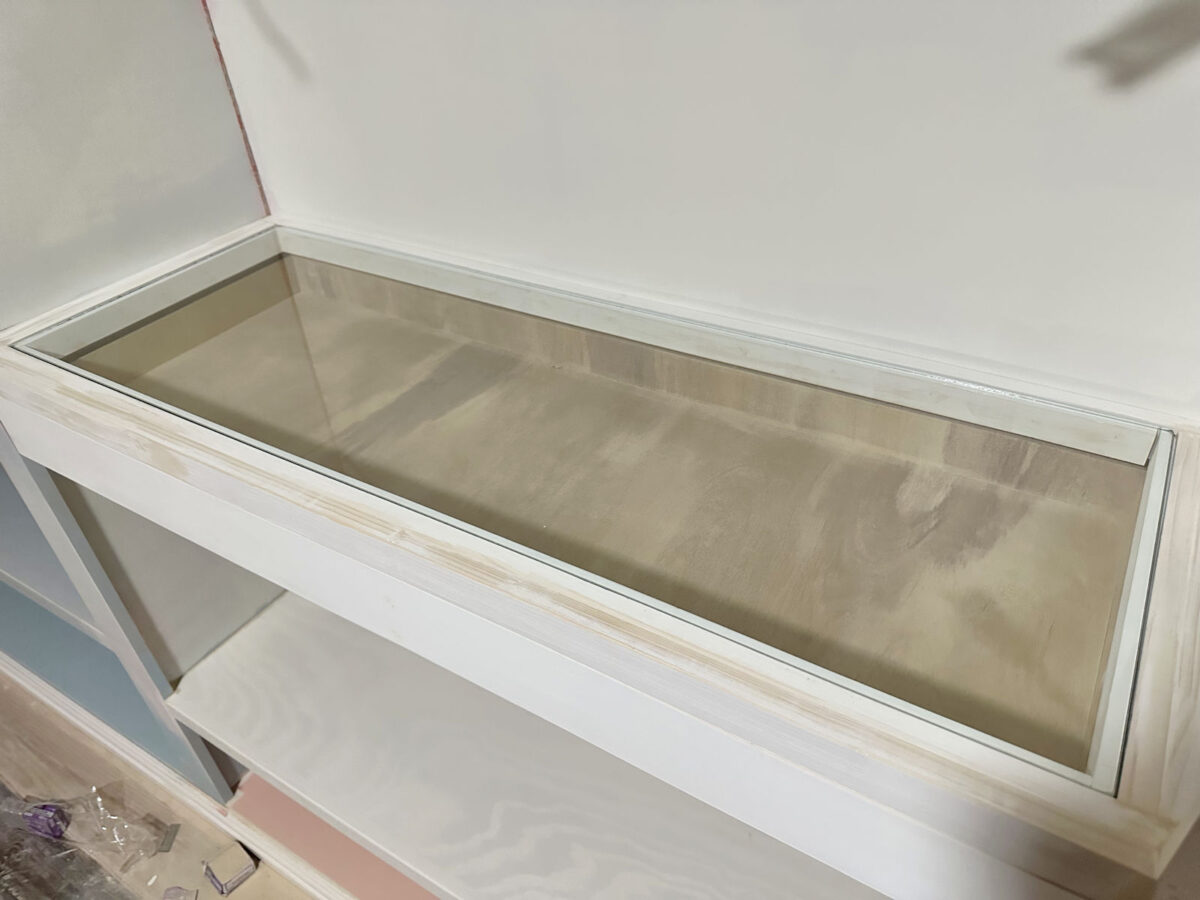
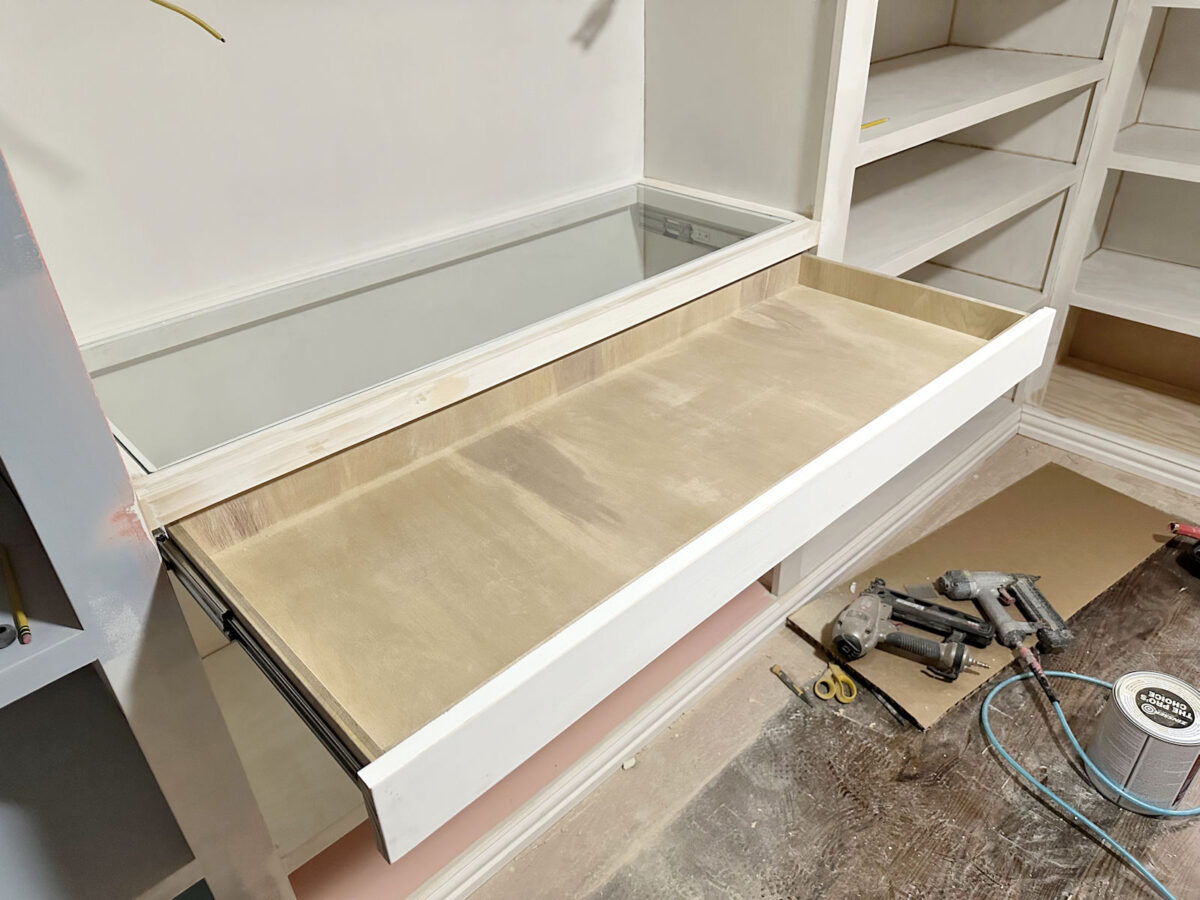
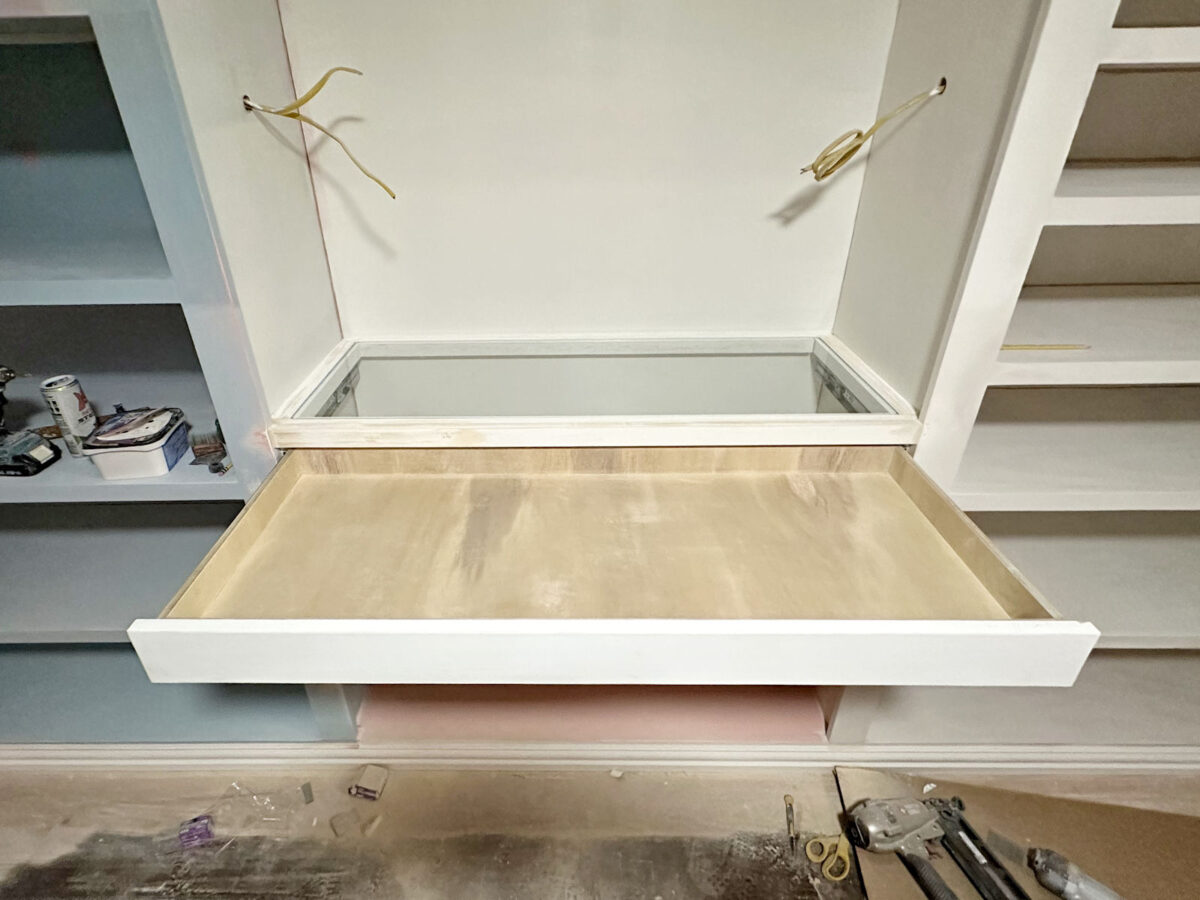
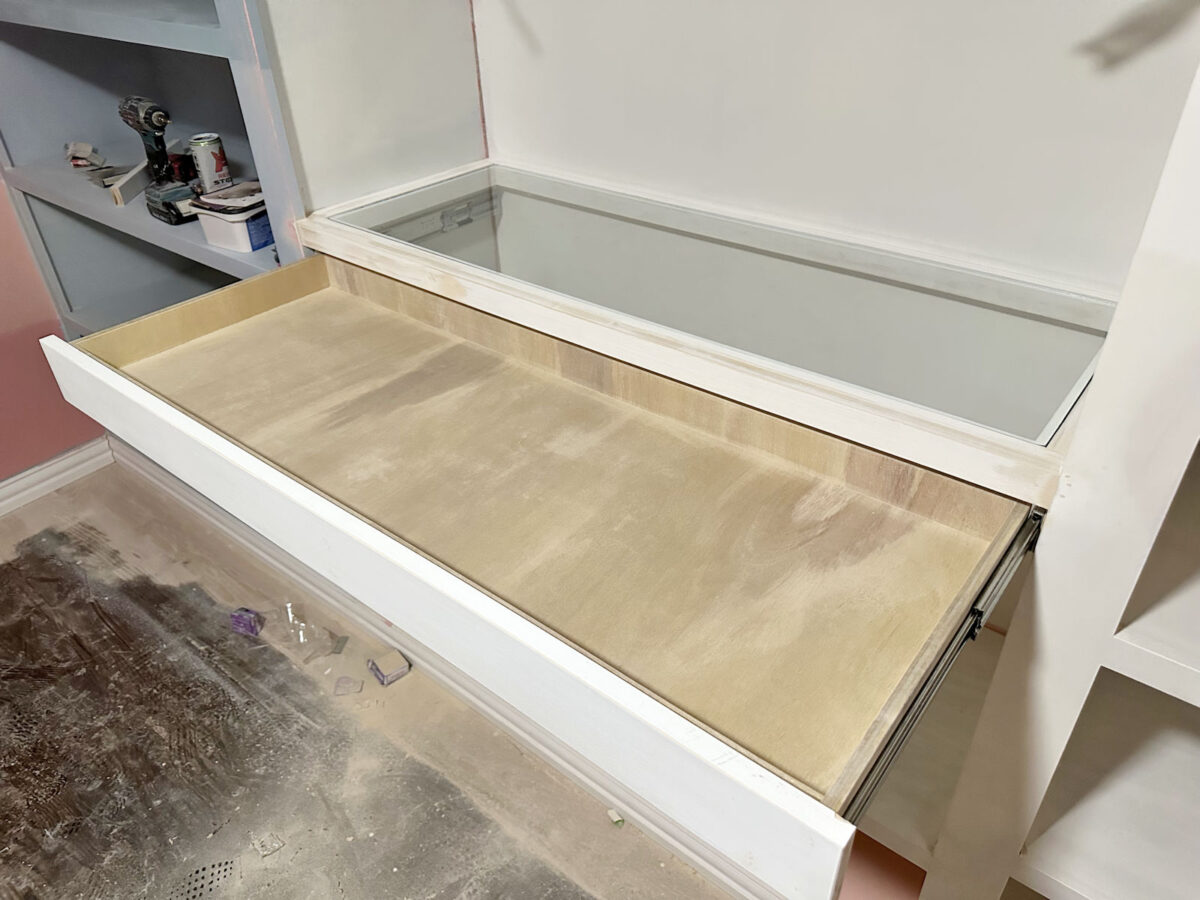
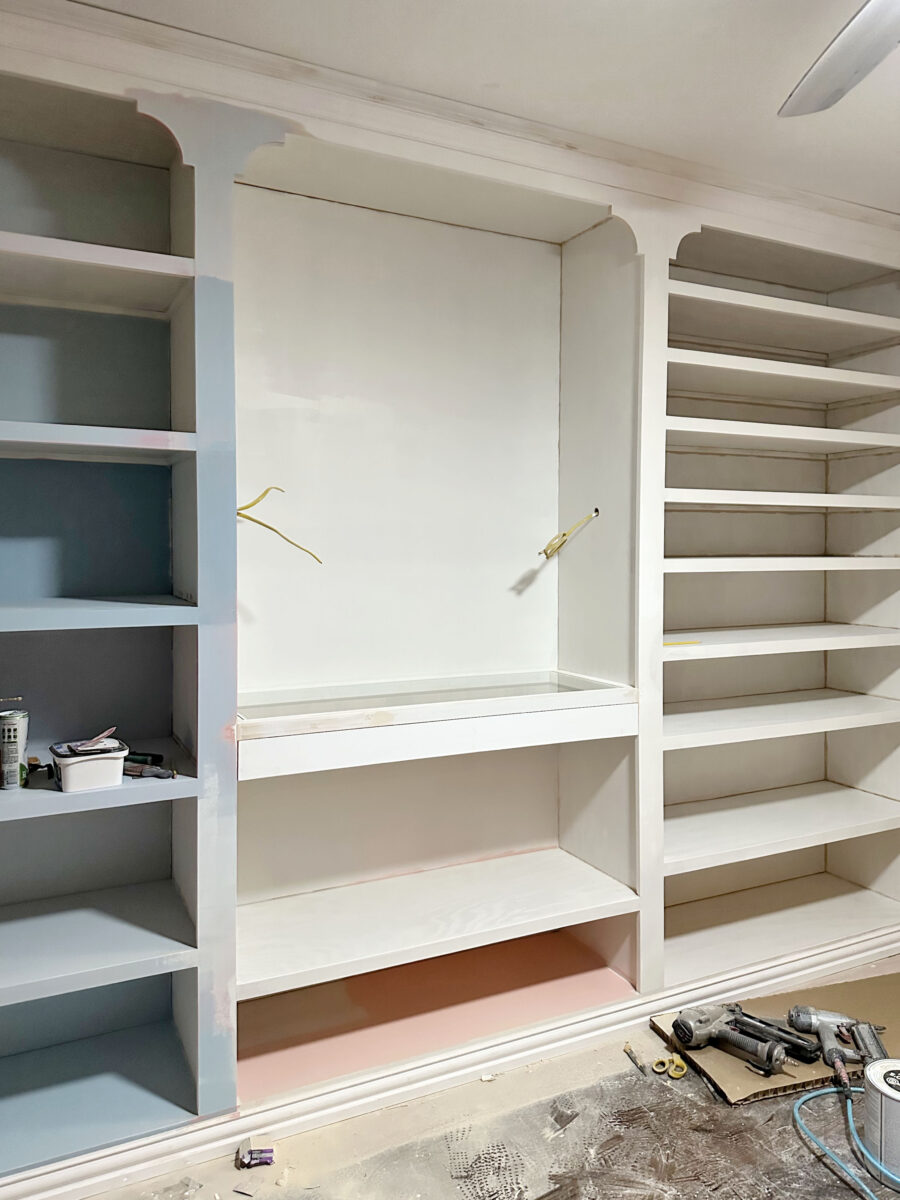
Yesterday, I finished one of the last remaining projects on the perimeter cabinets of my walk-in closet. I built the first part of my DIY jewelry organizer — the jewelry drawer with the glass top. This drawer is specifically for earrings, rings, bracelets, pendants, etc. I haven’t yet added the individual compartments to the drawer, so I put a couple of my current jewelry organizers in the drawer so we could get an idea of how it will look. And of course, it still needs to be primed, caulked, and painted, along with the rest of the cabinets.
So with that in mind, here’s how the whole setup looks right now.
When I finished building the drawer last night, I wasn’t sure if I wanted to add trim to the front. But this morning, I decided that I’ll probably add this tiny trim to the drawer just to give it a little something extra.
And I also haven’t picked out drawer and cabinet hardware for the room, so once I pick that out, I’ll add two pulls or two knobs to the drawer. I can’t decide if I want to use something really special, or if I want to keep it simple with the drawer and door pulls. I’m still looking.
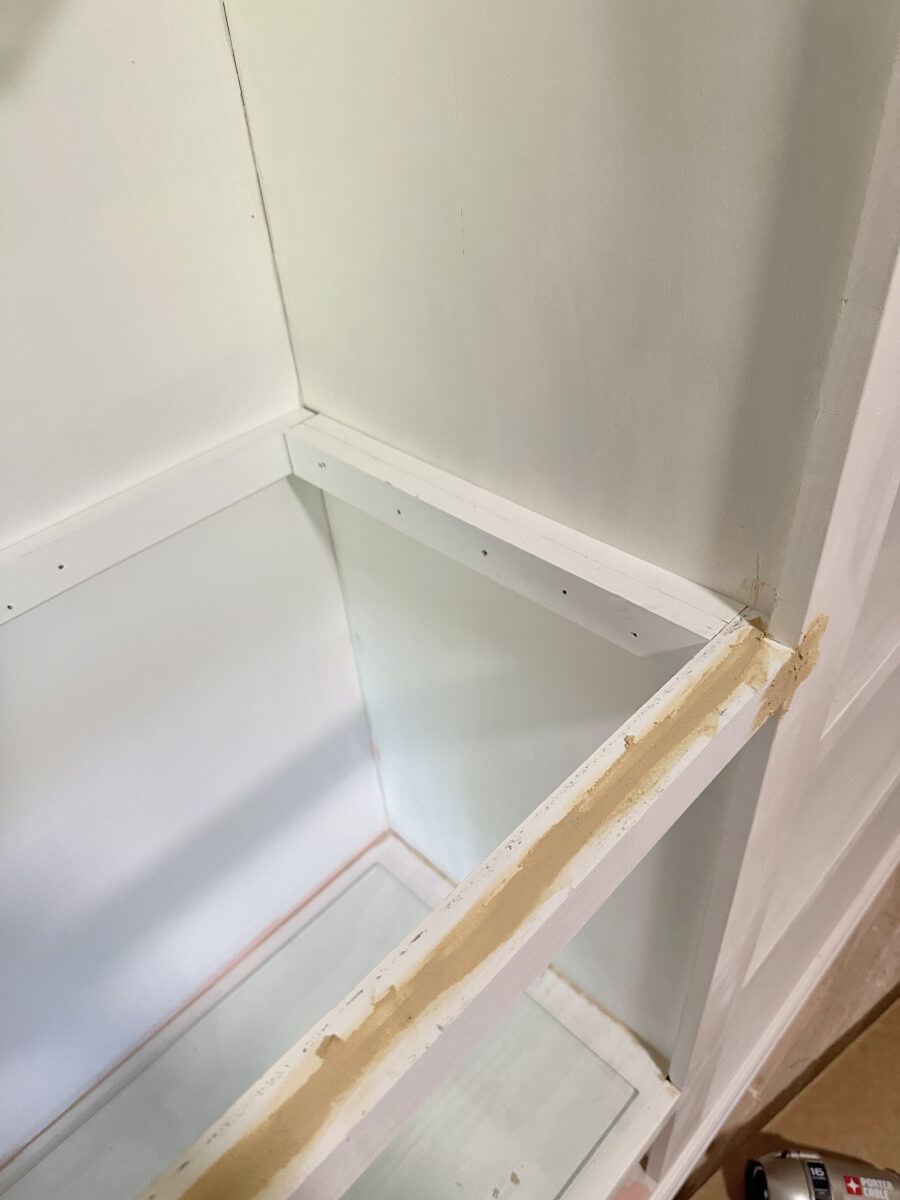
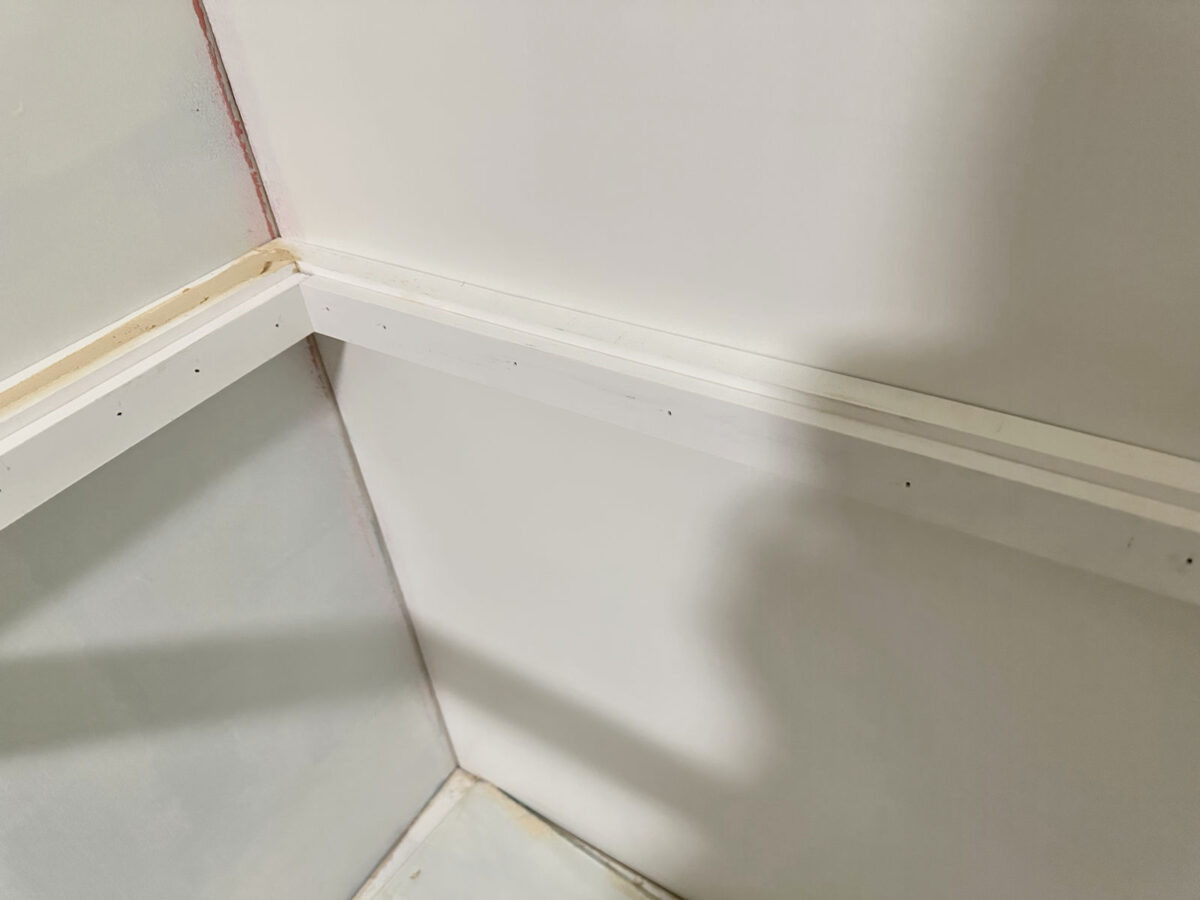
So let me show you how I built this jewelry organizer. I started by determining the height of the glass shelf, and I cut and nailed a 1″x2″ just behind the cabinet trim in that cabinet.
And then using more 1″x2″ lumber, I continued adding the frame around the sides and the back of the cabinets. To construct the entire frame, I used two layers of 1″x2″ lumber on the front, two layers of 1″x2″ lumber on each side, and just one 1″x2″ on the back of the cabinet. I nailed all of these in place using 16-gauge nails in my nail gun. And you can see that the second 1″x2″ piece on the front of the frame sat flush with the front trim on the cabinet.
I got a little ahead of myself and started adding wood filler before I took the pictures, but you can still see the general construction.
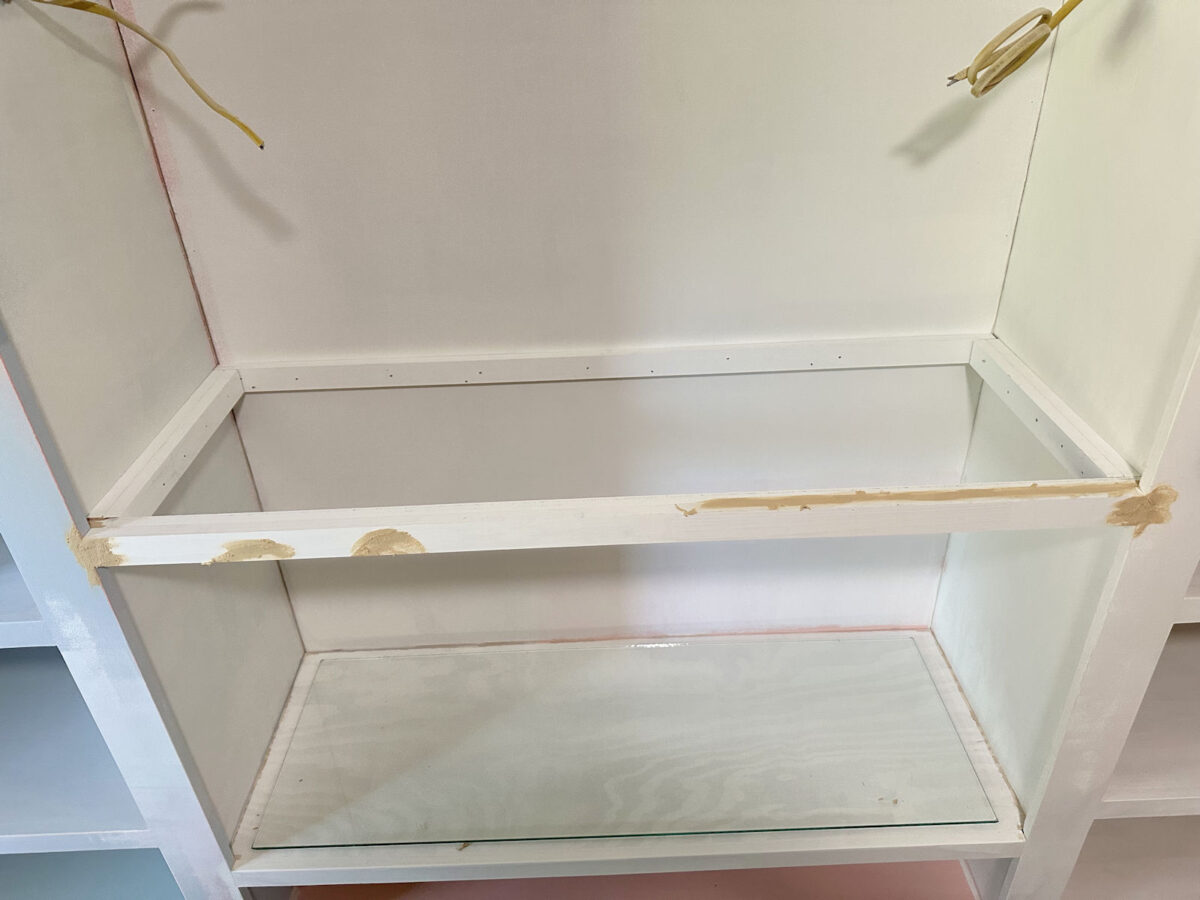
With that basic frame in place, here’s how it looked inside the cabinet. The opening inside that frame is the exact size of the glass that I ordered, plus about 1/8-inch in each direction so that I’d have 1/16-inch wiggle room on all four sides of the glass…
And then I needed to add the support for the glass. For this, I used my table saw to rip pieces of 1″x2″ lumber (which are actually 1.5 inches wide and not 2 inches wide) so that they were 1.25″ wide and 1/2″ thick. I cut those with my miter saw to the correct lengths to fit inside that frame, and then I attached them so that the bottom edges of those pieces were flush with the bottom edges of the frame pieces, leaving a 1/4-inch rabbet on top to support my 1/4-inch tempered glass.
Again, I got a little ahead of myself with the wood filler, but I think you can still see the overall construction. So again, on the front and sides, I had two layers of 1″x2″ lumber (which are actually 1.5 inches wide), and just inside those I attached one layer of strips ripped to 1.25″ x .5″.
Once that frame with the rabbet was built, I tested the fit of the glass. It was perfect!
After testing the fit of the glass, I removed it for safe storage and built the drawer, which I made out of 1/2-inch plywood.
I didn’t take pictures of the process for building the drawer simply because I’ve built so many drawers in the past that you can refer back to if you need that info.
Before building the drawer, I installed the drawer slides. To make sure that my drawer slides would clear the side trim on the cabinets, I first attached pieces of 1″x3″ lumber (which is actually 3/4″ x 2.5″) behind the front cabinet trim just below the glass countertop frame, nailed in place using 16-guage nails, and then I installed the drawer slides on top of those 1″x3″ pieces. Then I measured the distance between the drawer slides (that distance for this drawer was 42 5/8″), and I built my drawer to fit that width. So the outside dimensions of the finished drawer box is 42 5/8″ x 16″.
And finally, I cut a piece of 1″x4″ (actual size is 3/4″ x 3.5″) pre-primed lumber to use as the drawer front, and I attached it to the front of the drawer box, first tacking it into place using 18-gauge nails, and then screwing it to the drawer front using 1″ wood screws that are screwed through the inside of the drawer box and into the back of the drawer front to secure it into place.
And with that, the basic build of my jewelry drawer with the glass countertop was finished!
I’m so proud of how this turned out. I have to admit that I was nervous about this project because I’ve never built anything like this before, and I knew it had to be just right so that it didn’t look like an obvious DIY project. But it turned out exactly as I envisioned it.
And, of course, it’ll look even better once everything is caulked and painted. I haven’t decided exactly how I want to finish the inside of the drawer yet. I know that most custom jewelry drawers are lined with velvet or something fancy like that, but I really don’t have the patience or the desire to spend days of my time covering tiny pieces of wood to create small velvet-lined compartments. It’s just not that important to me. So I’ve considered just lining the bottom of the drawer with velvet or velveteen or something like that (if I can even find a good coordinating color) and then painting the wood that makes up the small compartments in the same color.
Or I could just paint the whole thing and forgo the fancy velvet altogether. If I paint it the whole thing, I thought it might be fun to paint it one of the corals that I tested out for the cabinets just to add a touch of a coordinating color to this area. After all, the section of cabinet just above this glass-top countertop will be wallpapered, so it might look great to bring that coral color in with this drawer.
I’m so excited about how this turned out. This project was actually so much easier than I thought it would be.
But I do think I need to add some trim to the drawer front just to make it obvious that it’s a drawer. Of course, adding drawer pulls will also make it obvious that it’s a drawer.
And now the final thing that I need to build is the necklace storage that will go in the open section just below the jewelry drawer. I’m still trying to work out the details of that. I think I almost have it, but I’m not quite there yet.
And I also need to figure out the details of how I want to finish the inside of this drawer — how many compartments, how many of each size, what color/finish, etc. But the hardest part is done.
The A2D Daily:
Addicted 2 Decorating is where I share my DIY and decorating journey as I remodel and decorate the 1948 fixer upper that my husband, Matt, and I bought in 2013. Matt has M.S. and is unable to do physical work, so I do the majority of the work on the house by myself. You can learn more about me here.
With 28 goals in all competitions this season, his Barcelona team top of LaLiga, powering past Borussia Dortmund in the Champions League and with a Copa del Rey final to look forward to, Raphinha is eyeing a treble – and is the favourite for the Ballon d’Or.
His goal and two assists against Dortmund in the first leg of that quarter-final took Raphinha to 19 goal contributions in the competition in this campaign – matching Lionel’s Messi best effort. It is an astonishing transformation for the 28-year-old Brazilian.
After two relatively underwhelming seasons, he was linked with a move to Saudi Arabia. But something has clicked. With Robert Lewandowski creating space and Lamine Yamal picking him out, Raphinha has been the willing runner, finding joy from the left.
Image: Raphinha stands alone as the top scorer in the Champions League this season
Datawrapper
This content is provided by Datawrapper, which may be using cookies and other technologies.
To show you this content, we need your permission to use cookies.
You can use the buttons below to amend your preferences to enable Datawrapper cookies or to allow those cookies just once.
You can change your settings at any time via the Privacy Options.
Unfortunately we have been unable to verify if you have consented to Datawrapper cookies.
To view this content you can use the button below to allow Datawrapper cookies for this session only.
His Barcelona blossoming has been one of the stories of the season, all the more remarkable in this era of precocious talents who arrive on the scene seemingly fully formed. Peruse that list of Ballon d’Or candidates and most of the others were teenage sensations.
Raphinha’s own route to the top has been less linear. Consider, for example, that it was only three years ago that he was there celebrating with the Leeds supporters in the away end at Brentford having helped the club to escape relegation under Jesse Marsch.
Image: Raphinha celebrates with the Leeds United supporters at Brentford
The story of how he became a Premier League player is serendipitous in itself. In 2020, Marcelo Bielsa, the then Leeds boss, was not even scouting Raphinha when he was shown the video of a game between Nice and Rennes. He was looking for a new left-back.
“That was a little bit of a problem position for us,” Andres Clavijo tells Sky Sports. You may remember Clavijo as Bielsa’s translator but in truth his role was much broader than that, working as an analyst for the coach, with a particular specialism in French football.
Image: Raphinha impressed Marcelo Bielsa during his season with Rennes in France
“I did a video of Nice versus Rennes and Raphinha absolutely tore the Nice left-back to shreds. Marcelo saw it and said to me, ‘Who is this player?’ I said, ‘That is Raphinha, he has had an unbelievable season, helping Rennes to qualify for the Champions League.’
“I remember saying to him, ‘He is probably way out of our budget because I am sure they will not let him go for anything less than £30m after the season he has had.’ They had just bought him from Sporting the season before for around £20m.
“But I think Marcelo then contacted [director of football] Victor [Orta]. Victor reached out to Rennes and they said it was impossible but it came about in the last couple of days of the window. It was crazy that we pulled that off. We could not believe our luck.”
Image: Marcelo Bielsa and Raphinha in conversation during their time at Leeds United
Raphinha was a revelation at Leeds, adapting quickly to life in the Premier League – and, crucially, life under Bielsa. “He is by far the best player that I have had the pleasure of being around. He is crazy talented but his work ethic is unbelievable,” says Clavijo.
“From the first day, he was just incredible in training. If you talk to any of the boys that were there at the time, they will tell you how good he was in training. He was just on a different level to everybody else. But the work rate is really what surprised everybody.
“His physical numbers were out of this world. It was just incredible.” Indeed, during his debut season as a Premier League player, his only full season under Bielsa, Raphinha made 715 sprints, the most by any winger that year, despite missing eight matches.
Factor in all positions and Raphinha made over 10 per cent more sprints than any other Premier League regular that season, one that was played without supporters inside the stadium. His motivation was intrinsic, albeit with a little encouragement from his coach.
“That is why he blended in so well with the way Marcelo wanted to play. If you look through Marcelo’s teams, if you don’t work then you are not really going to play. He had that work rate in abundance and also the ability that no other player on that team had.”
Image: Raphinha made the most sprints per 90 minutes of any player in the Premier League
Clavijo describes it as “absolutely crazy” to think that he was working with a future Ballon d’Or candidate at newly-promoted Leeds, but maybe he should have checked in with Diogo Fernandes, the coach at Avai, the Brazilian club where Raphinha started out.
Speaking to Fernandes when Raphinha was still at Leeds, his prediction for the player’s rise now appears prophetic. “I always told people he was the best I had worked with. I said that he would go on to play for Barcelona or another of the top clubs in Europe.”
Fernandes tells some great tales of the young Raphinha. He would often catch the ball during training when a pass to him had been overhit. “In order to prevent it from running away too far and having to go and fetch it because our training ground was very open.”
Not a problem until he repeated it during a game against Inter in the Copa Rio Grande do Sul. Raphinha had already been booked. “He automatically just reached out with his hand to stop it. Of course, they gave him a second yellow card and he was sent off.”
Then, there was the time that he was incensed because a bookable offence had been committed not by him but by a team-mate and began remonstrating with the referee. A little awkward when his team-mate was already on a yellow card and he was not.
That might just resonate with Barcelona supporters who witnessed Raphinha lunge at the ball on the line to nick a goal from Pau Cubarsi in that 4-0 win over Borussia Dortmund in the Champions League quarter-final first leg. Let’s call it ruthless singlemindedness.
“He was extremely competitive, explosive even. He always wanted to be the best. He was destined to reach the highest echelons of football because of his qualities, his dribbling ability, his intelligence, and his finishing. He was almost complete.”
Image: Raphinha made the move to Europe to play for Vitoria Guimaraes in Portugal
Almost complete, insists Fernandes. But when Raphinha arrived in Europe it was not to join one of the continent’s super clubs. He moved to Vitoria Guimaraes in Portugal and found himself in the B team coached by Vitor Campelos – with plenty still left to learn.
“He arrived from Brazil and he played his own way,” Campelos tells Sky Sports. “Football is different there, not so tactically developed. We started to show him where he must be as a winger.” A lot of work went into it but throughout it all Raphinha was eager to improve.
“He always wanted to learn more. Always he would ask me, ‘What do you think about this? Okay, so if the ball is there, where must I be now?’ I was a little stubborn with him about the positioning of the body and the positioning of the feet to receive the ball.”
In this context, Raphinha’s continued evolution as a player is a little less surprising. Fuse talent with an unquenchable appetite and big things can happen. “One good thing that he had was a big commitment to the team and the other players,” says Campelos.
“We saw that immediately when he started working with us. Those small details, even when we were doing some simple passing exercises in training, he always tried to do them at the maximum intensity, in the right way, because he is a worker, a professional.
“I remember sometimes his father watched training. We felt that he wanted to be something in football. He wanted to be someone and wanted to reach a high level. So he had this in his head from the start. He wanted to play in big teams, to play for Brazil.”
That was a still a long way off in 2016 when Raphinha was just a teenager, but for all the details that Campelos worked to instil in him, there was a key aspect of his game already in place. The finishing ability that is obvious now, was a strength back then too.
“From the start, his shooting accuracy was very strong when one against one with the goalkeeper. It was unusual. He would score maybe nine out of 10.” Helpfully, in LaLiga this season, Raphinha has had more than twice as many one-on-ones as anyone else.
Datawrapper
This content is provided by Datawrapper, which may be using cookies and other technologies.
To show you this content, we need your permission to use cookies.
You can use the buttons below to amend your preferences to enable Datawrapper cookies or to allow those cookies just once.
You can change your settings at any time via the Privacy Options.
Unfortunately we have been unable to verify if you have consented to Datawrapper cookies.
To view this content you can use the button below to allow Datawrapper cookies for this session only.
If Campelos honed the talent, Pedro Martins unleashed it. He was the head coach who gave Raphinha his senior debut in European club football with Vitoria. “When he was in the second team, he was starting our pre-season and I said, ‘You will stay with me.'”
Speaking to Martins about his former player, it is clear that he did not want to stifle him too much. “Raphinha was different. These kind of players, they change the game totally because they do things differently. Sometimes it can create chaos in the game.”
The experienced Portuguese coach continued: “His game, it will always be anarchic, but you need that bit of anarchy in a team. This kind of fire you cannot put out. It is a better to play a little bit more for the team, but we cannot take this out of them.
“His commitment was amazing. He was fighting to win balls, not just waiting for it, really showing solidarity with the other players. He has a big heart. My question was whether he would improve and develop his game for the team or remain this anarchic player.”
Martins talks of being “sure we could sell him to one of the big Portuguese clubs” and that is what happened, Raphinha moving on to Sporting after two seasons in the Vitoria starting line-up. From there came the move to Rennes, an important step for him.
“I think France was very good for his game understanding. And now at Barcelona, you need to adapt to their philosophy because if you do not adapt then you cannot play there. So he has adapted and I understand he is more mature and playing for the team.”
Datawrapper
This content is provided by Datawrapper, which may be using cookies and other technologies.
To show you this content, we need your permission to use cookies.
You can use the buttons below to amend your preferences to enable Datawrapper cookies or to allow those cookies just once.
You can change your settings at any time via the Privacy Options.
Unfortunately we have been unable to verify if you have consented to Datawrapper cookies.
To view this content you can use the button below to allow Datawrapper cookies for this session only.
Raphinha’s numbers for Barcelona this season highlight this spectacularly. Yes, he took that goal from Cubarsi against Dortmund, but while he is the Champions League top scorer, he actually ranks higher for assists than goals in LaLiga this season.
Indeed, Raphinha has created more chances from open play in the competition than anyone else. Decisive in possession but determined without it, he has become an all-round player at Barcelona. “He is 28 now so he is more mature,” notes Campelos.
What is fascinating is that it took until the third season at the club for him to truly flourish. Not everyone is afforded so much time at Barcelona. The reason for his transformation is partly due to a change of role that plays to Raphinha’s strengths.
Image: Raphinha has changed his position for Barcelona this season and is flourishing
“He can play in any of the [forward] positions,” says Campelos. But Raphinha was restricted to the right for much of his first two years in Catalonia. Now playing from the left, while being encouraged to make central runs in behind, he is a different animal.
From the left, he can both score and create. The result is that as well as supplying his striker, he has already scored as many goals in LaLiga this season as his first two seasons combined. Clavijo, the man whose video helped set him on this path, is not shocked.
“The fact that he is playing on the left, it is not a real surprise. He did not do it too much at Leeds, but when he was at Rennes, he played on that side quite often. Even in training at Leeds, you could just see that he was so good, he could play absolutely anywhere.”
Image: Shot map of Raphinha for Barcelona in this season’s Champions League
Clavijo adds: “I had no doubt that he would come good. The move was obviously a very big step up with the expectation and pressure. But I knew that once he got going, once he settled and could relax and be himself, he would prove to be a very, shrewd signing.”
Martins talks of his pride in Raphinha now, while Campelos takes pleasure in the potential being realised. “He is a hard worker so I thought he could achieve a high level but I never imagined that he could be the captain of Barcelona,” says his old coach.
In fact, Raphinha is one of five captains at Barca, part of the leadership group at the club, not necessarily wearing the armband but significant nevertheless – Lewandowski, for example, is not among the five. It is another reason for his growth this season.
Growth that could yet culminate in the Ballon d’Or.