In this blog, we discuss the reasons why you should pursue a career in accounting and the steps you need to take to become an experienced accountant.
Despite its abundance of opportunities, best aat accounting training can appear to be a challenging field to enter. How much time does it take to become an accountant? And when you become one, what advantages can you anticipate?
This blog looks at the reasons why you should think about becoming an accountant and the steps you need to take to get there.
Choose Your Path Before
beginning your search for a career in accounting, you should decide which level of education is best for you. There are many options, with ACCA and CIMA being two of the most well-known.
The ACCA is widely recognized. It is one of the world’s largest and fastest-growing accounting degrees. If you think you might like to work in a variety of roles, the ACCA certification is a great option.
The ACCA qualification can help you get work in public or private accounting. Alternately, you could start your own accounting firm.
People who want to work as management accountants will do best with the CIMA certification. In particular, pursuing a CIMA certification might be your best option if you want to work for a company.
Know Your Exemptions
The ACCA and CIMA want to give you credit for your previous knowledge and abilities. By allowing you to skip portions of the exams, knowing if you are eligible for exemptions and which ones to look for will help you study more efficiently.
As a result, you will be able to begin your job search and obtain certification more quickly.
Exemptions from the ACCA : The ACCA may grant exemptions to nine Applied Knowledge and Applied Skills exams and Foundation level qualifications. Unfortunately, you will not be eligible for a work-related exemption.
Before claiming an exemption, you should carefully consider your eligibility. After all, the information you acquire through study can assist you in passing the more difficult tests that lie ahead of you.
It might be in your best interest to study for that portion of the test regardless of whether you qualify for an exemption or not.
CIMA Exemptions : You may be exempt from taking the CIMA exams if you have a degree or other qualifications. You can look through a database on their website to see if you qualify.
The majority of qualifications are based on your degree. However, if you are a member of ICMAP or possess another relevant qualification, you may also be eligible for an exemption.
Studying online can help you pass your professional accounting exams. Let’s collaborate to get you qualified quickly!
Select a Program
Prior to beginning your exam preparation, you will need to select a program. You will have a lot of choices, whether you want an online program or a traditional learning environment.
Think about how adaptable your learning needs to be. An online study program might be best for you if you need to study on your own time or have an unpredictable schedule. However, you can benefit from live discussions and social interactions if you are able to attend class on time.
Garden rooms, wooden conservatories, and orangeries; Each of these three distinct kinds of extensions has its own unique characteristics. We’ve made it easy with our expert guide because we know that knowing which one is right for your home can be difficult.
We are frequently asked to explain the distinction between an orangery and a conservatory. By creating a bright and airy interior and establishing a coherent connection between your house and your garden, a glazed extension instantly transforms the space you live in and brings the outside inside.
However, what distinguishes an orangery from a garden room and what distinguishes a conservatory from an orangery? How can you determine which is best for your house? Basically they can be in every way classed as ‘garden room augmentations’, yet they are at last characterized by the extents of coating, lumber, and workmanship materials utilized in the building plan.
Let’s go over the various kinds of extensions in greater detail: what exactly is a conservatory
During the 1980s, conservatories were a very common type of glazed extension. They are usually made of uPVC and rattan furniture, and their walls and roof are usually made of glass and set on a brick foundation. The idea of easily adding more space to their homes, which could be used as a bright, spacious formal lounge or dining room with close-up views of their gardens, was welcomed by homeowners.
A conservatory’s extensive space can be filled with as much natural light as possible because it is mostly made of glass. Unfortunately, traditional conservatories have developed a bad reputation for being cold in the winter and hot and stuffy in the summer.
Additionally, the uPVC had a propensity to age and turn yellow; not exactly an appealing appearance. Conservatories started to go out of style as people realized that their expensive investments could only be used for half the year when the weather was nice.
This is regrettable because a high-quality conservatory made of wood can be a beautiful addition to any home. Underfloor heating, solar control glazing, and roof vents that help to improve circulation, as well as solar control glazing that limits the amount of heat coming in from the sun, are all solutions to the common temperature issues.
What is an orangery or orangerie
Orangeries were a symbol of wealth and prestige among the elite in the 17th century. Traditionally, orangeries were used to shield imported citrus plants from the harsh British winters. With their elegant architectural lines and timeless style, the aristocracy thought these beautiful rooms gave their mansions a sense of splendor and opulence.
Since the conservatory has become less popular, more and more people are choosing modern garden rooms and orangeries with timber frames. A garden room or orangery extension is still the pinnacle of luxury and exudes an air of opulent elegance because it combines perfectly balanced design with flawless functionality.
No matter how many times you’ve moved, there are always challenges to overcome. With experience, it might become easier to manage, but there are many obstacles to overcome. Which plastic storage boxes storage unit to rent, which size moving truck to buy, how many cartons or containers to buy, and how to pack fragile items are just a few examples.
We will concentrate on one aspect: how to select the appropriate size of moving truck. The truck must be packed correctly to avoid damage and accidents. If you choose a truck that is either too big or too small, you could run into a lot of problems. It might put everything you packed inside in danger.
The right-sized truck will make your move easier on your budget and more accessible if you consider its proper functionality. A larger truck is more expensive to rent than a smaller one, so you should also think about your budget. Read on for all the information you need to choose the right size truck for your move.
Bedroom Count Technique
The bedroom count technique is one of the most common methods for determining the appropriate moving truck size. A chart that you can use to see how many bedrooms a moving truck can hold is provided by many moving and storage companies that offer moving services. It’s a fairly simple method!
When deciding where to start, these size estimation charts are helpful. Be that as it may, they are vague assessments, not altogether exact. Some bedrooms are larger and can hold the same amount of furniture and other items as two or three smaller bedrooms.
Additionally, there are a lot of rooms in homes that don’t fit into standard room sizes, such as studios, sitting rooms, work offices, storage rooms, mud closets, and studios. They might not be the right size for the chart, but you can get a general idea of how many people each room can hold. Using the bedroom count method, count the final number of bedrooms to easily select the appropriate moving truck size for your needs.
Determine the Truck’s Cubic Feet
Each moving truck is made to carry a certain number of items, which are typically measured in cubic feet. The dimensions of the vehicle’s interior range from the roof’s size to the total area of the floor. You can stack and distribute all of your boxes evenly, according to their weight and length, to make good use of it.
However, you might need the entire floor as opposed to the length from the floor of the truck to the ceiling, which might be more practical for you. One way or the other, except if you are moving and pressing specialists, you will require help to productively occupy the whole room. Therefore, if some items require more space than anticipated, selecting a truck that is slightly larger than your requirements is safer and preferable.
Keep in mind that this method is more accurate and reliable than the bedroom count method. Calculating the dimensions and placing the boxes in the truck in the right order might take more time. Nevertheless, it counts the total cubic space of everything you intend to store in the vehicle, which is more consistent.
Rather than measuring each item individually, pack all of your small and loose items in boxes and measure the size of the parcels. It won’t take much time and will provide a more accurate estimate of size. The total size will be approximately equivalent to the truck’s available space.
With stay-at-home requests lifted the country over, and before summer closes, families are making summer get-away arrangements. Prior to getting together the vehicle and going out to the lake or the forest, it’s brilliant to consider ways of making your home safer. There are a few straightforward and modest things that you can do now which can immeasurably work on your possibilities getting back home to find your home simply the manner in which you left it.
Activity Locksmith Sutton Coldfield has a few hints that can serve you over time, in any event, when you are not holiday.
Try not to report your get-away anticipates virtual entertainment. While your loved ones by and large aren’t a hotspot for concern, you don’t know companions of companions and other people who might approach your web-based entertainment posts. To be protected, save your get-away plans and excursion pictures for posting when you get back.
Secure your entryways and windows
Continuously take your home key off your key chain while valet leaving your vehicle, as an educated hoodlum can make a key to your home by just snapping a photo of your home key.1 Likewise ensure that you briefly eliminate that extra key you have concealed under the mat or a close by rock. On the off chance that you have sliding glass entryways, the most straightforward thing to do is to placed a stick or thick wood dowel in the base track of the sliding entryway. You can purchase slide-locking bars on the web.
You can likewise sustain the entryway by changing out the first entryway locking component with a business locking item that includes a couple of bolt locking framework that connects to the locking point of the entryway and has steel bolts that safe the way to the frame.2 Window stops, which keep windows from opening more than a few inches, are likewise smart. This is a somewhat reasonable item that can be seen as on the web.
Scene to safeguard your home
It is generally smart, regardless of the time, to ensure that shrubberies and trees don’t conceal your windows, entryways and other passageways to your home. Congested hedges can permit thieves a spot to stow away while getting to your home and discourage your neighbors from seeing a break-in. Certain individuals decide to establish prickly shrubberies under window passages as a hindrance. Scene lighting and movement actuated lighting are additionally wise ventures with regards to ruining would-be hoodlums. 3
Managing skin inflammation can appear to be a daunting struggle you won’t ever win. Certain individuals battle with skin inflammation breakouts more than others, yet the something normal among a great many people is they need to dispose of it anyway conceivable.
Over-the-counter treatments might be powerful for minor cases, yet those actually are never an assurance. A typical misguided judgment is you must have extreme skin break out scarring to fit the bill for an expert skin inflammation scar correction treatment.
That is basically not the situation, since laser hair removal in birmingham skin inflammation scar treatments can assist with even minor skin break out scars. Here are a portion of the circumstances where you ought to think about an expert treatment.
Forestall OR Change Skin break out SCARRING
Some skin inflammation is bound to make scars than others. With laser skin break out scar treatments, you can forestall skin break out scars from happening in any case by killing microorganisms around the impacted region, which could prompt more skin break out breakouts.
Yet, on the off chance that you’ve proactively experienced scarring of any seriousness, the most effective way to reexamine them is by looking for a treatment from a respectable clinical expert.
Skin inflammation is adequately troublesome to manage all alone, however when it prompts scarring, it’s not difficult to turn out to be much more reluctant. In the event that you want to conceal your skin or not associate however much you used to on the grounds that you’re humiliated in your own skin, then now is the ideal time to look for proficient laser skin break out scar treatments.
The treatments can be finished in less than 60 minutes, generally speaking, and results should be visible in just multi week. Nobody ought to must be hesitant in their skin, and an expert skin inflammation update treatment is your most ideal choice to guarantee you feel more sure with your skin.
While CONTROLLING Skin inflammation BREAKOUTS BECOME Incomprehensible
Skin inflammation breakouts can now and again happen at the absolute worst minutes. Once in a while an expert compound strip for skin inflammation could be a possibility for controlling these breakouts.
Contingent upon the guidance from your clinical expert, attempting a substance strip for skin break out could be the principal proficient treatment to attempt prior to going through laser treatments.
There are substance strips you can buy over-the-counter, yet not exclusively are these generally insufficient, they could be perilous on the off chance that not managed accurately by an expert with broad experience.
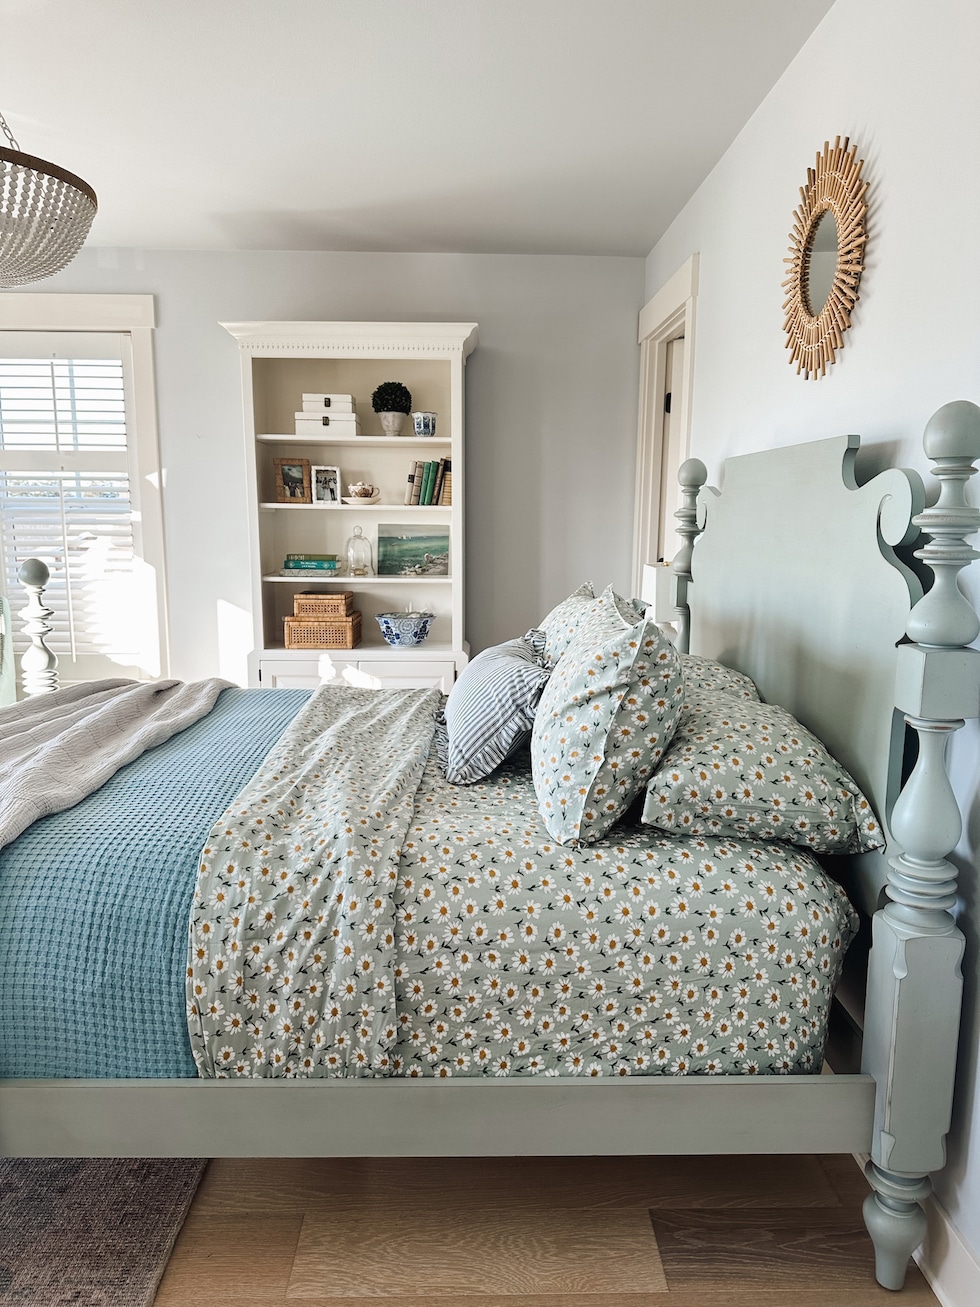
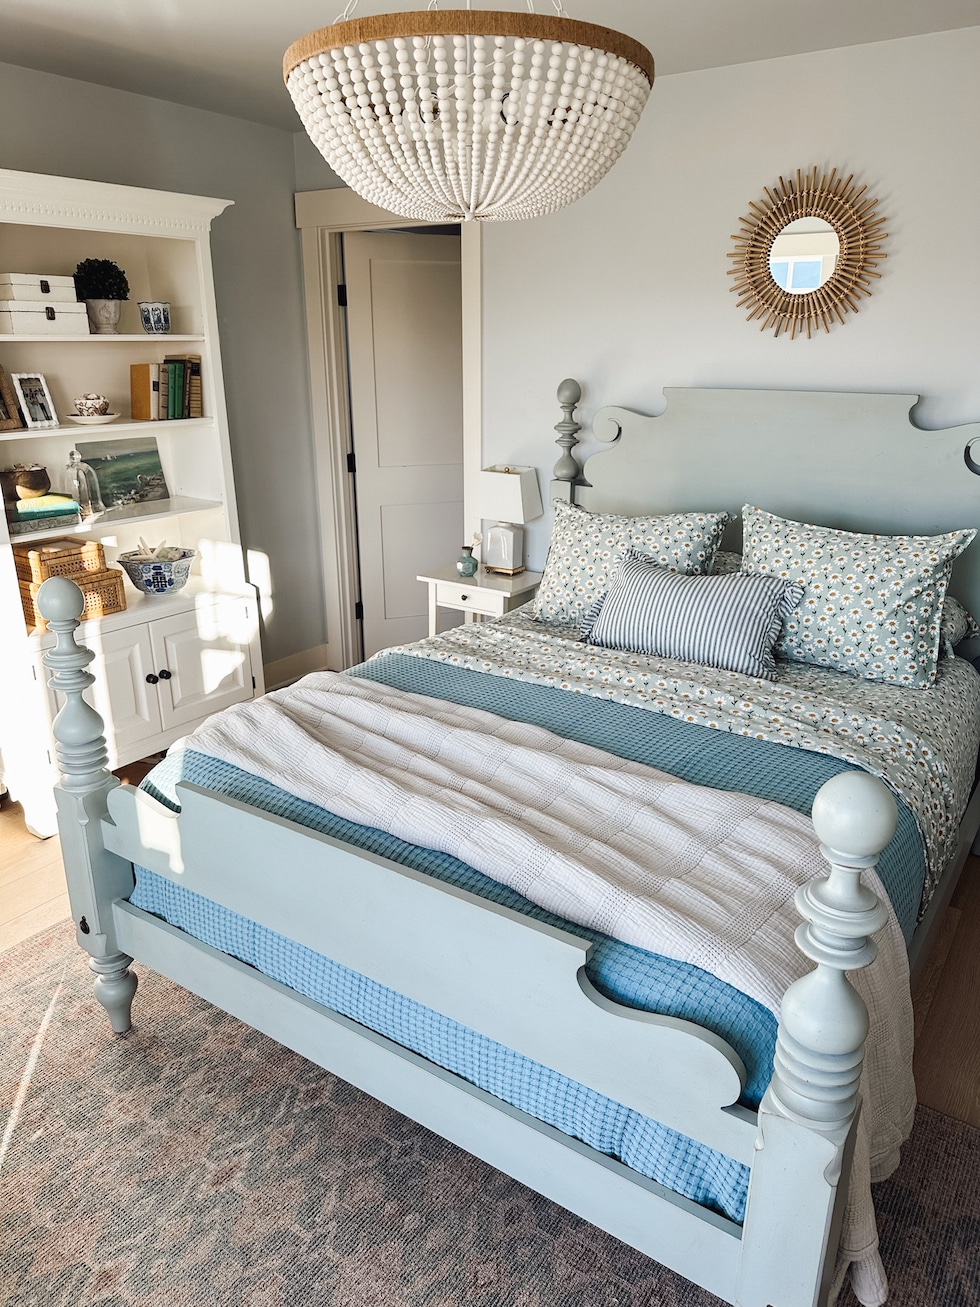
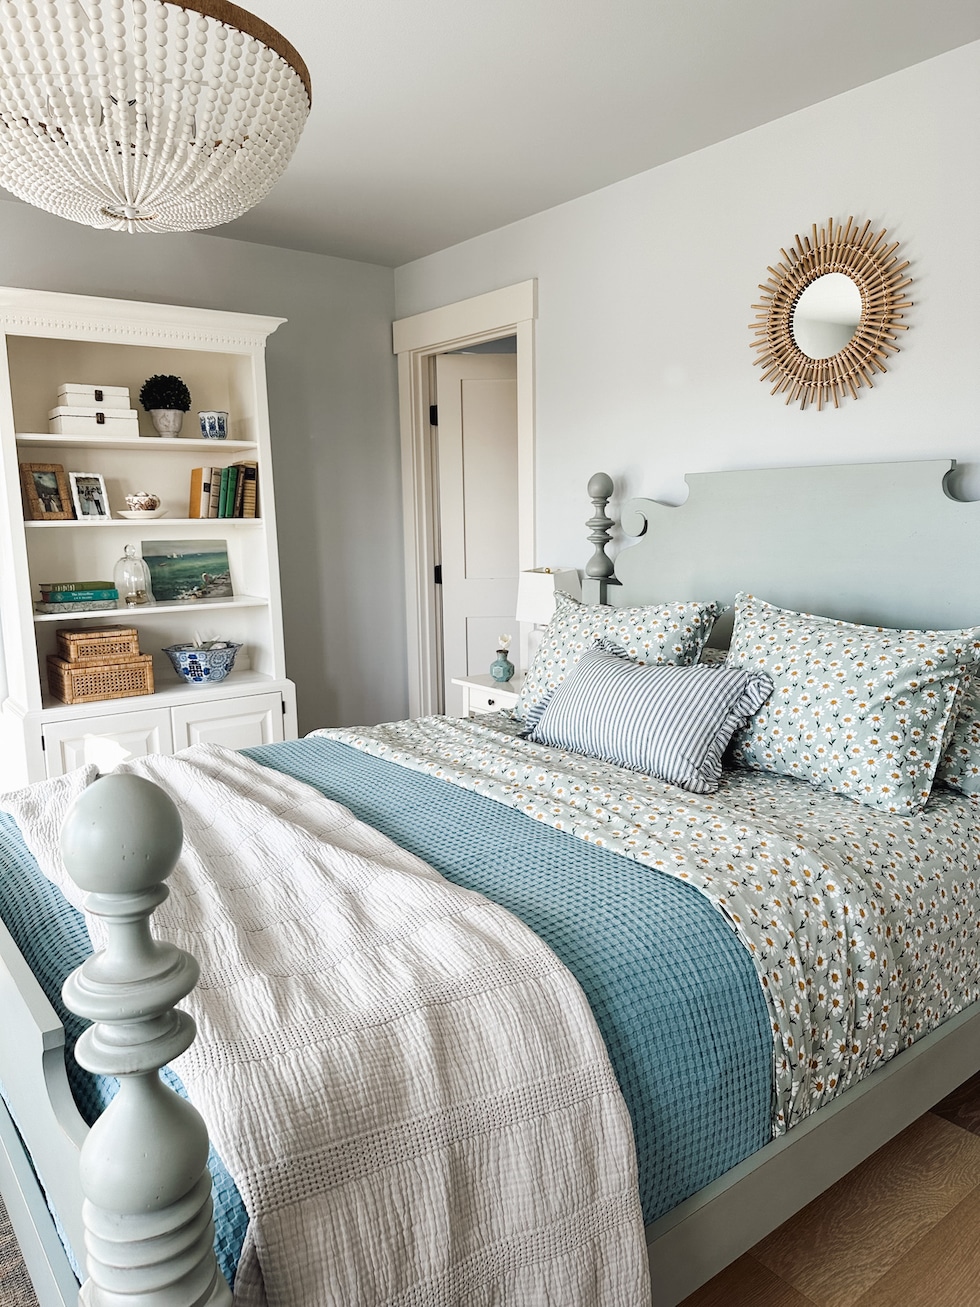
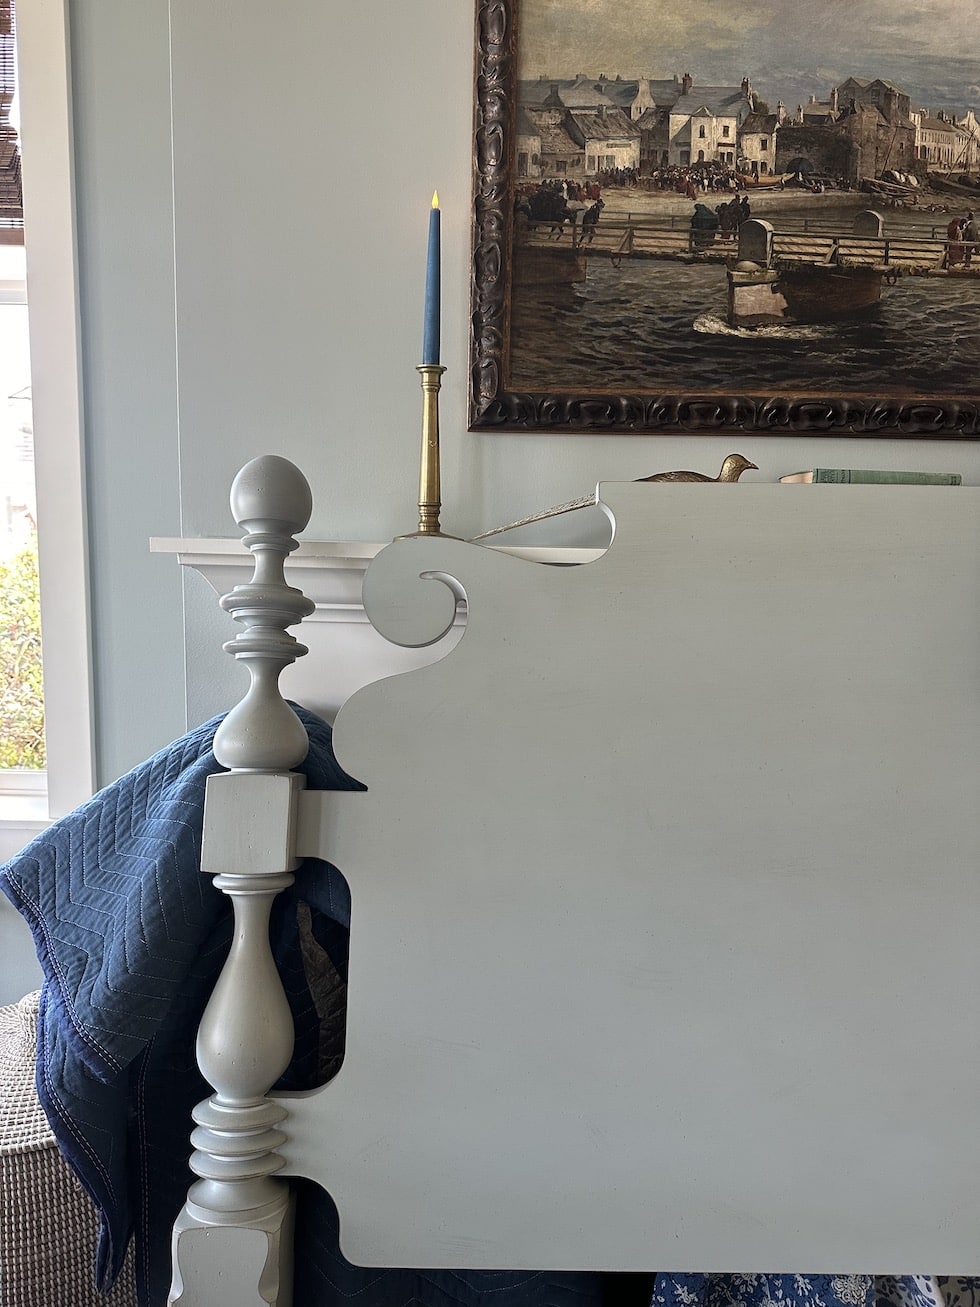
After four weeks leaning against our fireplace in the living room, the Ethan Allen Quincy bed we found on Facebook Marketplacefinally made it up the staircase to our room this weekend (thanks to some helpers we hired to bring it up for us).
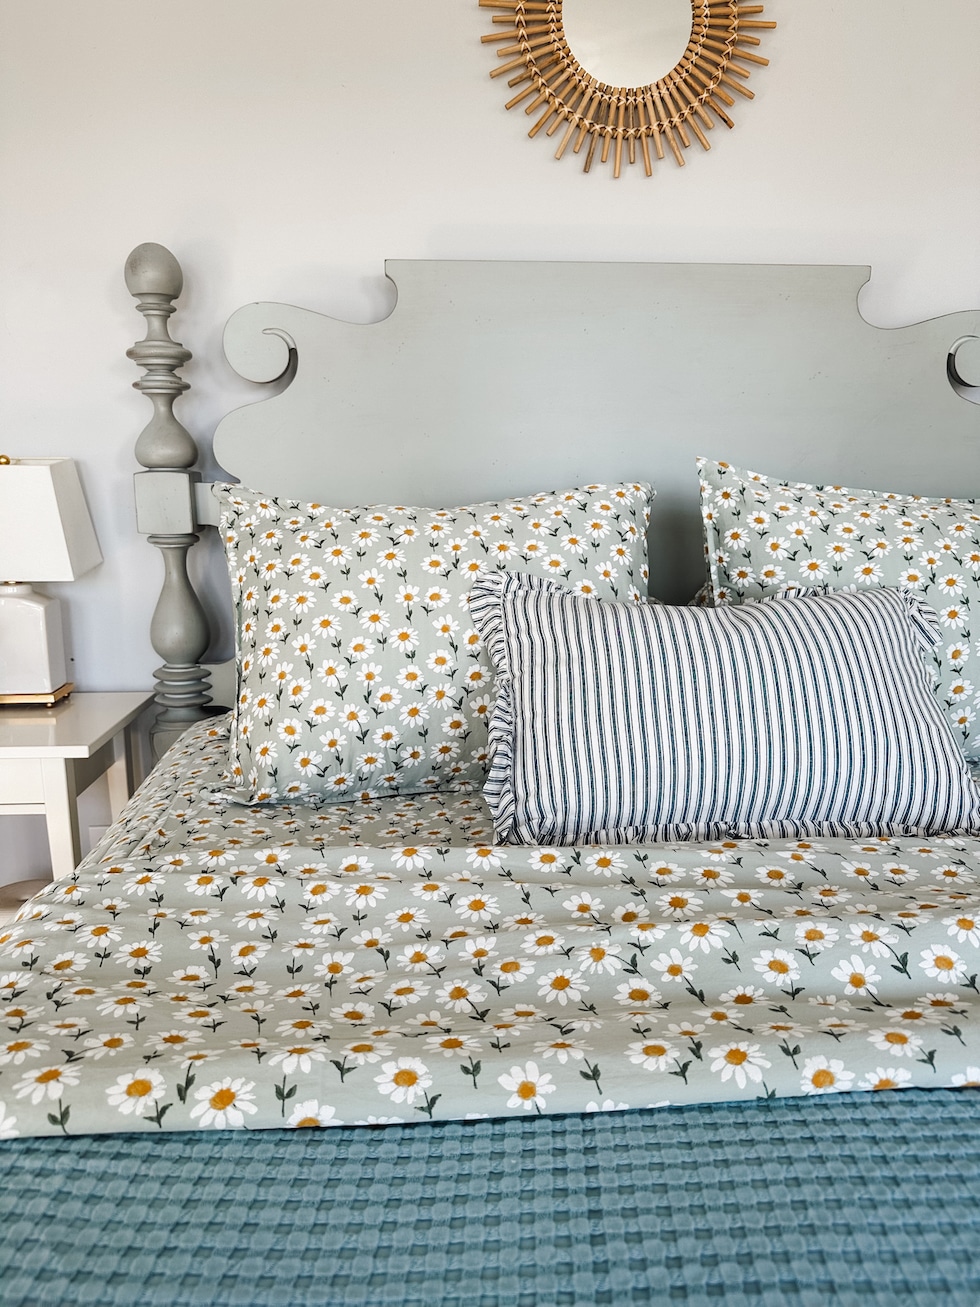
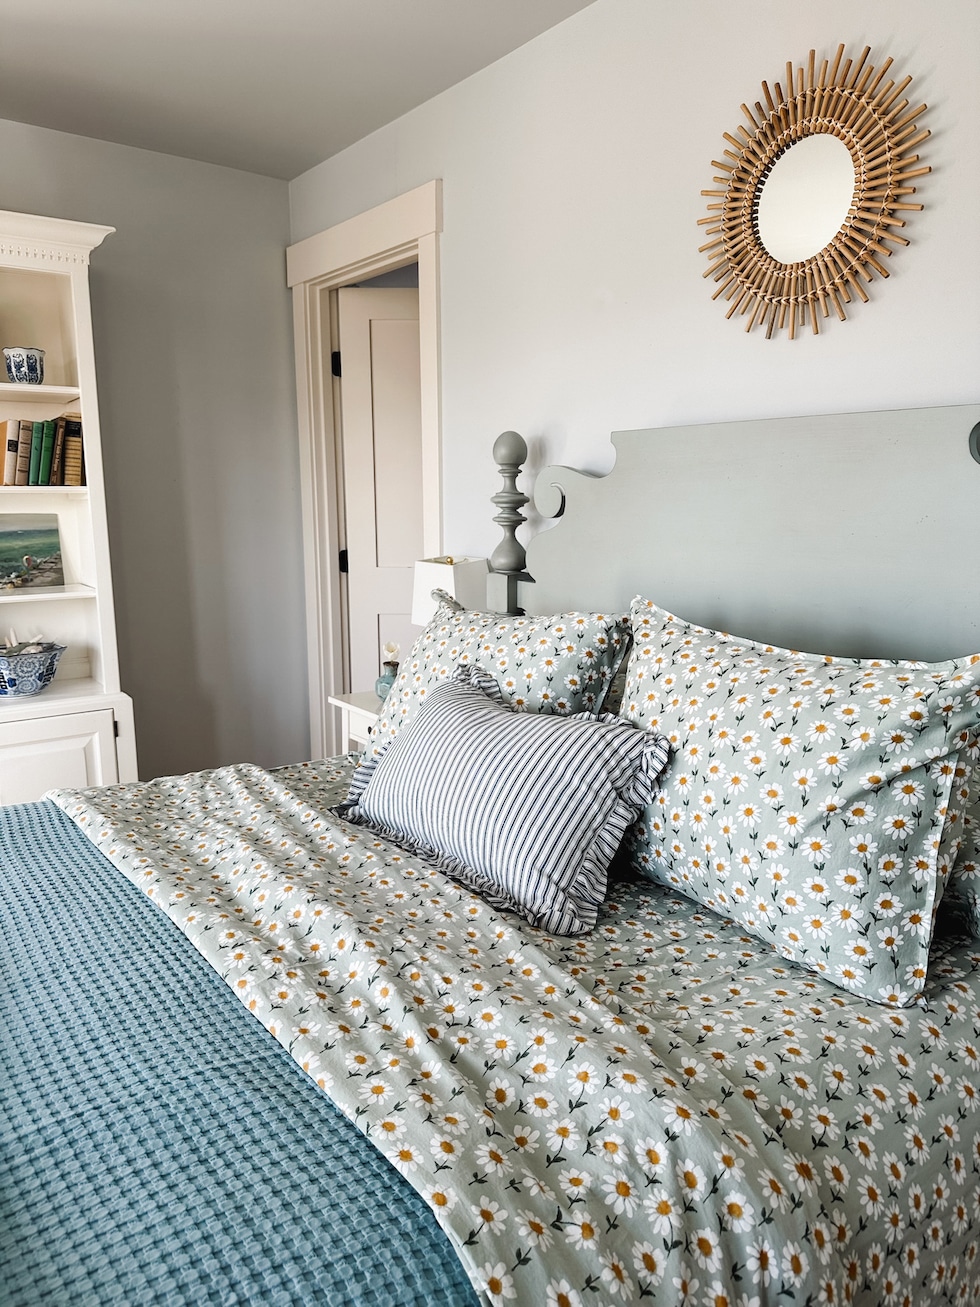
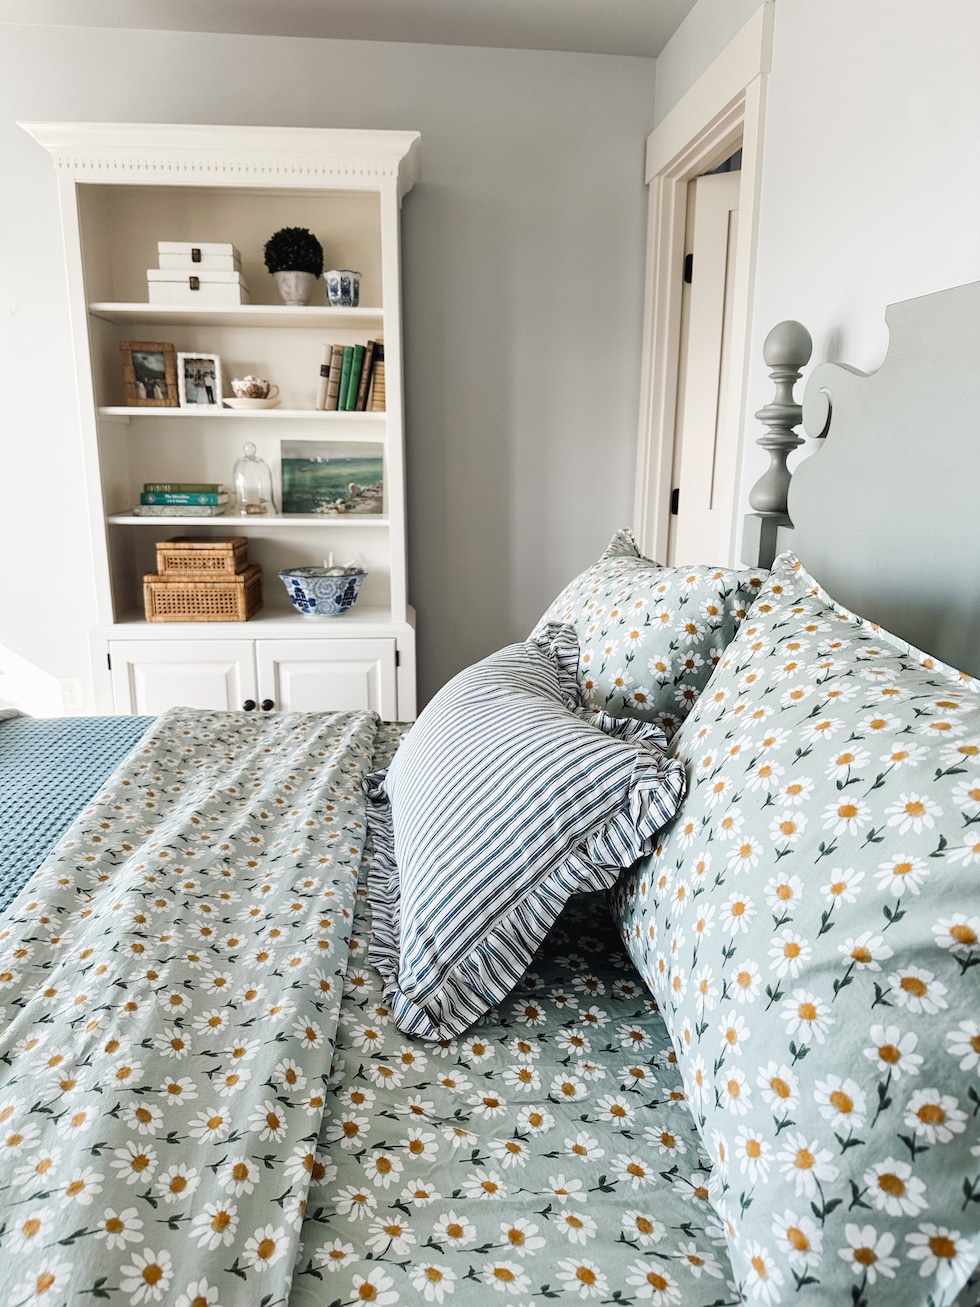
I couldn’t love it more! When I would get cute new shoes as a kid I would keep them by my bed so I could see them as I drifted off to sleep. Did you do that, too? Now I get drift off to sleep in a cute new bed and wake up happy in my daisy sheets!
Even though we now have to make a few unexpected updates like new bedside tables and lamps, repainting walls and probably some other refreshes to make this all work, you can imagine how happy this whole turn of events makes me :).
Some people search for months or years for specific pieces they want, but I found my dream bed immediately on my first search for it. I wasn’t even planning to buy a bed right now, but it was meant to be. Serendipity. I need to start searching more often!
You can read my first post about finding the bed here.
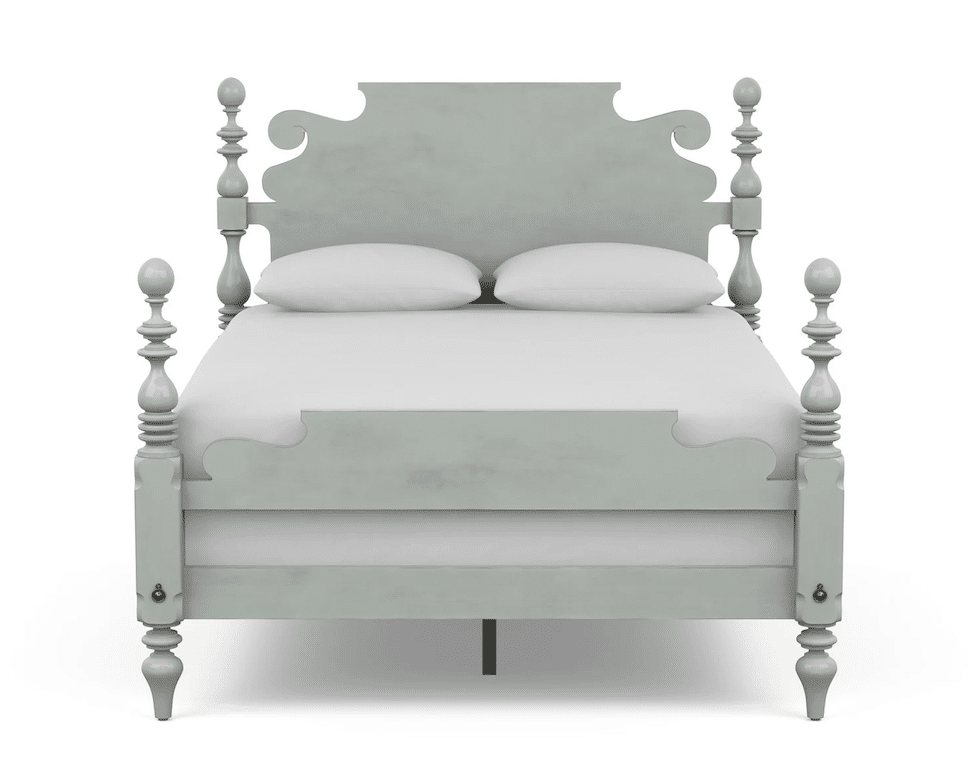
Minutes before I thought to look for the bed on FBMP, I was showing my husband this exact bed on Ethan Allen. Crazy, yes? I was making a dream mood board for our home and wanted to include this bed as a part of my overall style “vision.” So I had only shown it to him to ask if he liked it (he did) and which color he thought I should choose (we both agreed the robin’s egg blue felt right).
Suddenly at that very moment I thought to myself, you should search for it on FBMP. I knew it was a long shot, but WHAT IF? Dream big! So I typed in Quincy Bed Ethan Allen and BAM! there it was! My robin’s egg blue Quincy bed. I had wanted this bed for years, so I could hardly believe my eyes!
However, even though we got the message back that we could come get it, I knew it wasn’t going to be easy. This bed was in Canada (we’re on the other side of the border in the US) and we don’t own a truck.
And that was only the beginning of the challenges!
Many of you asked to read the rest of the story and the mishaps we faced, so I’ll share more that I didn’t share in the original post.
So here is the rest of the story — for you, my curious friends. 🙂
For some reason we always forget to turn on the “roaming” feature on our phone when we go to Canada.
So I will say that our first challenge would’ve been avoided had we simply remembered to do that :).
Our car is old enough to not have any built in navigation features, but we were in a rented Uhaul that didn’t have one either.
As soon as we crossed into Canada, the map feature on our phone stopped working so we were instantly …. lost. Somehow after running around an outdoor shopping mall we managed to find a bank machine that was supposed to be open for 24 hours — but it was closed.
That meant we couldn’t get the Canadian cash we would need to buy the bed.
Not to be discouraged, we headed toward the the seller’s home (fortunately I had saved step by step directions so it was almost like the old days without a phone or computerized navigation hahah), but we had to go without the cash to buy the bed.
The seller didn’t speak much English so we were communicating with her grown daughter over the phone. I had explained on our way to their home that the bank machines were closed. We began trying to find a different way to get her the money, which ended up being more difficult than we expected.
She originally said she didn’t want to use PayPal which would’ve been the simplest way to do this from the beginning, but eventually she agreed to set up her account so we could pay for it that way.
But after looking at the bed, we discovered a new problem. We couldn’t get the bed apart with the tools we brought! I was really starting to worry that we’d have to go home without it. My husband said at least I hadn’t paid for it yet, but I didn’t want to come so far only to go home without it!
So then we had to leave the bed and their home to go to Home Depot to find the right new tools. I’m surprised she trusted us to return. Thankfully she didn’t just sell it to someone else while we were gone!
We found the right tools and finally got the bed apart. Now it was time to get the bed downstairs. The headboard was so heavy that the owner kindly offered to help us. She was probably worried we’d drop it down her staircase or crash into a wall, which honestly worried us a little, too ha.
She was a small lady but she stood on one side and I was on the other and my husband at the far end! We’re clearly not as young or buff as we used to be, but we somehow managed to get it down the staircase and into the rented truck.
Finally the daughter’s PayPal account was available so I could transfer the money and we could go home with the bed in the truck. PHEW! Perseverance.
By this point we had been in Canada for about four hours longer than we had planned. After a quick stop at Chipotle we made our way to the border and praise be, crossed over without incident. They did ask why we were in the country, what we bought and why, and they looked in the back of the truck to be sure we weren’t smuggling anything illegal in.
I can’t imagine I would ever again go to this much effort for a Facebook Marketplace find, but all in all, our Quincy bed was worth it. Of course, if I found another great deal on something I loved this much you know I would do it all again! But the real question is, after reading this tale, would anyone in Canada ever sell to me again? Who knows.
My Quincy bed is such a charmer, I am so excited to have a piece I love so much!
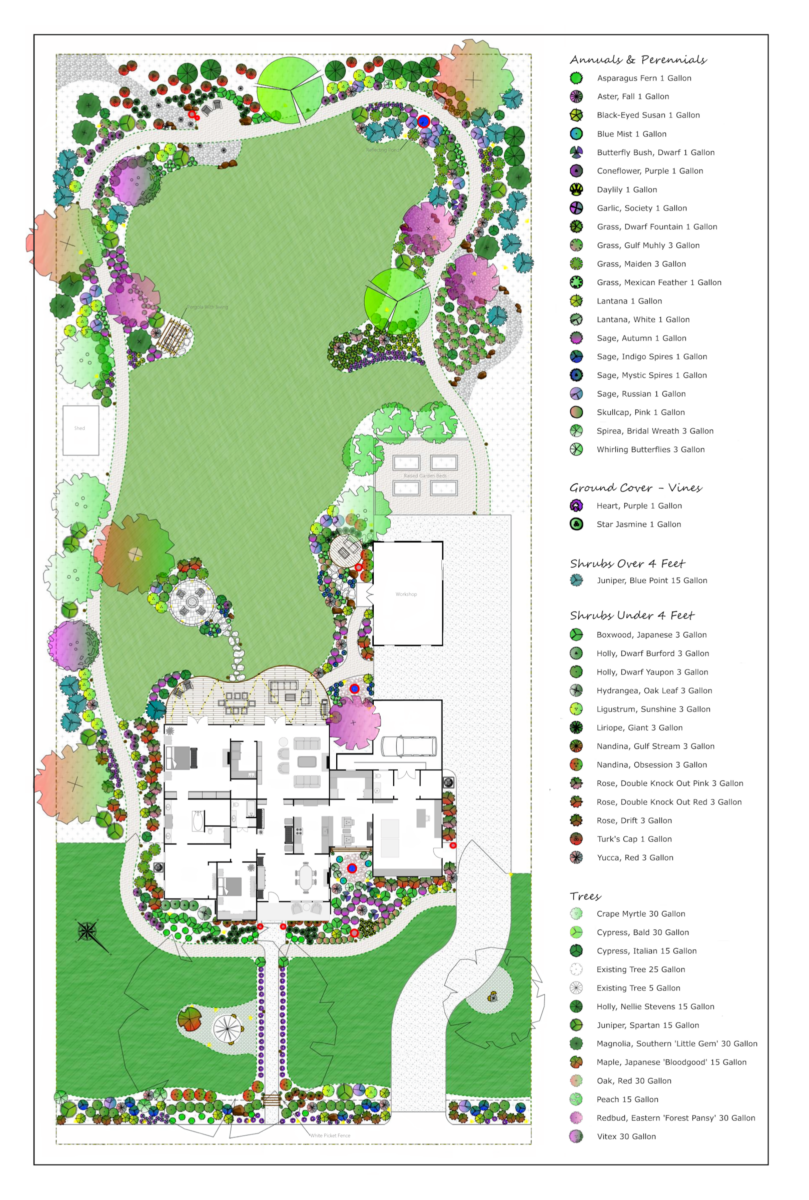
I told y’all in a previous post about how a very kind and generous reader offered to print my landscape design plan for me, and she had the capability of printing it HUGE. So I took her up on her very generous offer and had the landscape design printed 52″W x 78″H. I wish y’all could see this thing in person because it is magnificent. But it also presented a dilemma. How in the world was I going to mount and frame a HUGE print like that?
If you’re new around here, this is the landscape design I’m talking about…
Matt (my husband) had bought that landscape design for me about two years ago. I met with a local landscape designer and told him all of my wishes and vision for our one acre lot, and that’s the design he came up with. I think it’s so pretty, so I’ve been wanting to have it printed and hang it on a wall ever since I saw it the first time.
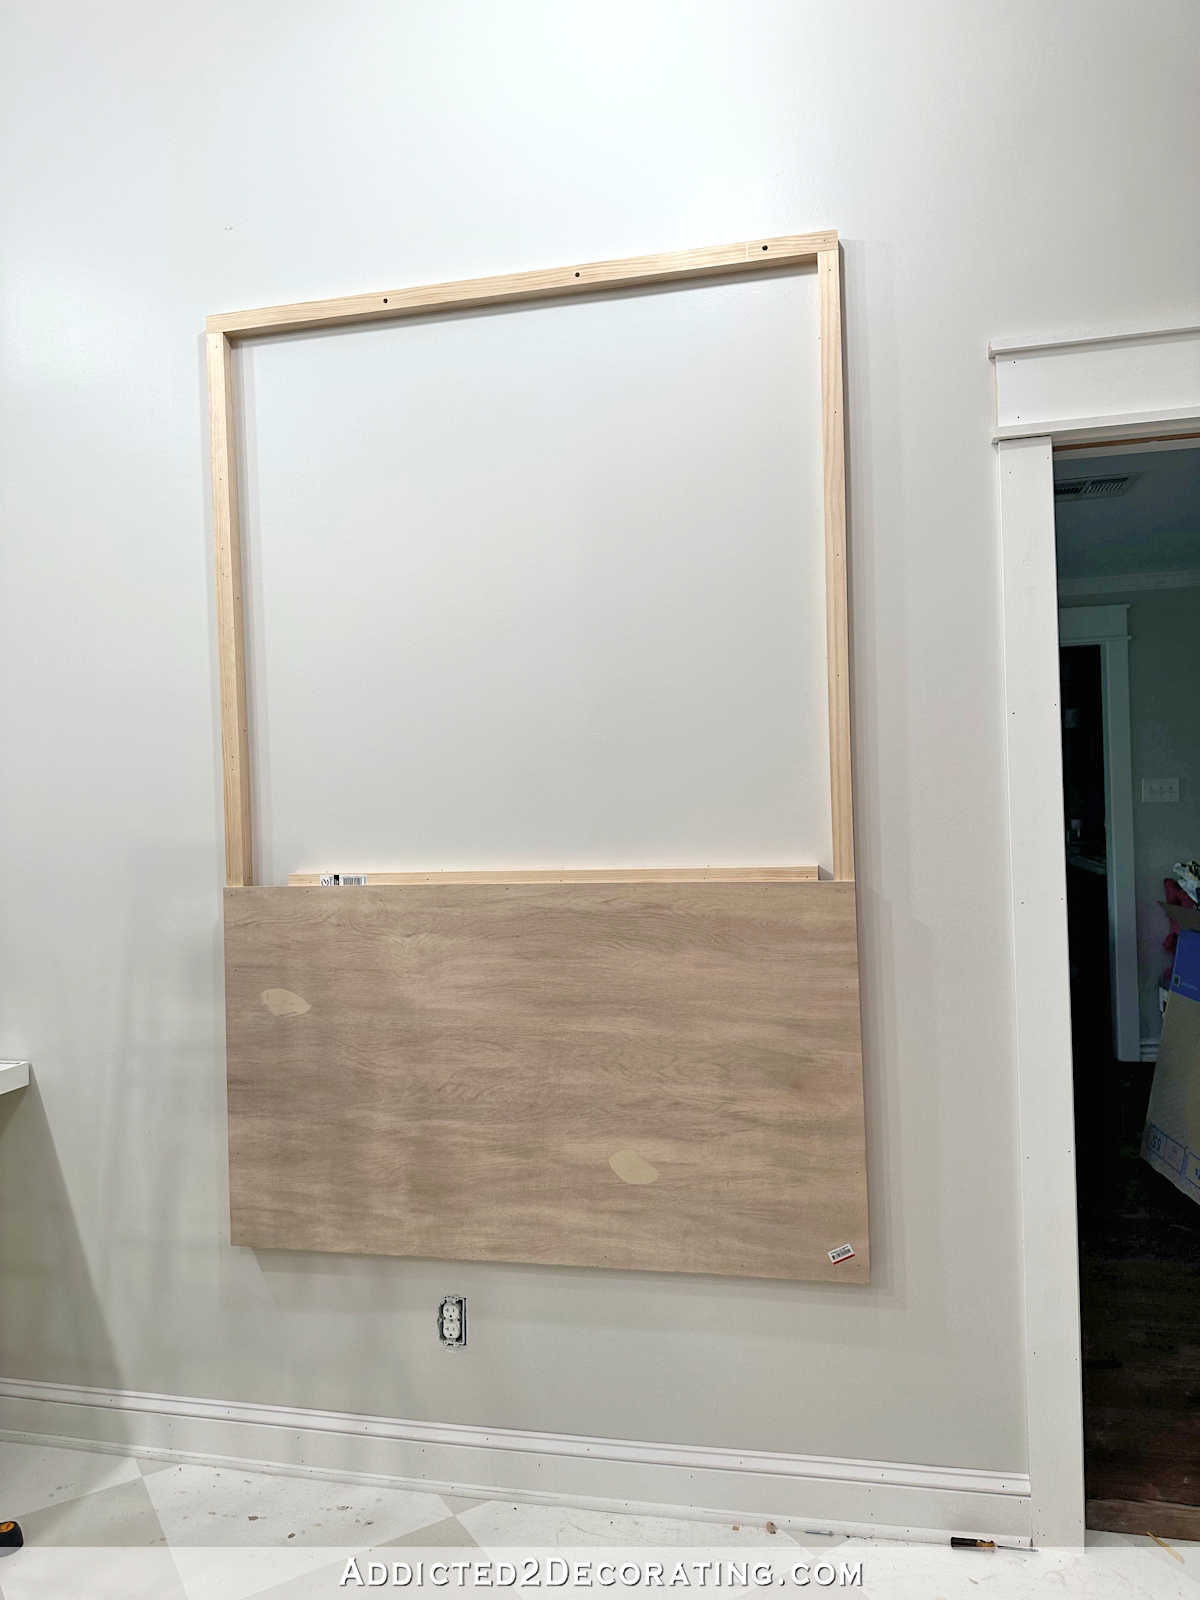
With the print being so big, I though the easiest thing would be to mount the print on plywood, and then frame it and hang it. Super simple, right? So a couple of days ago, I headed to Home Depot to pick up a piece of plywood for this project, and it wasn’t until I had parked and was getting out of the car that it dawned on me…this thing is 52″ x 78″!! A piece of plywood is only 48″ wide!
So then I had to stop and rethink my plan. What I came up with was a plan to basically build a huge cradle wood panel, which is exactly what I used to mount my little resin petri discs on. It’s basically a frame of wood with a solid piece of plywood or MDF attached to the top to create a wood canvas.
Except that instead of it being a tiny 5″ x 5″, I needed it to be about 150 times that size. 😀
And since I always work alone, another consideration I had to work through was whether or not I’d be able to build this massive cradle wood panel and then mount it on the wall by myself. Since I’m only five feet tall, which means that my arm span from fingertip to fingertip is five feet, I seriously doubted my ability to lift a 52″ x 78″ cradle wood panel off the floor and hoist it onto whatever hanger I decided to use. So instead, I decided to build the cradle wood panel directly on the wall.
I started by using my level, framing square, straight edge (i.e., a piece of extra lumber), and a pencil to mark off the placement of the bottom right corner. I wish that I could have built this just above the baseboard, but as you can see, I had to clear the electrical outlet.
Next, I used a stud finder to mark the placement of the wall studs along the bottom horizontal line.
I cut a piece of 2″ x 2″ lumber to 52″ wide, and then used the wall markings to mark the placement of the studs on the lumber. I pre-drilled screw holes, and then used my largest bit to drill about 1/2-inch into the lumber so that I could countersink my screws, and so that they would be long enough to go into the studs.
I attached that horizontal board to the wall along the marked line using 2.5-inch screws. I used my level to double check that the line was level.
Next, I cut and attached the vertical 2″ x 2″ pieces. I didn’t screw these to the wall, and I didn’t make sure they were in studs. Since the weight of these pieces will be held by the bottom horizontal piece, I only needed to be sure that these pieces were firmly attached to the wall and to the bottom piece. I started by using my nail gun and 2-inch 16-gauge nails to nail through the bottom horizontal piece and into the end of the vertical pieces. I used three nails on each side.
With those pieces attached to each other, I then used my framing square to make sure the vertical pieces were perfectly square with the bottom piece, and then nailed the vertical piece on the right to the wall using those same 2-inch 16-gauge nails.
Next, I attached the top piece. This one was screwed into studs just like the bottom piece, and it was also nailed to the vertical piece just like I did on the bottom corners.
And then finally, I finished up by nailing the left vertical piece to the wall and to the top horizontal piece.
To make sure that the vertical pieces stayed firmly against the wall, I also went back and added nails going diagonally from the inside edge of the wood and into the wall. The purpose of that is to create tension. With the nails going through the front of the wood and straight into the wall, and the nails going diagonally from the inside edge of the wood and into the wall, these vertical pieces won’t pull away from the wall.
And again, the vertical pieces don’t really have to carry weight because the weight is resting on the bottom piece, which is screwed into studs, and the top piece is also screwed into studs so that it won’t pull away from the wall.
For the face of the cradle wood panel, I had to use two pieces of plywood because, again, plywood is only 48 inches wide and this panel is 52 inches wide. So I wanted to add a piece of lumber horizontally where the two pieces of plywood would meet so that I could nail the edges of the plywood to this piece. I didn’t want to purchase another piece for this, so I just used a scrap, which was just a few inches shy of the whole width. That’s not a problem as long as it is also firmly attached to the wall. So I attached it in the same way as the vertical pieces, with nails going directly through the front into the wall, and the nails going diagonally through the top and bottom edges and into the wall.
Then I was ready to attach the first piece of plywood. I started with the little piece so that I could more easily hold it into place while nailing it to the wood frame.
And then I did the bigger piece on top so that I could rest the weight of the bigger piece on the bottom piece while I nailed it into place.
You’ll notice that there’s a gap between the pieces that gets bigger towards the right side. I had checked and double checked my frame to be sure the corners were perfectly square, so when the second piece of plywood didn’t line up perfectly with the frame, I knew the issue was the plywood. So I had to straighten it out around the edges, which created that gap between the two pieces. Things like that can happen (and have happened to me many times) when I let Home Depot or Lowe’s cut my plywood for me.
I wasn’t quite sure what to do about that gap. Would it show through the print? Would it create an unsightly ripple? I got the print out and tacked it to the panel to determine how to proceed.
This paper is super thick, but I could still see a difference in color at that gap. And I do plan to paint the whole panel white before mounting the print, so leaving the gap wasn’t really an option.
So then I had to decide how to fill the gap. Caulk didn’t seem like a good option. I needed something that could be sanded smooth. But wood filler didn’t seem like a reasonable option because the gap was too wide. That much wood filler would not only take forever to dry, but would undoubtedly crack, requiring several coats and many hours of waiting.
The option I thought was the best was to use drywall tape and mud.
So that’s where I left the project. It will probably need at least one more coat of drywall mud after I sand what’s there. (I’m not good at all with drywall mud.) And then I’ll prime and paint the panel, then mount the print, and then frame the whole thing.
Of course, I could have just opted to attach the print directly to the wall, and then use picture frame molding to frame it. I came very close to doing that, but in the end, I just felt like that wouldn’t give the print the prominence it deserves. It would make it look more like wallpaper than a separate piece of framed art. And I think this definitely deserves to be a separate piece of framed art, so making sure that it projects from the wall two inches will make it look like it’s mounted on a gallery wrapped canvas. This print deserves that.
Addicted 2 Decorating is where I share my DIY and decorating journey as I remodel and decorate the 1948 fixer upper that my husband, Matt, and I bought in 2013. Matt has M.S. and is unable to do physical work, so I do the majority of the work on the house by myself. You can learn more about me here.
Every year, the Met Gala red carpet produces some of the most memorable celebrity fashion moments of all time’s affair in New York City—themed “Sleeping Beauties: Reawakening Fashion”—was certainly no different, with a bevy of A-listers hitting the red carpet in custom creations. The night’s very best dressed attendees were those who paid homage to this year’s theme (and “the garden of time” dress code)—doing so in both thoughtful and unexpected ways. Of course, all of the official 2024 Met Gala co-hosts made the best dressed list.
We were taken away as Ke Ke Palmer arrived on the carpet so eloquently in a form fitting gown designed by Marc Jacobs. From her neckline to the sleeves, the gown was embellished with timeless beaded embroidery sequins embracing her silhouette perfectly. Zendaya turned heads in not one but two striking looks—including her custom Margiela look, and a vintage Givenchy dress from the house’s spring 1996 collection. Jennifer Lopez opted for a sparkling Schiaparelli number; while stars like Teyana Taylor wore a red velvet rose applique gown from the archives of The Blonds.
Thanks for joining me today. Traders are ramping up bets that the pound will fall in the coming months amid a growing conviction that the Bank of England will cut interest rates before the US.
The level of wagers placed by investors against sterling has hit a 16-month high, according to data from the US Commodity Futures Trading Commission, first reported by the Financial Times.
Meanwhile, asset managers have not been more pessimistic about the future strength of the pound since March last year, according to State Street, one of the world’s largest custodian banks.
The pound has fallen 1.5pc against the dollar this year, although that has still made it the strongest performer among the G10 group of major currencies.
However, traders expect the Bank of England, which announces its next interest rate decision tomorrow, will cut borrowing costs earlier and faster than the US Federal Reserve.
Derivatives trades indicate that a first interest rate cut will happen in Britain by September at the latest, while money markets suggest it could be as late as November in America.
On Tuesday, Minneapolis Fed President Neel Kashkari, who does not have a vote on rates this year, suggested the Federal Reserve may need to forgo reductions in borrowing costs this year due to stubborn inflation.
Asian stocks slipped and the dollar climbed as markets assessed mixed signals from US policymakers and economic data on the path for Federal Reserve interest rates.
The yen sank even with the threat of currency intervention from Japanese authorities to support it.
Crude oil wallowed near two-month lows amid signs of easing supply pressure and continued hopes for a Middle East ceasefire.
MSCI’s broadest index of Asia-Pacific shares outside Japan slid 0.4pc, with mainland Chinese blue chips and Hong Kong’s Hang Seng each down about 0.6pc.
Japan’s Nikkei slumped about 1.4pc as traders took profits following the previous session’s 1.6pc surge. The tech-heavy index also succumbed to pressure from a sell-off in US chip stocks on Tuesday.
In America, the Dow Jones Industrial Average of 30 leading US companies edged up 0.1pc to 38,884.26. The broader S&P 500 gained 0.2pc to 5,187.70, while the tech-rich Nasdaq Composite index dipped 0.1pc to 16,332.56.
Minneapolis Fed President Neel Kashkari suggested the Federal Reserve may need to forgo interest rate cuts this year due to stubborn inflation.
The yield on 10-year US Treasury bonds fell to 4.45pc from 4.49pc late on Monday.
I am a believer in making room in our home for serendipitous discoveries. If you keep your eyes and heart open, you never know when you’ll unexpectedly find something more wonderful than you could have planned.
A home should tell our stories. And what better way to add character to a home than to furnish it with serendipitous discoveries?
Today I will share my thoughts on furnishing our home and the tale of unexpectedly discovering my dream bed on Facebook marketplace just a few days ago!
You might recall that I had recently posted about a little spring refresh of our bedroom. In that post I said I was still looking for a new light fixture but other than that I didn’t really have any other immediate plans for updating our room.
Well, things have taken an unexpected but exciting turn. Not only did a find a new light fixture but thanks to a mood board I made and a serendipitous discovery on Facebook Marketplace, I brought a new to me coastal dream bed to our home and now I can’t wait to have it in our little bedroom overlooking the Salish Sea. It was meant to be.
Our Plan for Furniture
In my post about our spring mantel and our thrift store pheasants, I mentioned that I was now open to the possibility of being on the hunt for “new to me” furniture. In downsizing to move here we gave away a lot of furniture! This is a smaller home so not everything we had fit and I didn’t want to feel overwhelmed trying to make decisions right away.
There is no rush. We are happy with our home and I’m always content to use what we have. And I’m still working through trying to pare down and get rid of things we don’t need here! It’s been a process. We bought a few accent chairs here and there to fill out spaces but I decided that if anything we truly love comes along (and on our budget), we’ll happily swap anything else out. That slow process will help us continue to enjoy making this home our own without any pressure or timeline.
But now that our renovation is over, I feel a little more “ready” to begin looking around more and even scrolling FB Marketplace now and then, just in case. It actually seemed like fun to just look so I began looking at FB Marketplace and found a new little console table with a marble top and a darling chair. Those finds ignited my creativity and renewed my excitement over the thrill of the hunt! I will share those pieces in a future post.
So I guess my plan for furnishing our living room was simply to be open to serendipitous discoveries! I have taught my HomeBody Gathering Place decorating community about the value in developing their sense of serendipity as well as how to bring a collected style together to it feels cohesive.
It really is fun to have a home that tells a story! The stories of how our home came together is what helps create a sense of sanctuary. I did originally think that if I bought anything it would be for the living room! Well, that’s what I get for trying to plan! 🙂 Being open to whatever you find can make the stories of your home even more interesting! You don’t know what you’ll find or when. And when you discover something you really love, it feels like it was meant to be so I’ll happily adjust any plans.
How Creating A Mood Board Led to My Dream Bed
In HomeBody Gathering Place last week we taught how (and why!) to make a mood board. There are SO many reasons I think a mood board can be very useful in home decorating and renovations, but one reason is that they can help you to better visualize and define your own style. That really is important to creating a home you will love.
Over the weekend I was inspired to make a mood board for our bedroom. Now mind you, I wasn’t intending to buy furniture for the bedroom, I just wanted to visualize my style as whole. I wanted to visualize all of the rooms to create our style.
A mood board doesn’t have to turn into a shopping list (although that is another useful reason to make one), it can be just for inspiration!
One decorating principle I teach in the HGP is to start by making a dream board first, and then a reality board can come next. I find creating a dream board to be quite inspiring as it can encourage you to get out of a design rut or save you from always playing it safe instead of listening to your heart is telling you.
Once you can visualize your dream style, you can still incorporate what you already have but also elements of your dream into your reality.
So that’s what I did. I let myself dream a little! The first thing I put on my board besides a couple of pieces I had was an image of a bed I’ve loved for years. It’s classic, but also feels so whimsical, which I think truly is my style at heart.
I looked at all the colors the bed came in and loved them all, but I landed on robin’s egg blue. This bed has always reminded me of waves at sea and what better color for it than my favorite shade of blue?
The bed was only a dream for me, but it represented something significant about my style. An unexpected bit of whimsy is something I always crave in a home. Even if it’s just in one element, the lightheartedness and unpretentiousness of a whimsical style makes it feel like home to me.
The Serendipitous Discovery – In Another Country!
While there seemed to be no chance of me getting that bed, I reminded myself that if you are really going to be open to serendipitous discoveries, you cannot close off the possibilities before you even start. Don’t pre-determine what you’ll find or decide in advance what is or is not possible. If something speaks to your heart, listen!
So even though it seemed to me to be the most unlikely thing to find on Facebook Marketplace (especially when you don’t live in a big city) I thought I might as well look. Why not? I wasn’t in a hurry or expecting to find this bed. But even if I never found it, maybe I’d find something else that would be of a similar style or mood. There was no hurry or expectations.
This is what I love about creating a home over time. Any pressure of immediate gratification is off when the thrill of the hunt is ON! You never know when the discovery will be made.
Minutes after placing the robin’s egg blue bed on my dream board, I opened FMP and typed in the name of the bed. As I said I really didn’t expect to find it. But I immediately did a double take. Much to my surprise, there it was. My dream bed! Some people call that a “God sighting” — it really did feel like a gift was sitting right there waiting for me.
But that’s also when I went into panic mode. The price was a fraction of the cost of a new bed and no sales taxes, no shipping, so it was a no brainer…but …. there were other roadblocks. We don’t own a truck. And also, this bed was across the border in Canada. It was late Saturday night. We didn’t have any Canadian cash and no banks were open. So many questions but I decided to at least message her.
I didn’t hear back.
I couldn’t sleep a wink all night. That’s when I knew. If this bed made my heart flutter this much, there was no doubt it was meant to be. I didn’t want to accidentally miss a return message so I checked my phone really early in the morning. At 5:30 AM, she asked when we could come get it.
By 10AM we had rented a Uhaul utility truck and were on our way to the border. It turned into a much longer story — involving finding no cash machines open on Sundays, not having the right tool to take the bed apart, our phones did not work while we were in Canada and many other challenges — but we didn’t give up!
By 6PM Sunday night, my dream bed was in our home.
Dare to dream friends! You never know what might happen. 🙂 I had to use the funds I had set aside for something in the living room, but I can’t imagine a piece of living room furniture I’d love more than my new bed. Right before we found the bed and the day after my last update post on the bedroom, I bought the new light fixture so I guess I’ll be working on the bedroom now :). That’s how you create a collected home over time, it just might turn into an unexpected adventure!
Of course, I also really loved the bed I had (this cane bed) but GOOD NEWS all around my daughter Courtney and her husband wanted a new bed, and now I just happen to have a lovely one to pass along to them. Win win!
[unpaid/samples] I first came across L’Era when they got in touch last year – it’s a new, mother & daughter founded jewellery brand whose point of difference is using gold plating that’s ten times thicker than usual vermeil. One of the things I said at the time was that I wear my jewellery – I don’t take it off for baths, showers, sleeping or well, anything really. If you know vermeil, you’ll know it has a tendency to wear off really quickly and before you know it you are suddenly wearing a silver bracelet or necklace.
.L’Era Jewellery – New Designs
They also use lab grown diamonds to create tiny pendants like the one above. It keeps costs down but it looks as spectacular as the real thing. I like fine (as in delicate and small) jewellery – my Indian rings are a recent passion and up until I had those, I was all about the tiny jewels. Most of my jewellery is very understated – you’ll have seen a variety of fine chain bracelets on my swatching pictures over the years but none in recent months because they went dull or broke. As I say, I don’t treat them with any particular care. So, I was really curious to see how L’Era fared over time – I put the Paperclip bracelet on last October and haven’t taken it off since. The wear is very impressive – it’s still as gold as it was at the beginning.
L’Era Jewellery – New Designs
From bottom to top – a vermeil necklace I bought not so very long ago and it’s completely lost its lustre, my original L’Era Paperclip bracelet, and the new Shimmer Paperclip bracelet, which, like it’s plainer sister, went on my wrist straight away and has stayed there.
L’Era Jewellery – New Designs
There’s also a Shimmer Paperclip necklace (also on straight away!) which will be a summer go-to – it’s a great length being somewhere between short and long so if you’re layering your chains, this is an excellent middle chain.
There’s an anklet in the same design but I am not ready by any means to get my ankles out yet! When I am ready, I’ll wear with trainers.
L’Era Jewellery – New Designs
I love both the bracelet (£45 HERE) and the necklace (from £59 HERE). The mini lock with a lab grown diamond is £59 HERE. The jewellery comes so nicely packaged in a pistachio green wallet inside a box and honestly, it feels like such a treat to have these. I have a code for you – use BRITBEAUTY20 for 20% off (excluding sets) until 31st May 2024. If you have special birthdays to buy for (I think Lucy would love these because she is like me in preferring understated jewellery) or just think it’s time to shine up your spring, I’d genuinely recommend for robust but delicate daily wear.
Transparency Disclosure
All products are sent to me as samples from brands and agencies unless otherwise stated. Affiliate links may be used. Posts are not affiliate driven.
When it comes to the my studio, I’m starting to feel like I’m trapped in Groundhog Day, repeating the same work day after day after day with only some slight variations and with no end in sight. But after I stopped working last night, I took some time to take inventory of what I still have to do, and I am actually making progress. I’m so ready to be done with this room! There’s still quite a bit to do, but I’m going to make every effort to have this room finished by the end of this month so that I can move on.
When I talk about finishing this room, I’m not including the studio bathroom. That will be a separate project, and I do plan to work on that as soon as the studio is finished. But there’s no way I can get the studio and the bathroom done by the end of this month. That much I now for sure. But I do think it’s possible that I can get the studio finished by the end of the month.
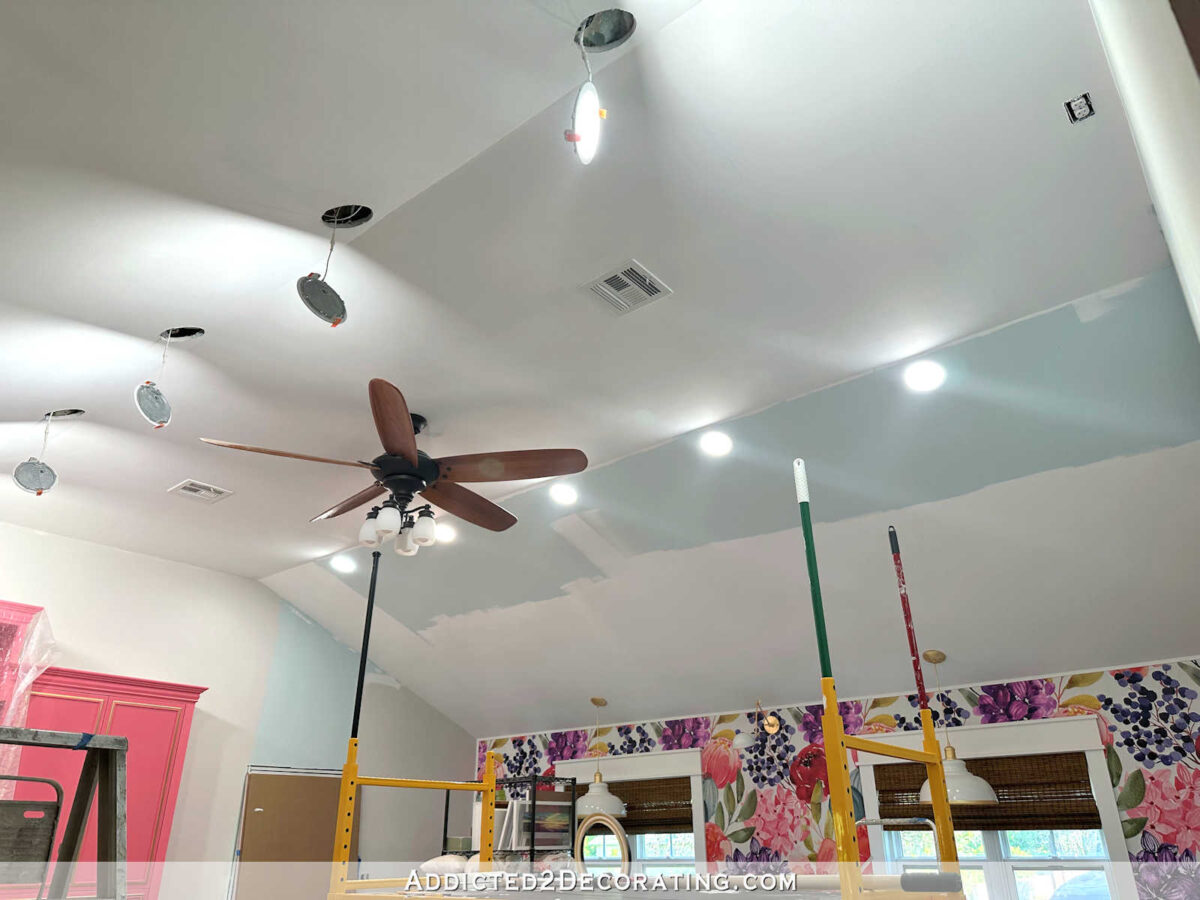
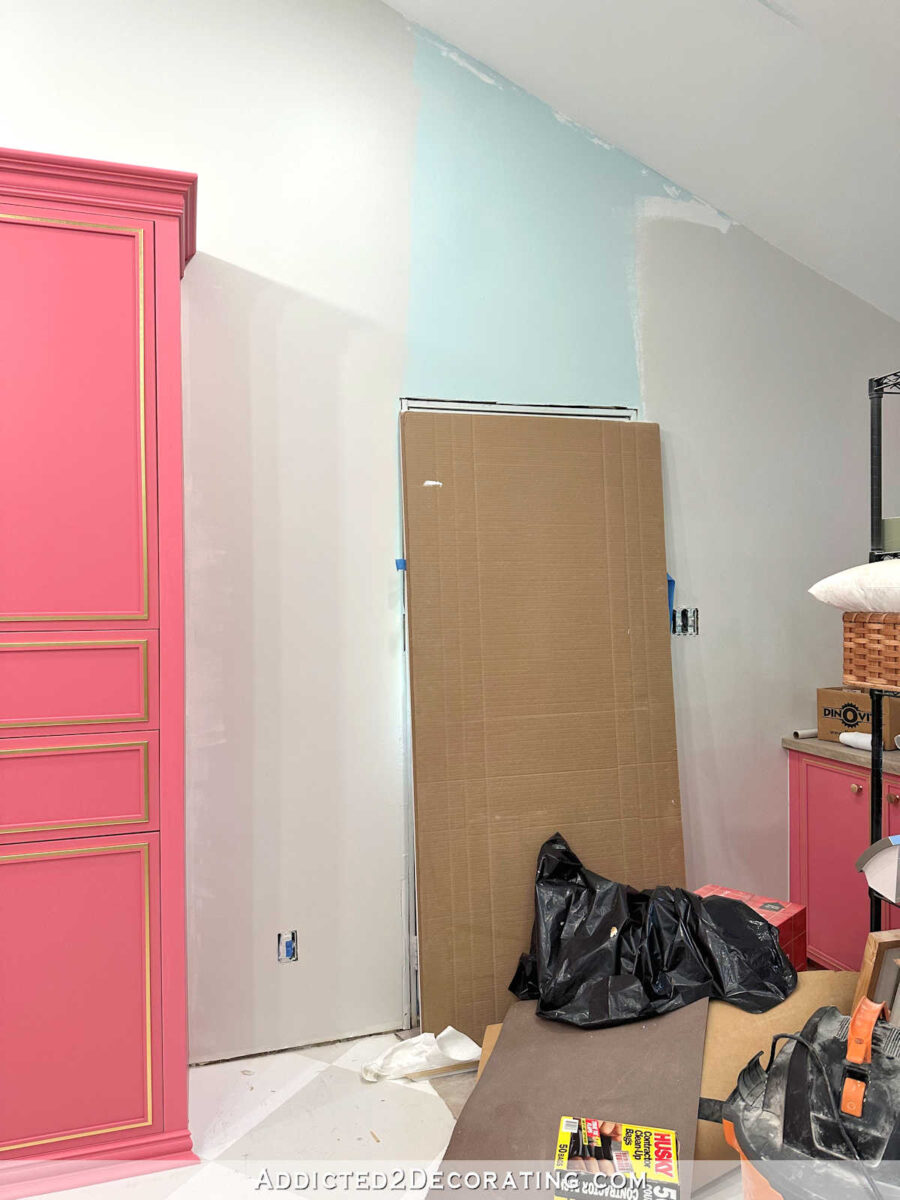
Over the last couple of work days, I’ve been trying to get the rest of the ceiling painted. It’s a much bigger job than I had anticipated, even with the scaffolding. I had to do quite a bit of cleaning and rearranging before I could get started, and I’m still having to work around a lot of big items. So far, I have most of the ceiling painted, with just this strip of blue ceiling on the mural side of the room that still needs to be painted.
Once I get the ceiling finished, painting the rest of the walls will be a breeze. This ceiling is a bear, though. I came *this close* to hiring it out, but I guess I just needed to prove to myself that I could do it.
I also have some trim to finish — baseboards and door casing around two doors. The door to the right of the office area cabinets (which is currently covered up) still needs to be trimmed out, and those areas still need baseboards.
And then the long empty wall has a door that still needs to be trimmed out, and it also needs baseboards.
And then both of those doors need to be painted.
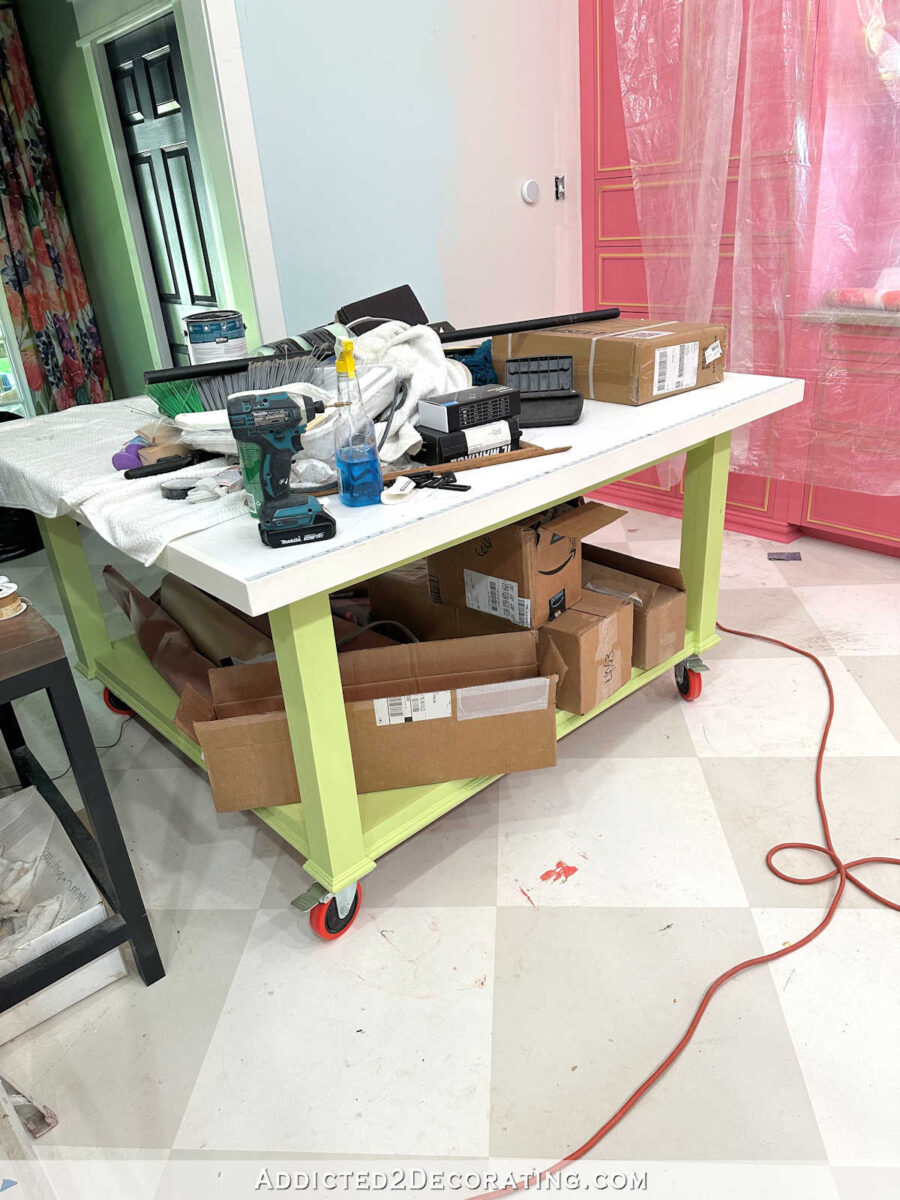
The bases on my two work tables need to be painted. They’re going from this bright green to eggplant.
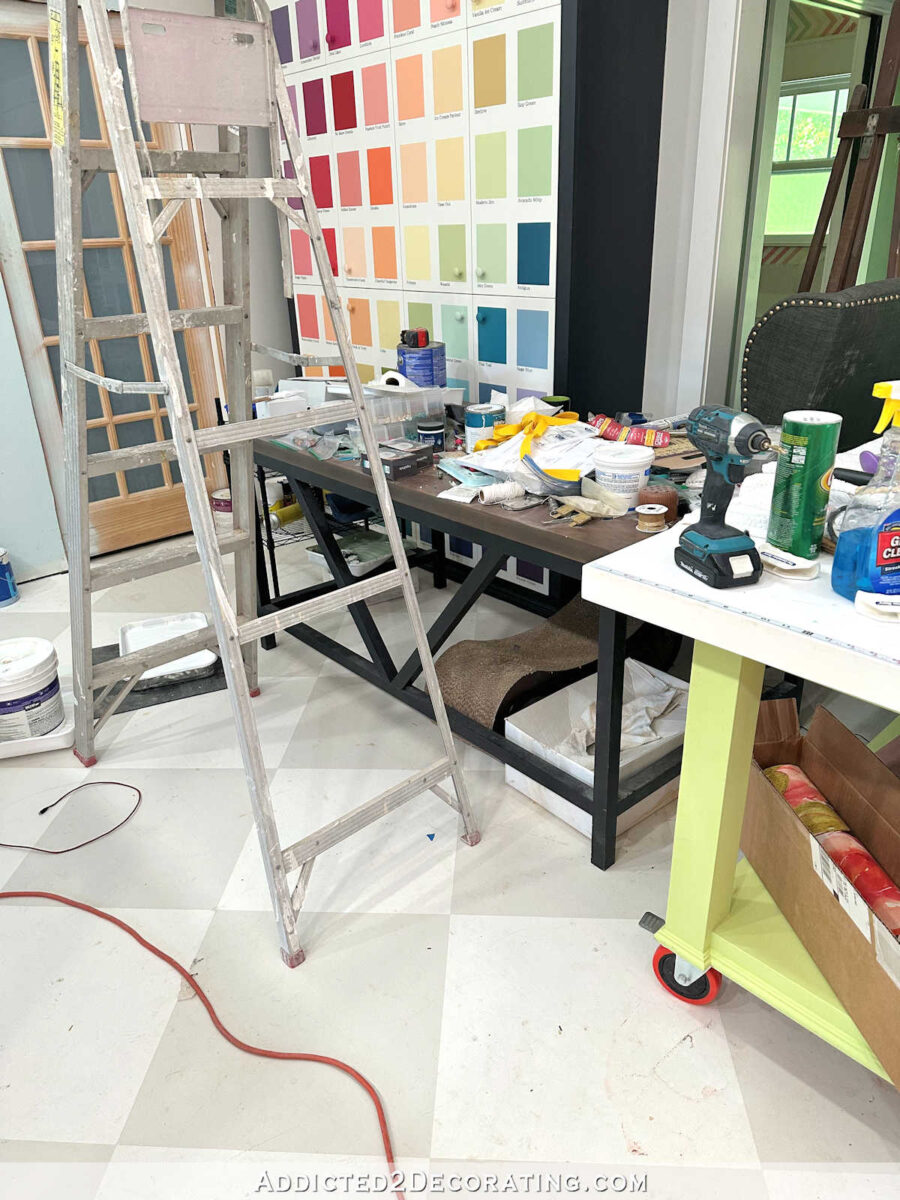
And then my desk needs a makeover, the black on the paint swatch cabinet needs to be painted white, and my desk chair needs to be reupholstered.
The cabinets in the office corner of the studio are finished for the most part, but there are still some finishing details that need attention. I need to install all of the door knobs and drawer pulls, and install the window shade. I’m still waiting for the window shade to be delivered, and I already know that the company forgot to cut the shade to my custom dimensions. But evidently, they won’t do a replacement order until I receive the first one and verify that it won’t fit. *Sigh*
And of course, I still need to make a decision about what to do with the wall around the windows and the backs of the cubbies. Regardless of that decision, I still need to add lights to the cubbies and finish the electrical stuff. I still have four electrical outlets that need to be installed inside the cabinets.
I also have two outlets that need to be installed on the other side of the room, and then there’s the decorative stuff. I’m still trying to work out in my mind how I want to handle the long, blank wall, but I think my plan is coming together. And then I need to print and frame the landscape design to go on the wall next to my desk.
And finally, I need to make the pendant light to go above my desk. I’ve already gotten started on that. After doing some figuring, I determined that the light will require 1300 tasting spoons (that’s 500 more than the gradient pinwheel artwork required!), so I’ve already cut the handles off of all 1300 wood tasting spoons.
But now every single one of those has to be sanded and shaped so that it’s not obvious that they used to have handles. I’ve only sanded this many so far…
…so that is going to be a very time-consuming project. But quite honestly, I love those types of projects. Maybe I’ll sit outside and sand spoons on Monday during the eclipse. There will be 2 hours and 40 minutes from first contact to last contact. I don’t want to miss it, but I’m also not the kind of person who can just sit still for 2 hours and 40 minutes with nothing to do. 😀
I’m sure there will be some other little projects that I’m not thinking of right now. In fact, I’m sure the floor will need some touchups, and some cabinet doors and drawers will need some readjusting. I’m sure there will be other things.
So here’s the punch list:
Finish painting the ceiling and walls;
Install and paint baseboards;
Install and paint door casings on two doors;
Paint two doors;
Paint bases on work tables;
Paint desk and add two drawers;
Paint black parts of paint swatch cabinet white;
Finish wiring electrical outlets;
Add lights to cubbies;
Finish trim on office area cabinets;
Install window shade;
Reupholster desk chair;
Make pendant light;
Frame and hang landscape design;
Decorate long, blank wall;
Clean and touchup paint on floor;
Finish adjusting doors and drawers;
Install drawer pulls and door knobs.
Each individual thing seems so simple, but seeing the whole list makes me wonder if there’s actually any possible way I can get it done by the end of the month. I’ll give it my best shot, though! I’m so ready to be done with this room and move on!
Addicted 2 Decorating is where I share my DIY and decorating journey as I remodel and decorate the 1948 fixer upper that my husband, Matt, and I bought in 2013. Matt has M.S. and is unable to do physical work, so I do the majority of the work on the house by myself. You can learn more about me here.
Jobi McAnuff and Robert Snodgrass analyse the race for promotion from the Sky Bet Championship after Ipswich, Leeds and Leicester all picked up wins on Easter Monday.
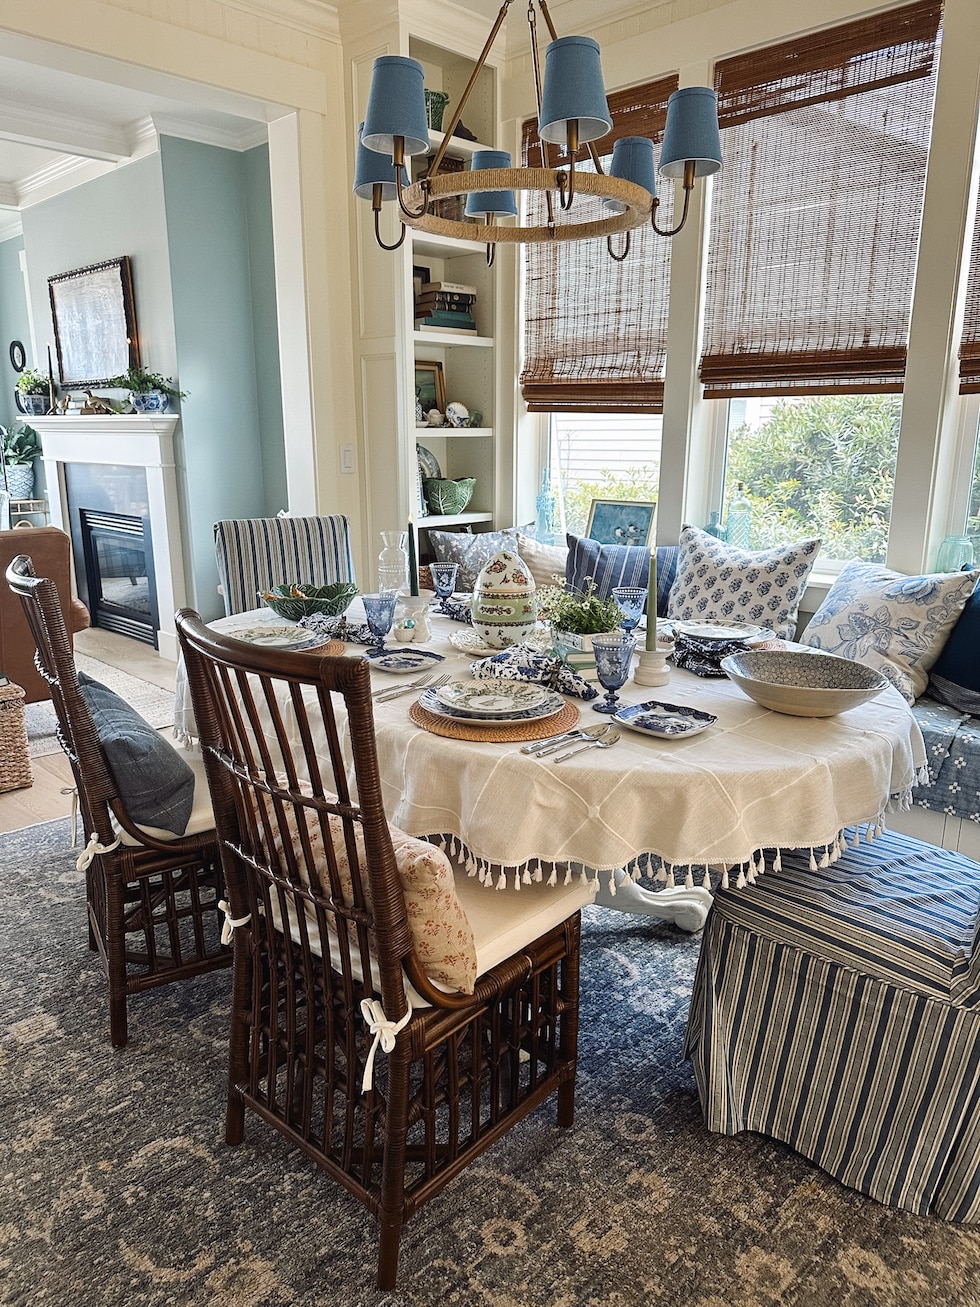
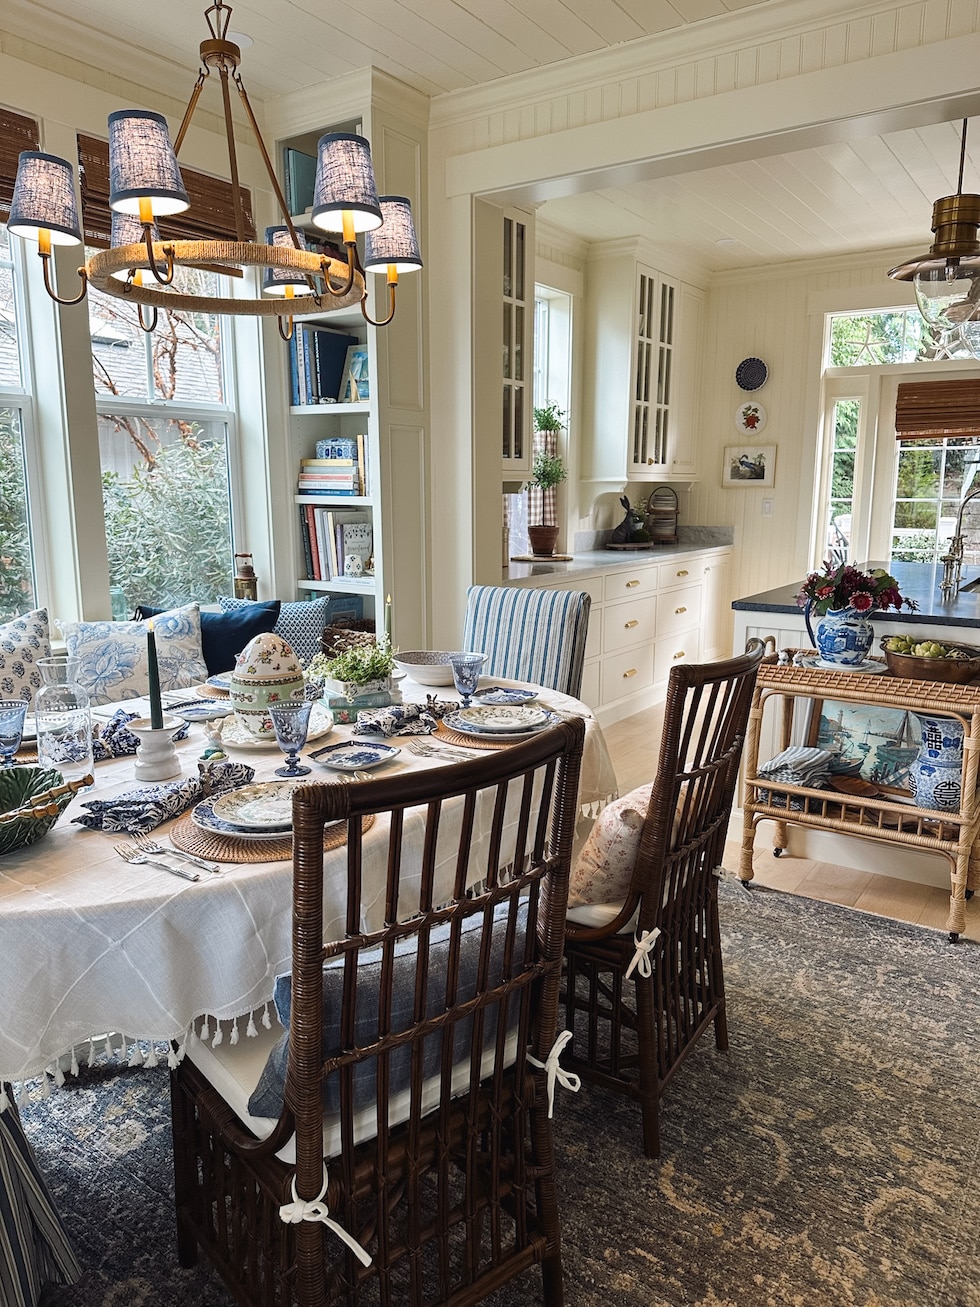
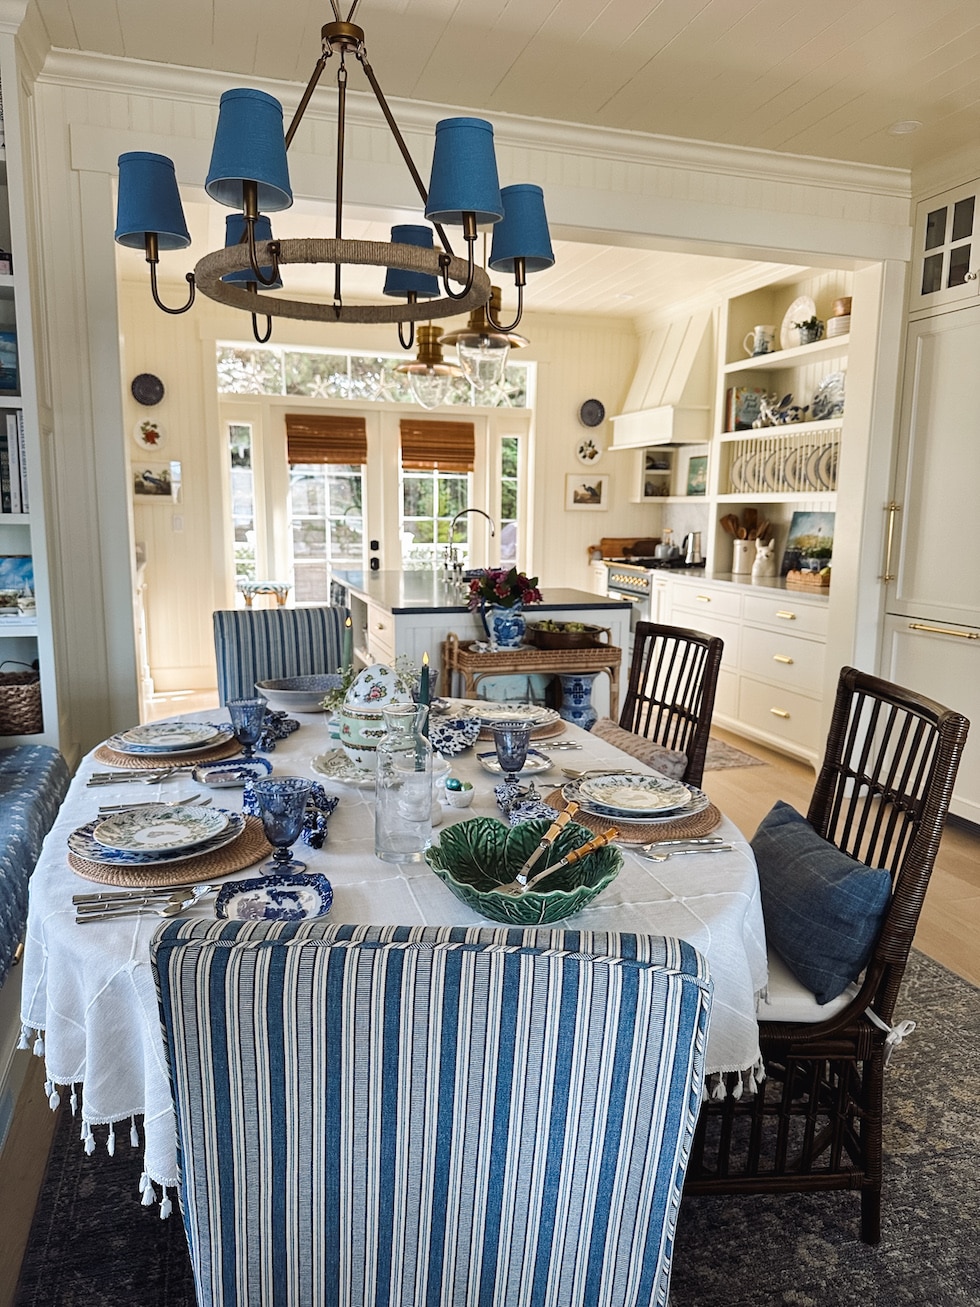
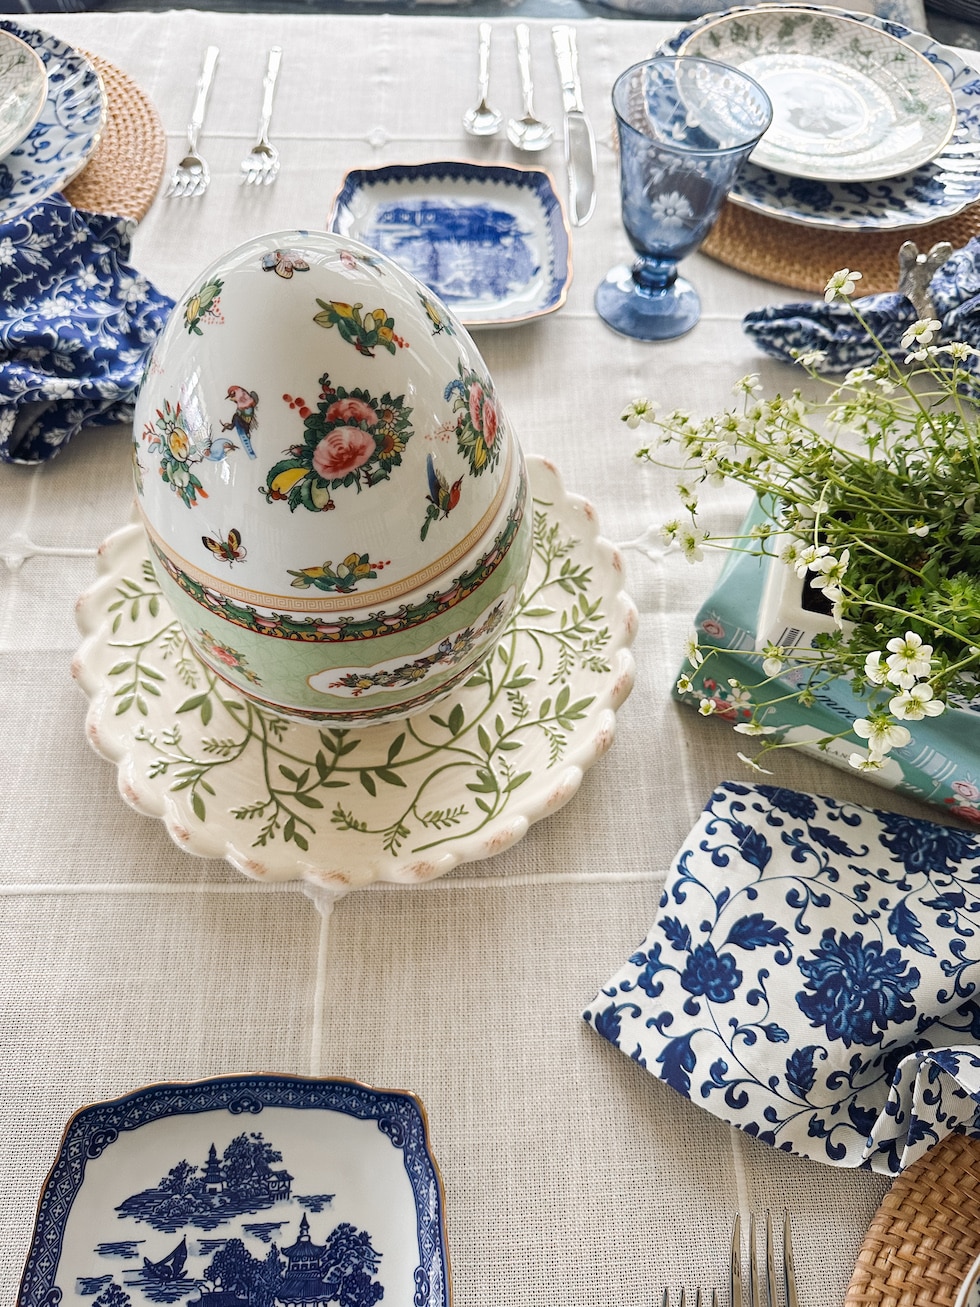
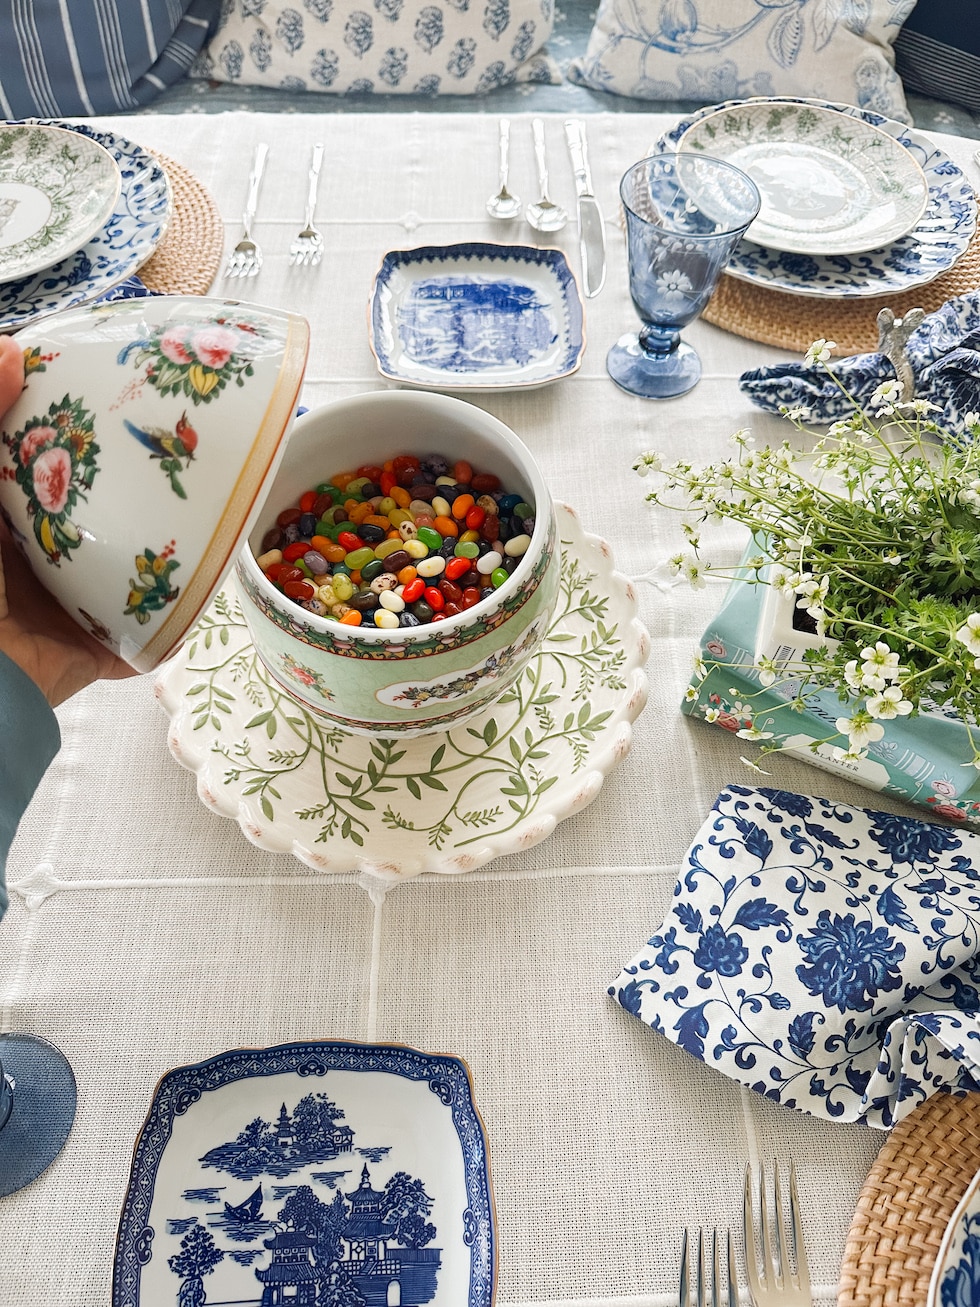
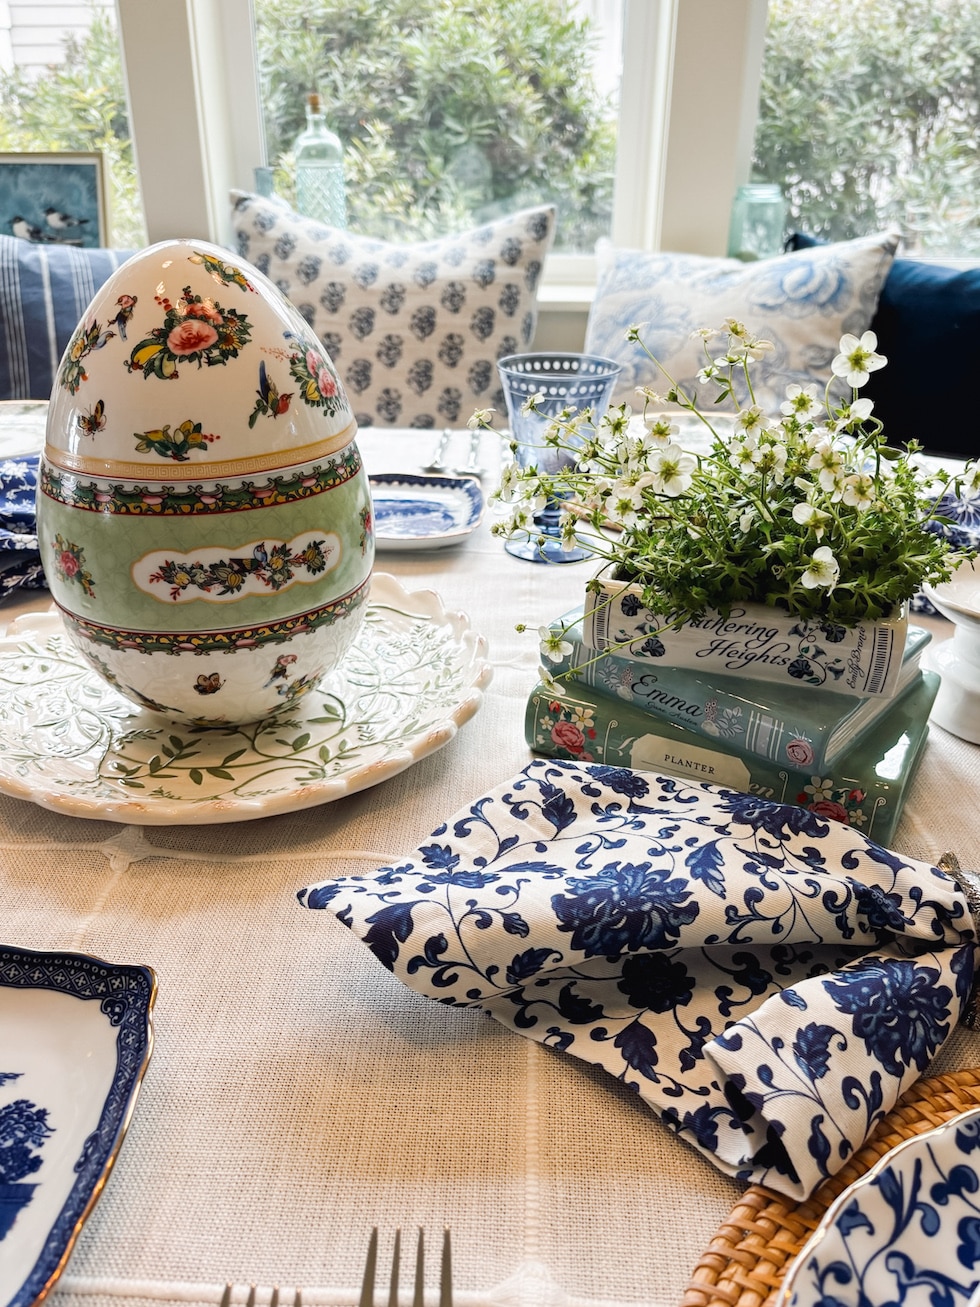
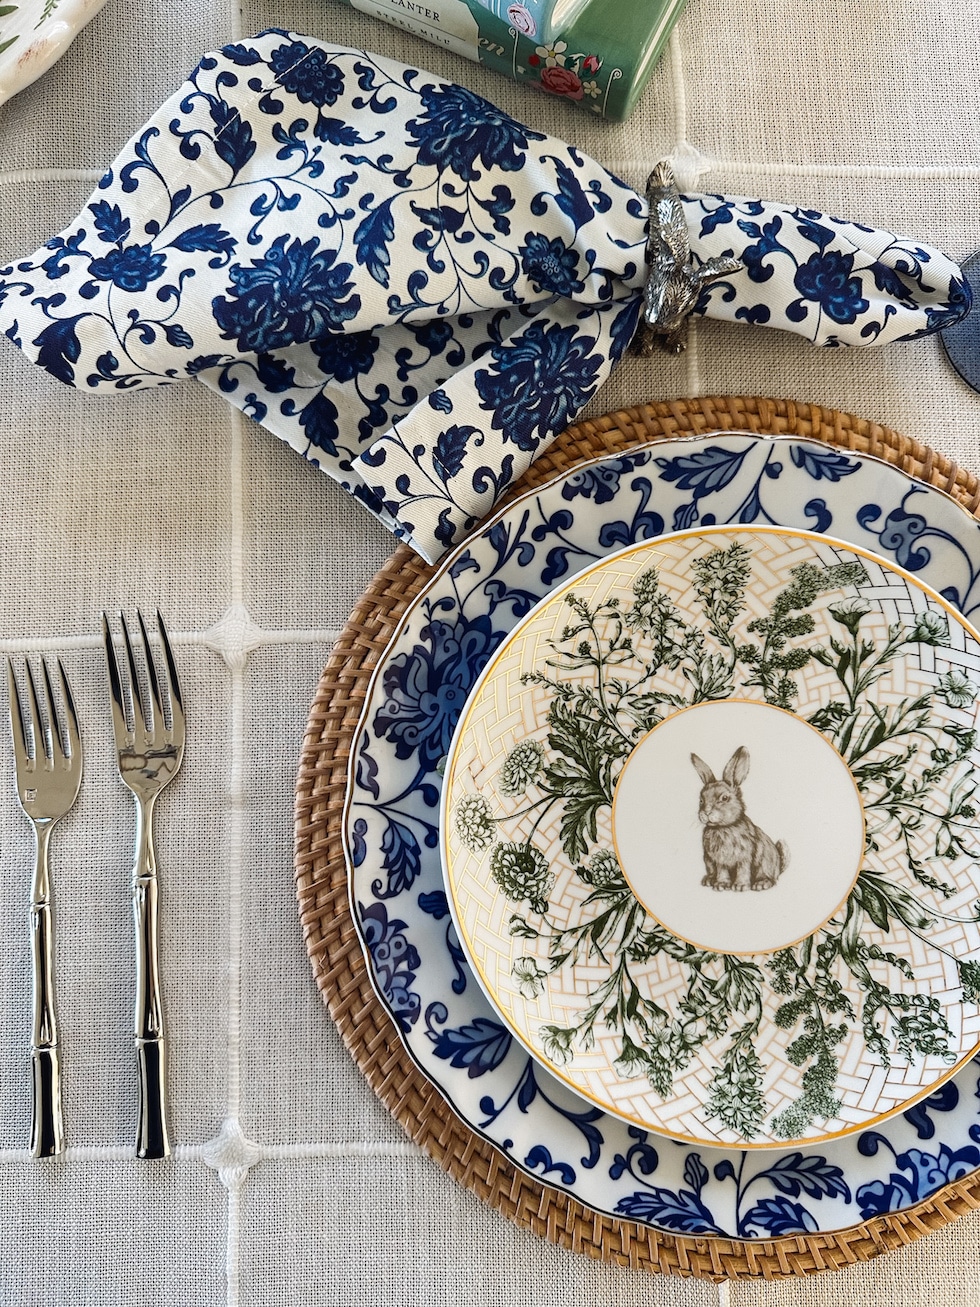
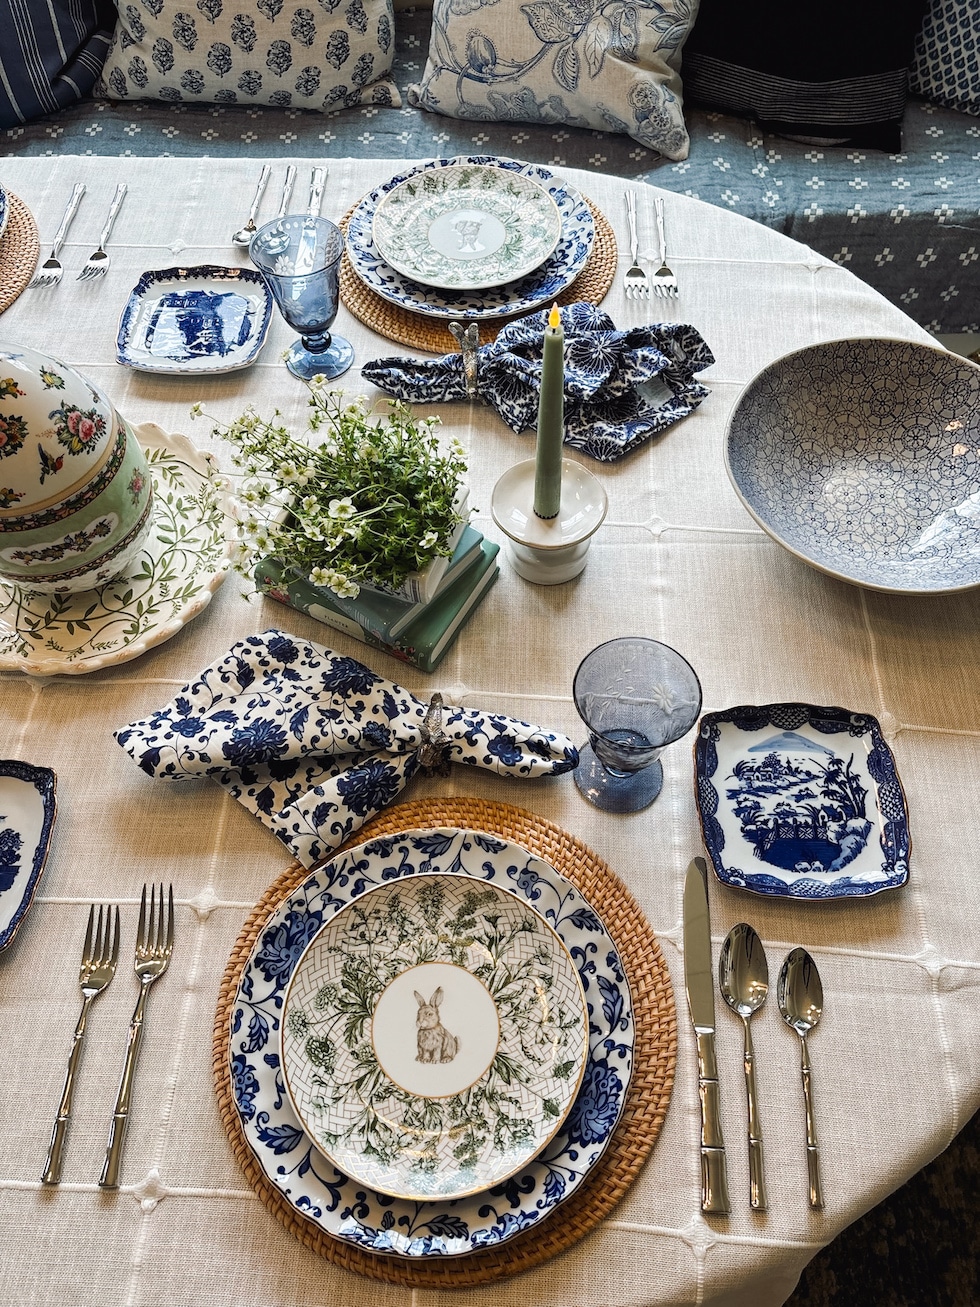
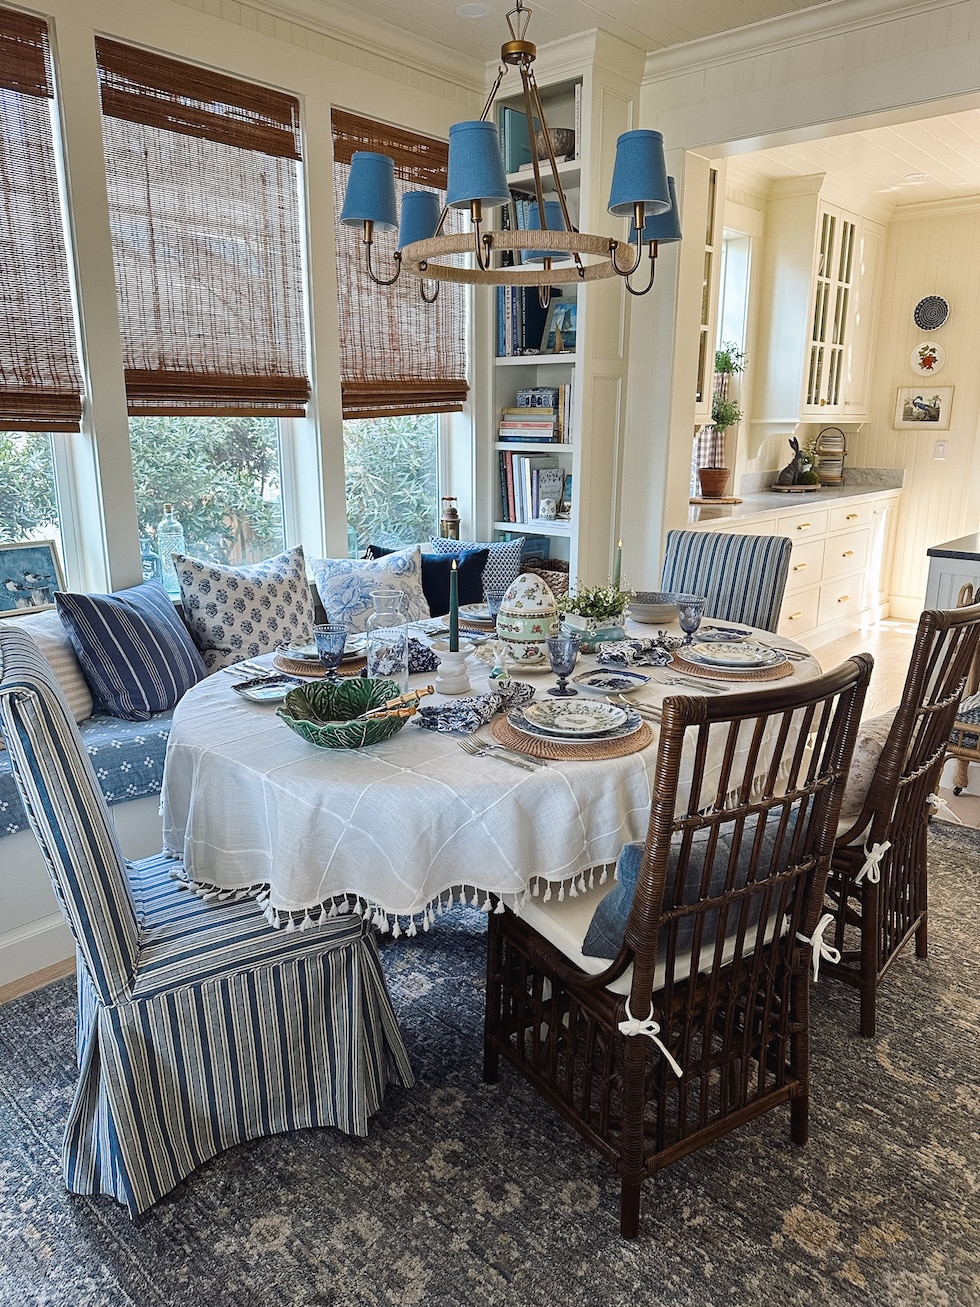
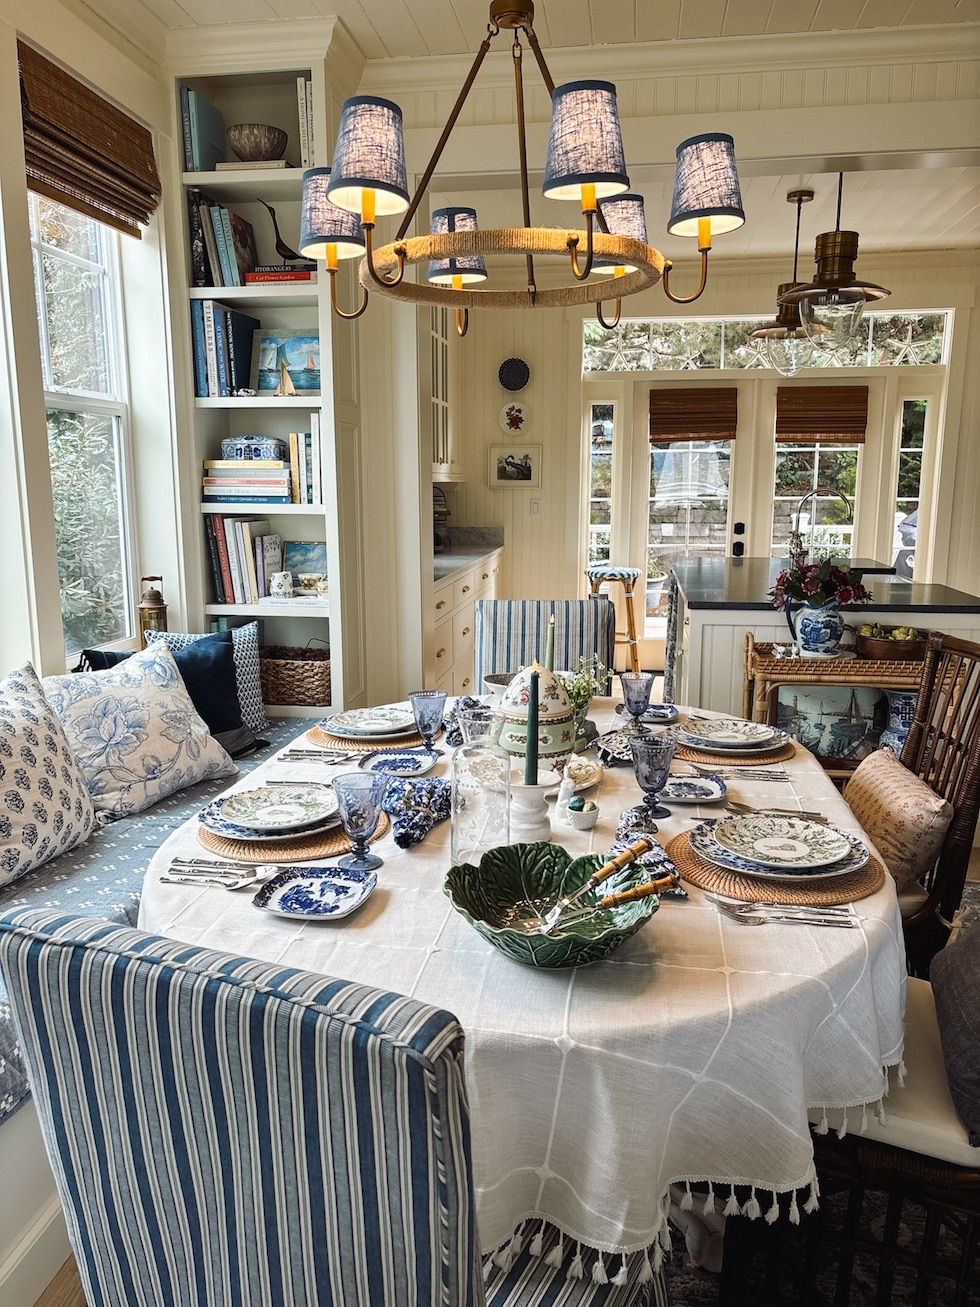
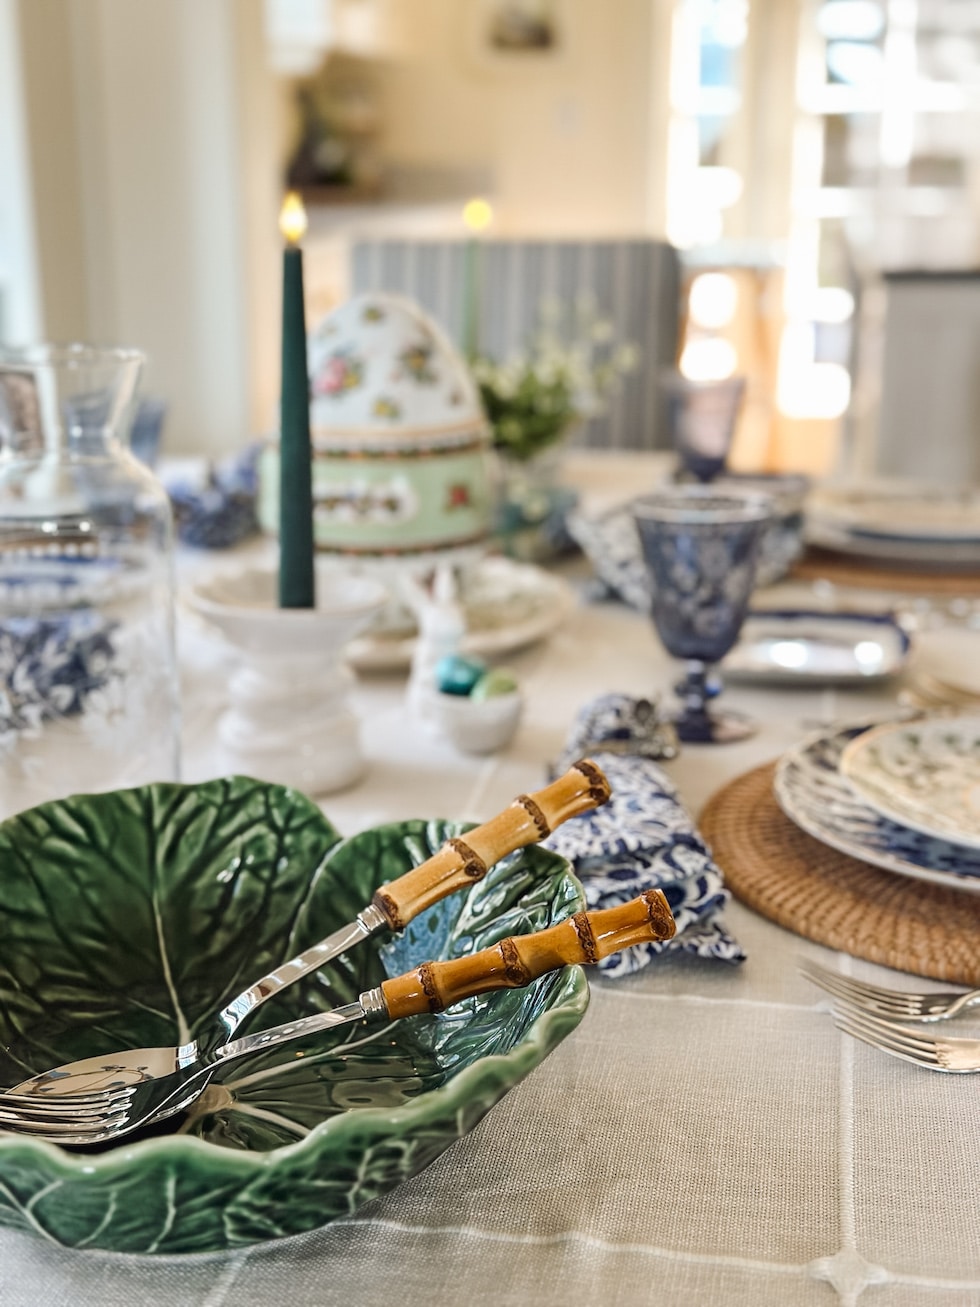
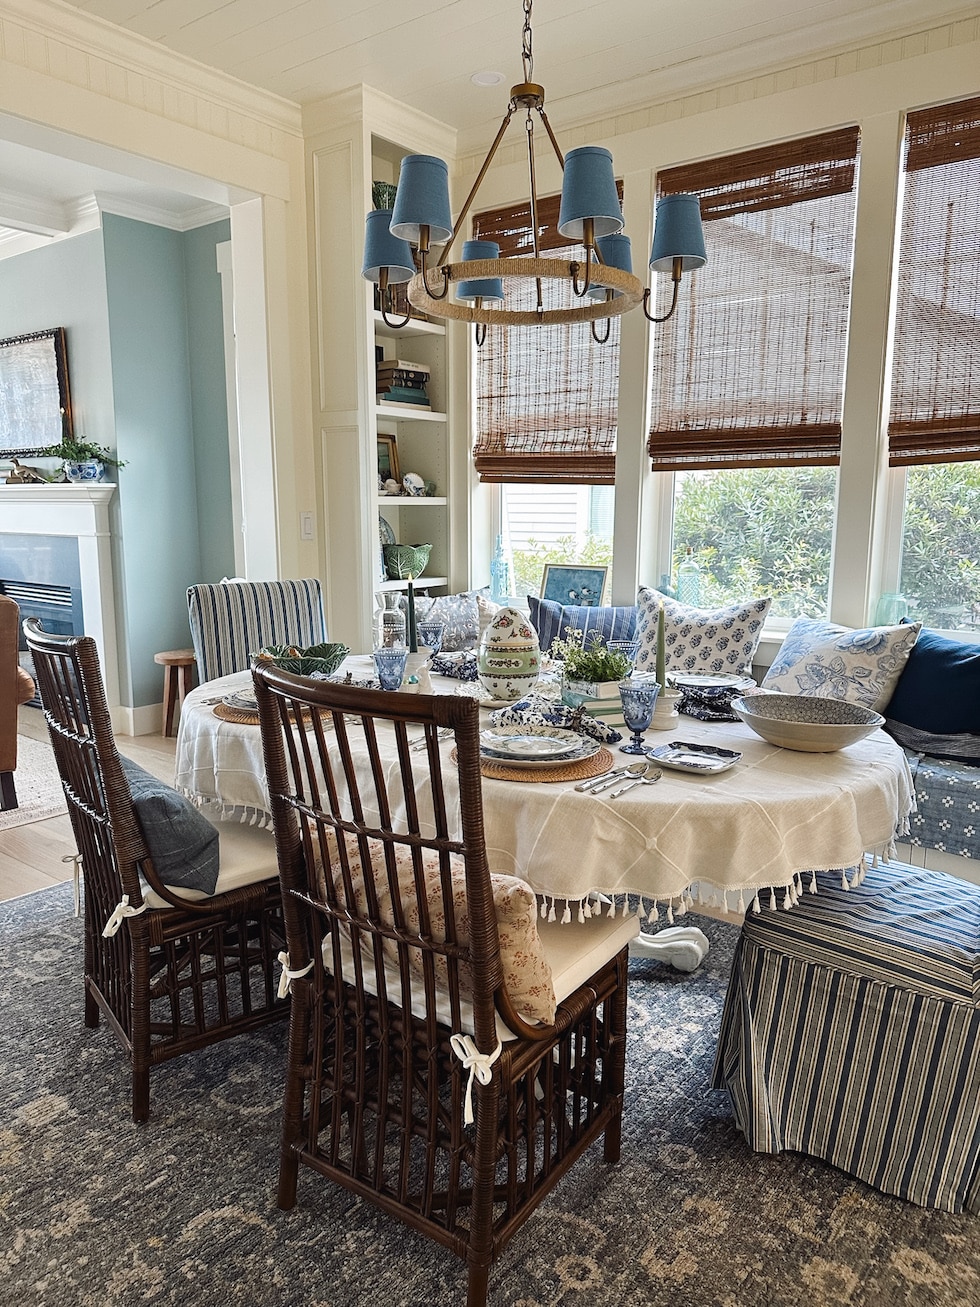
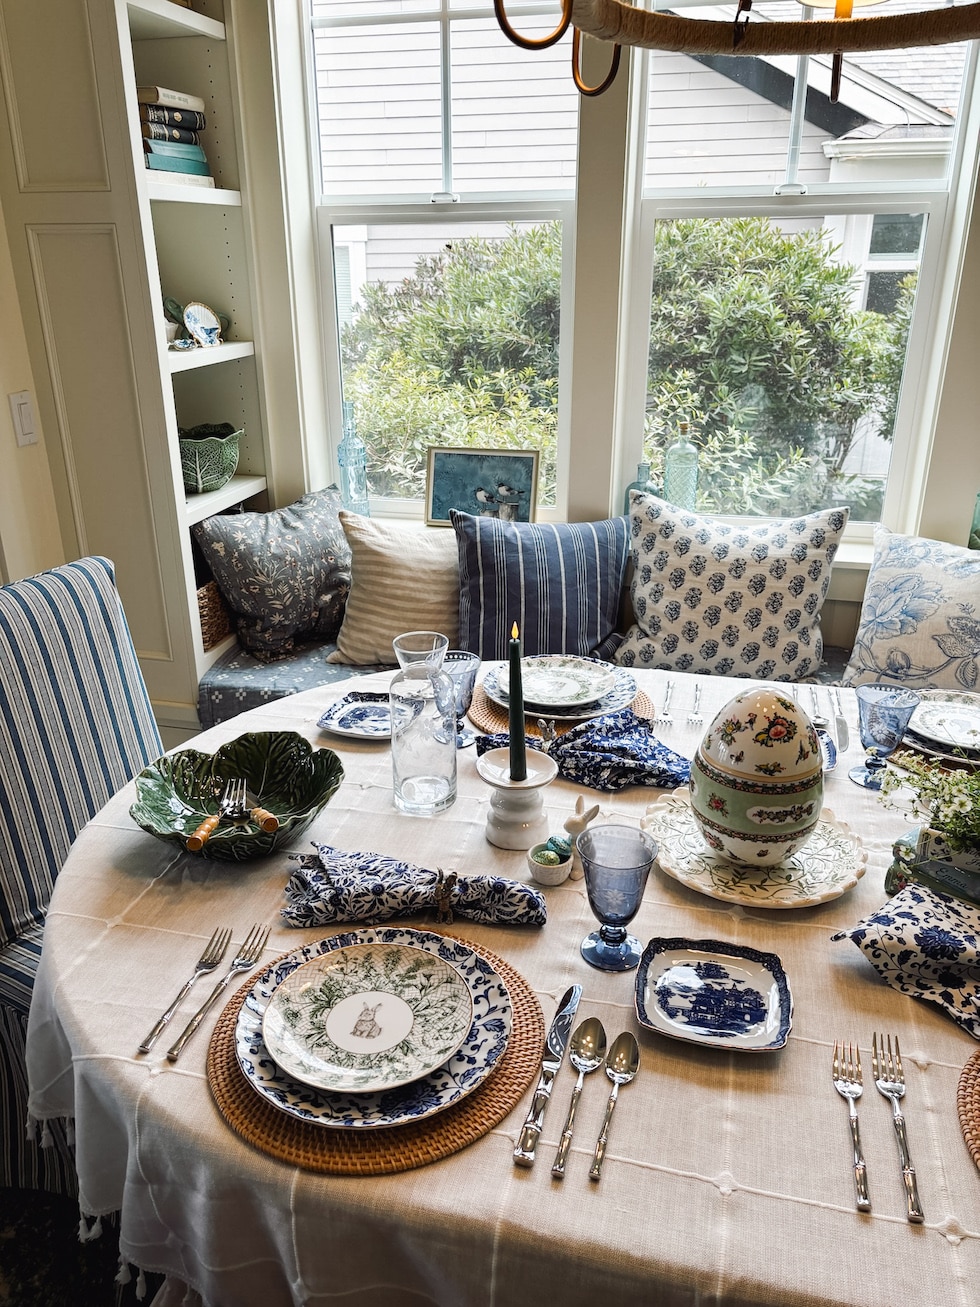
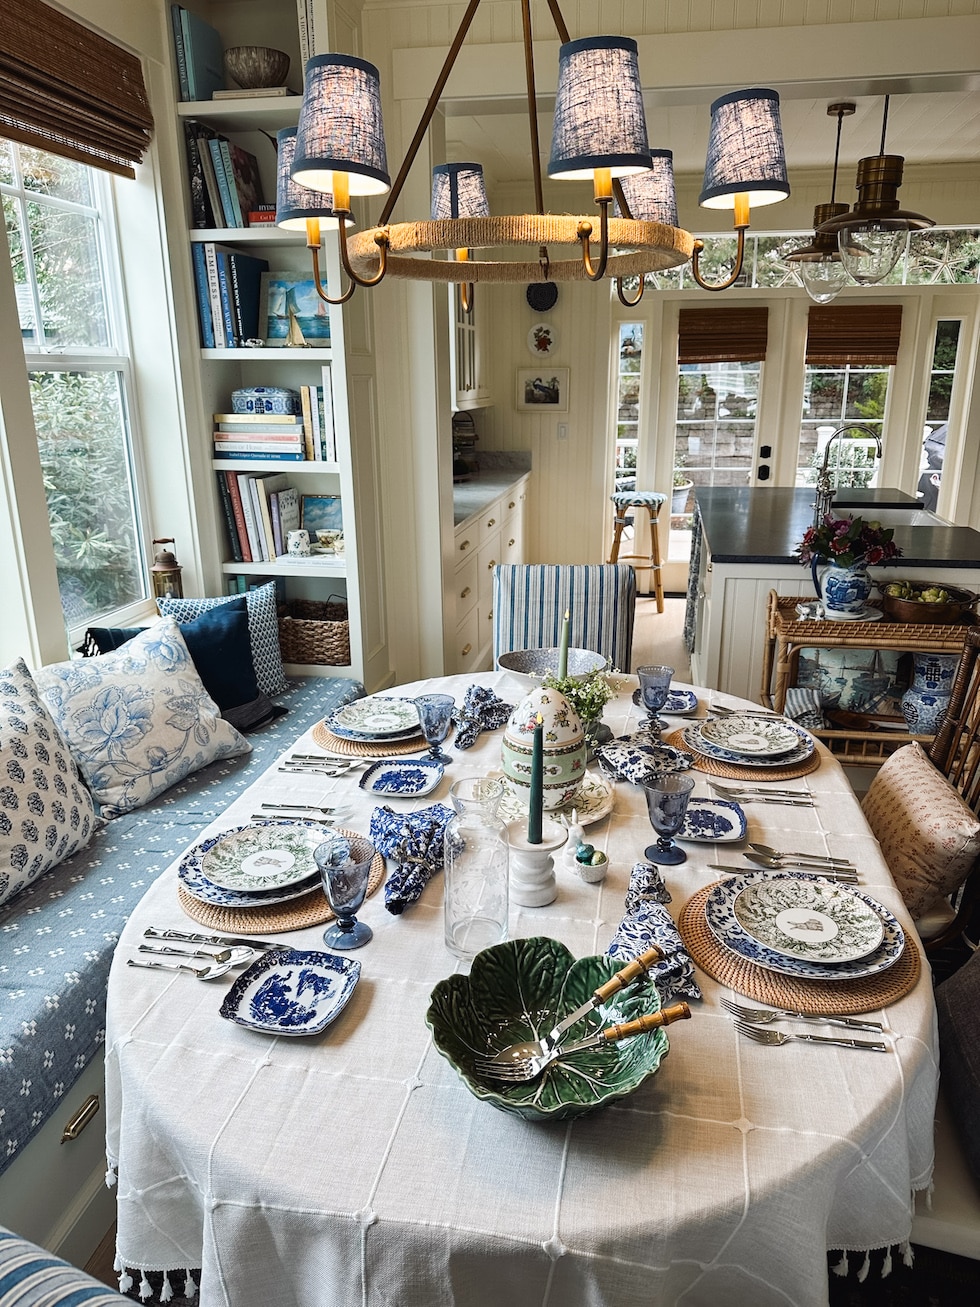
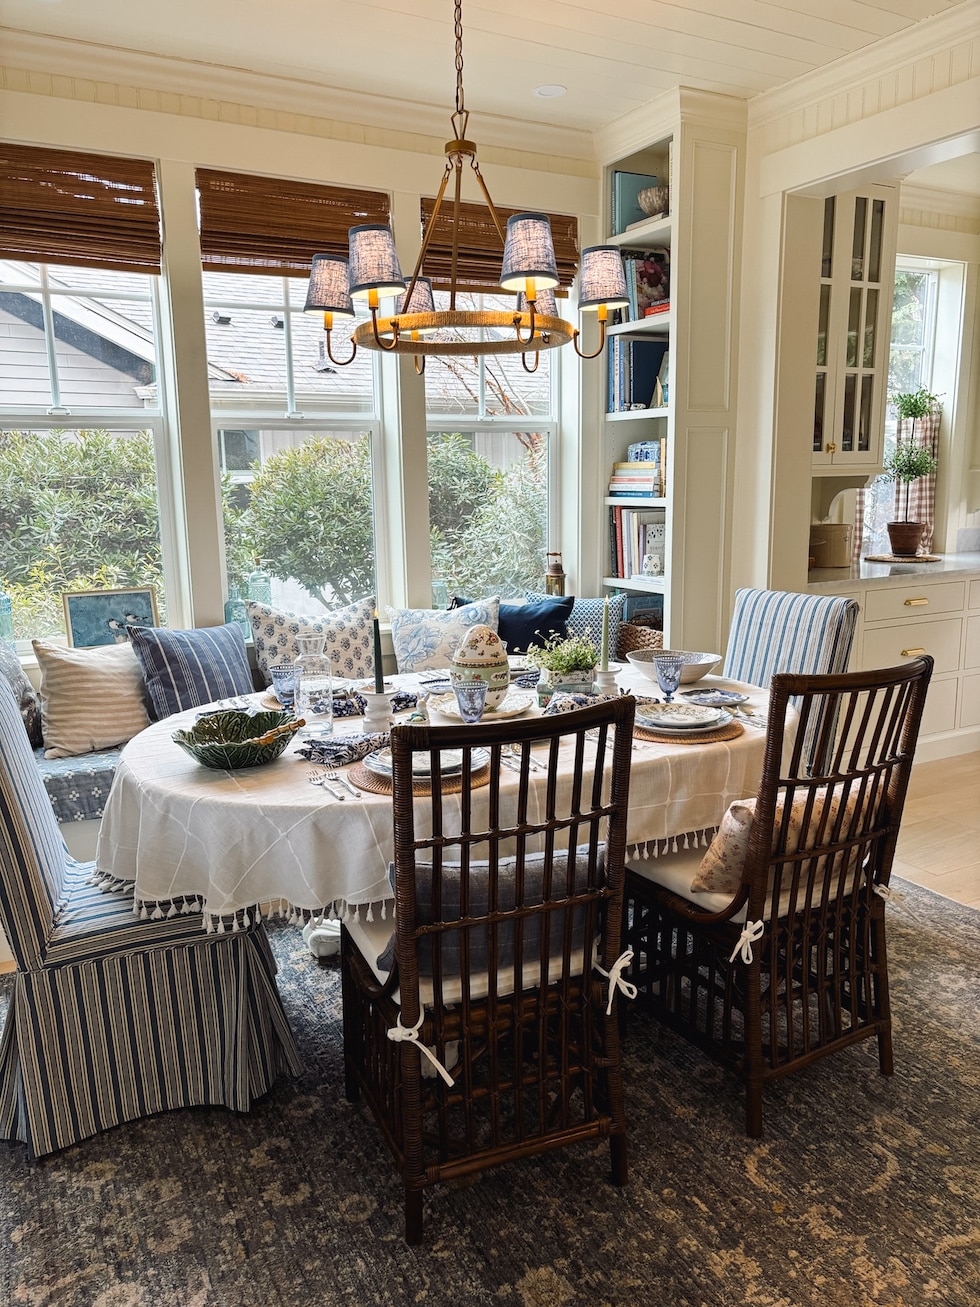
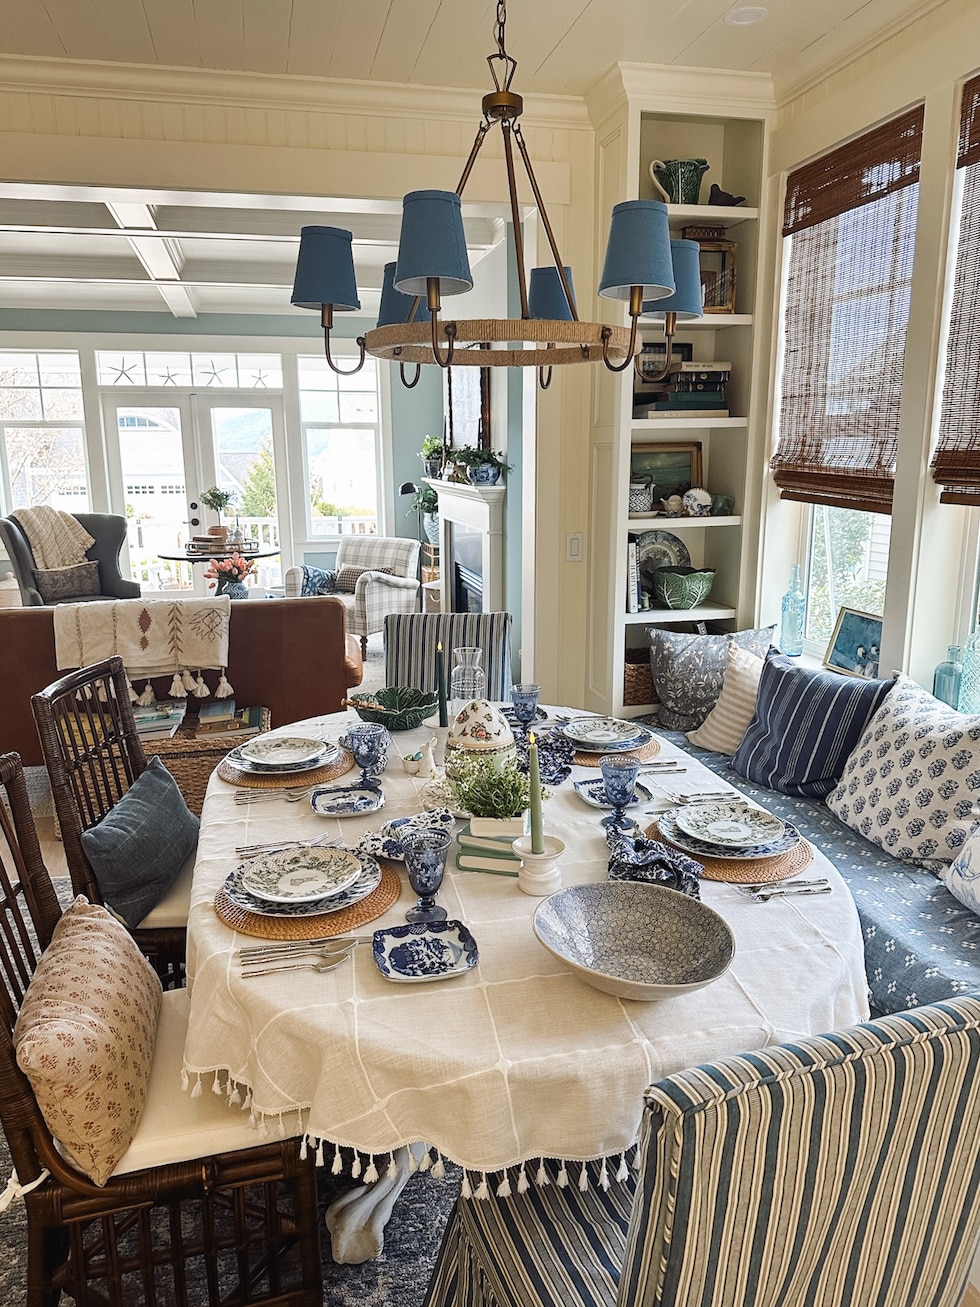
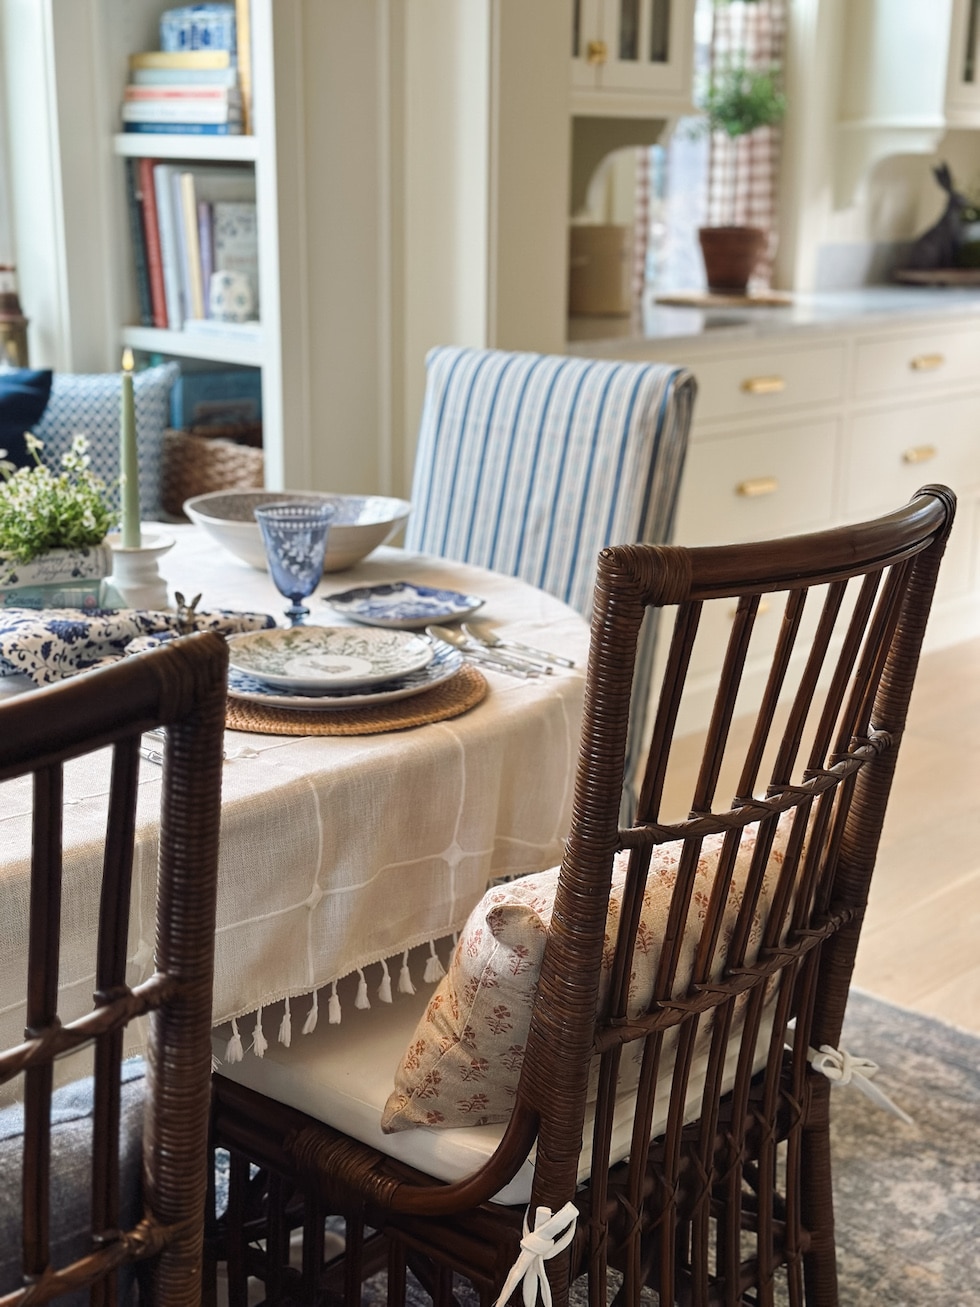
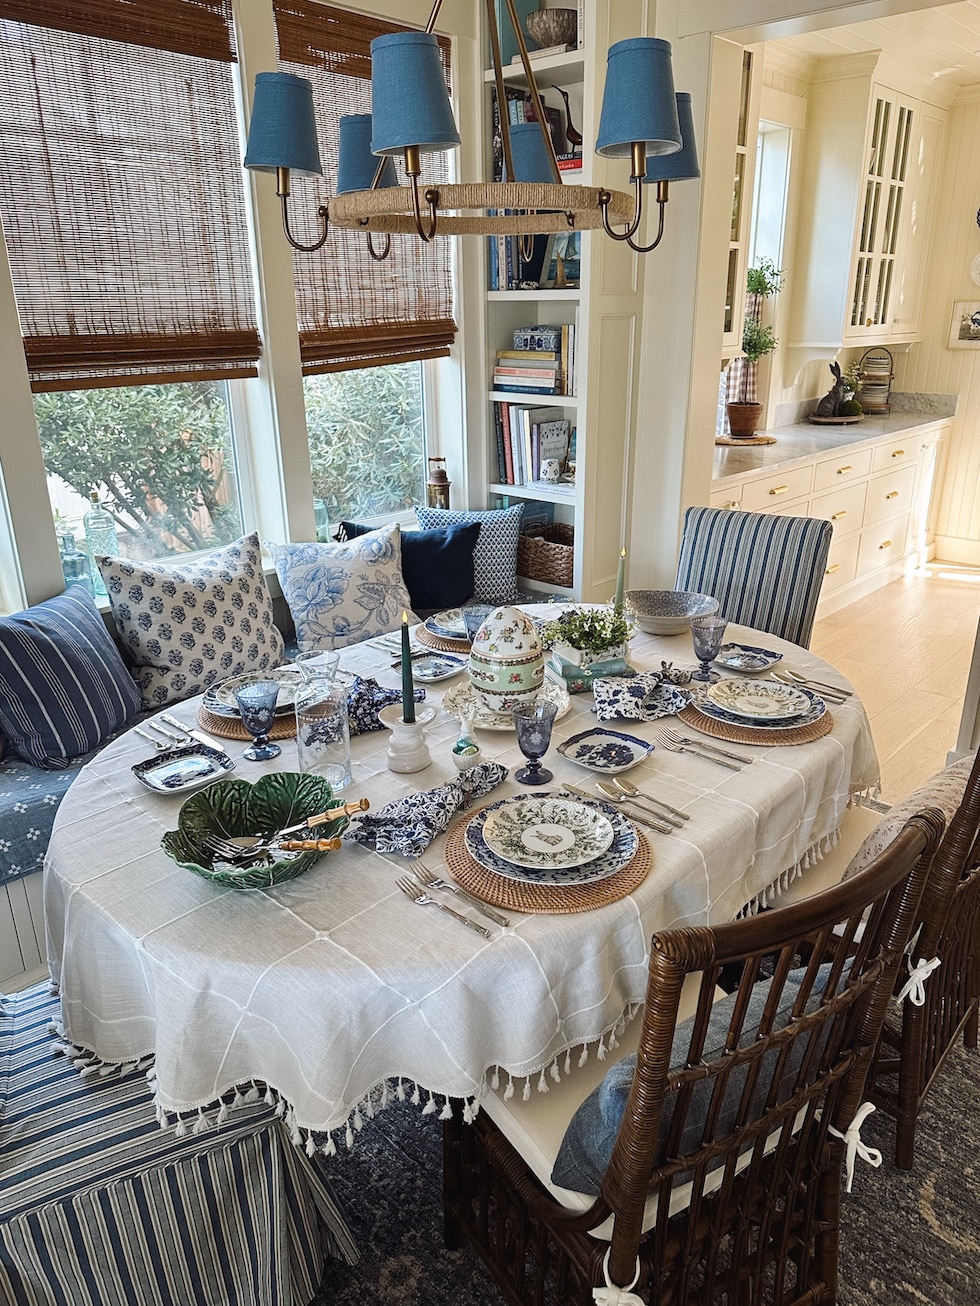
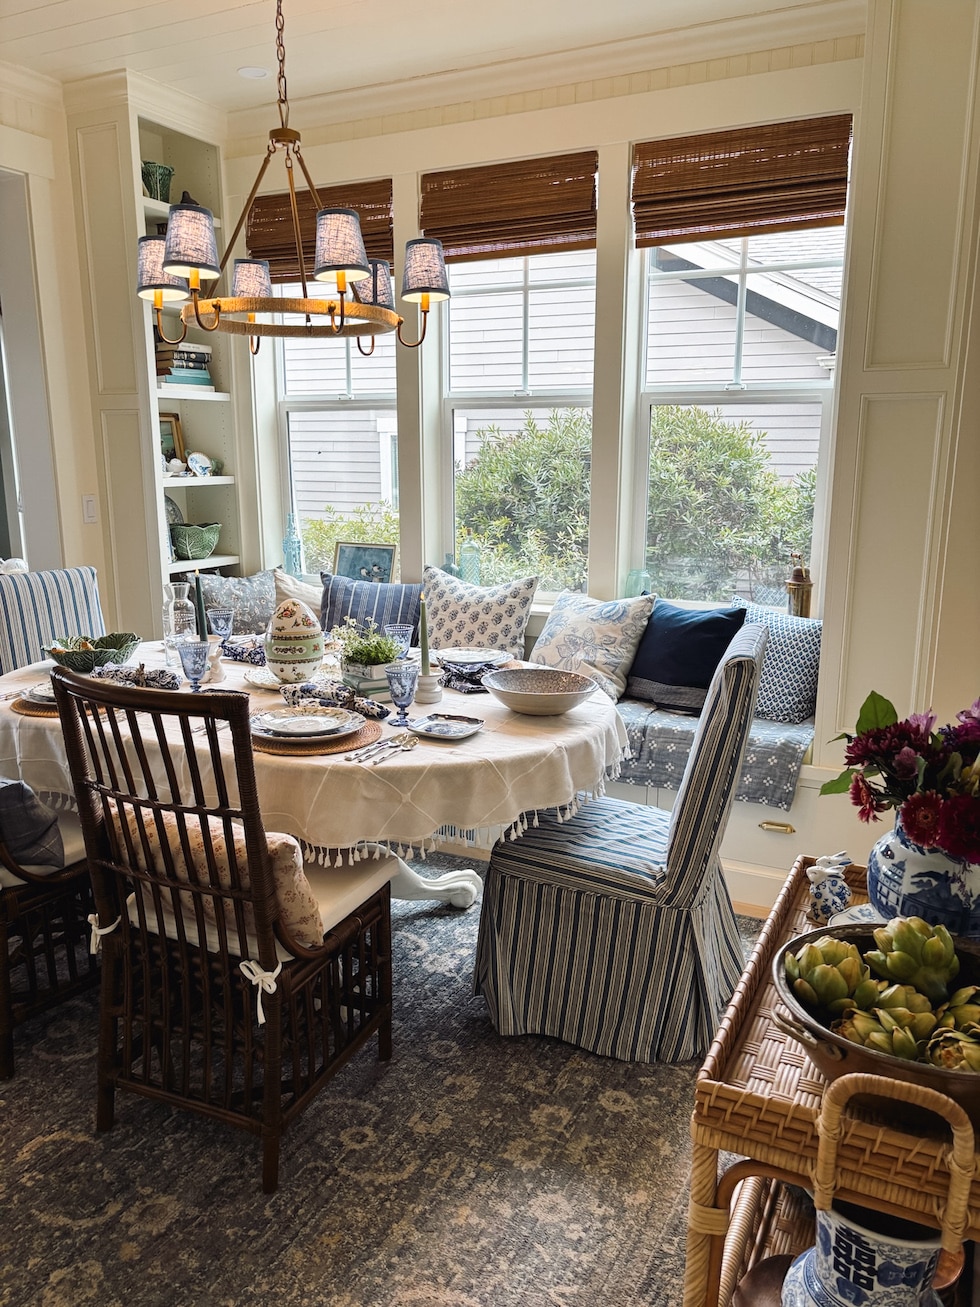
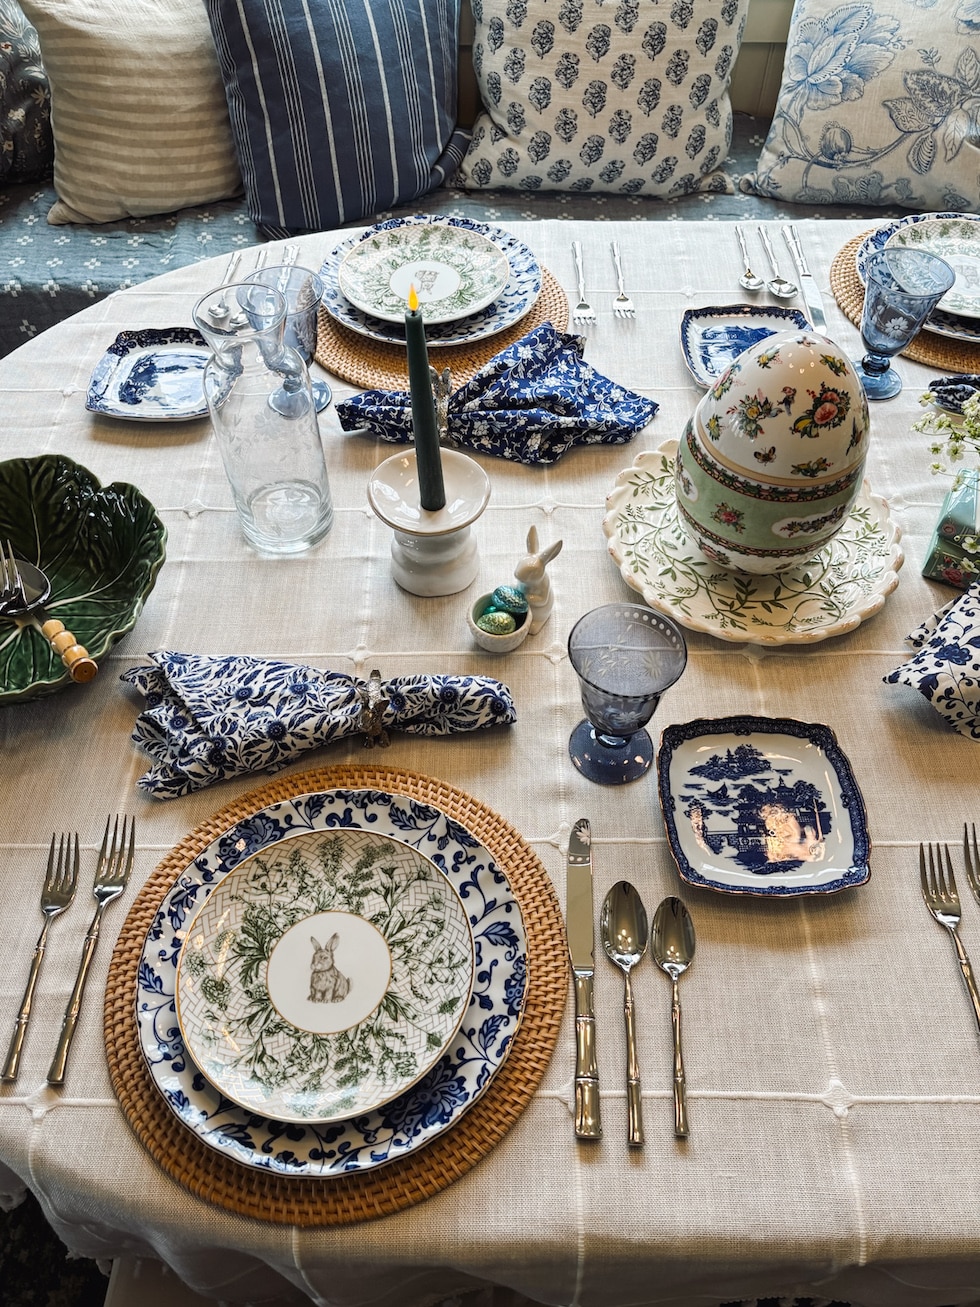
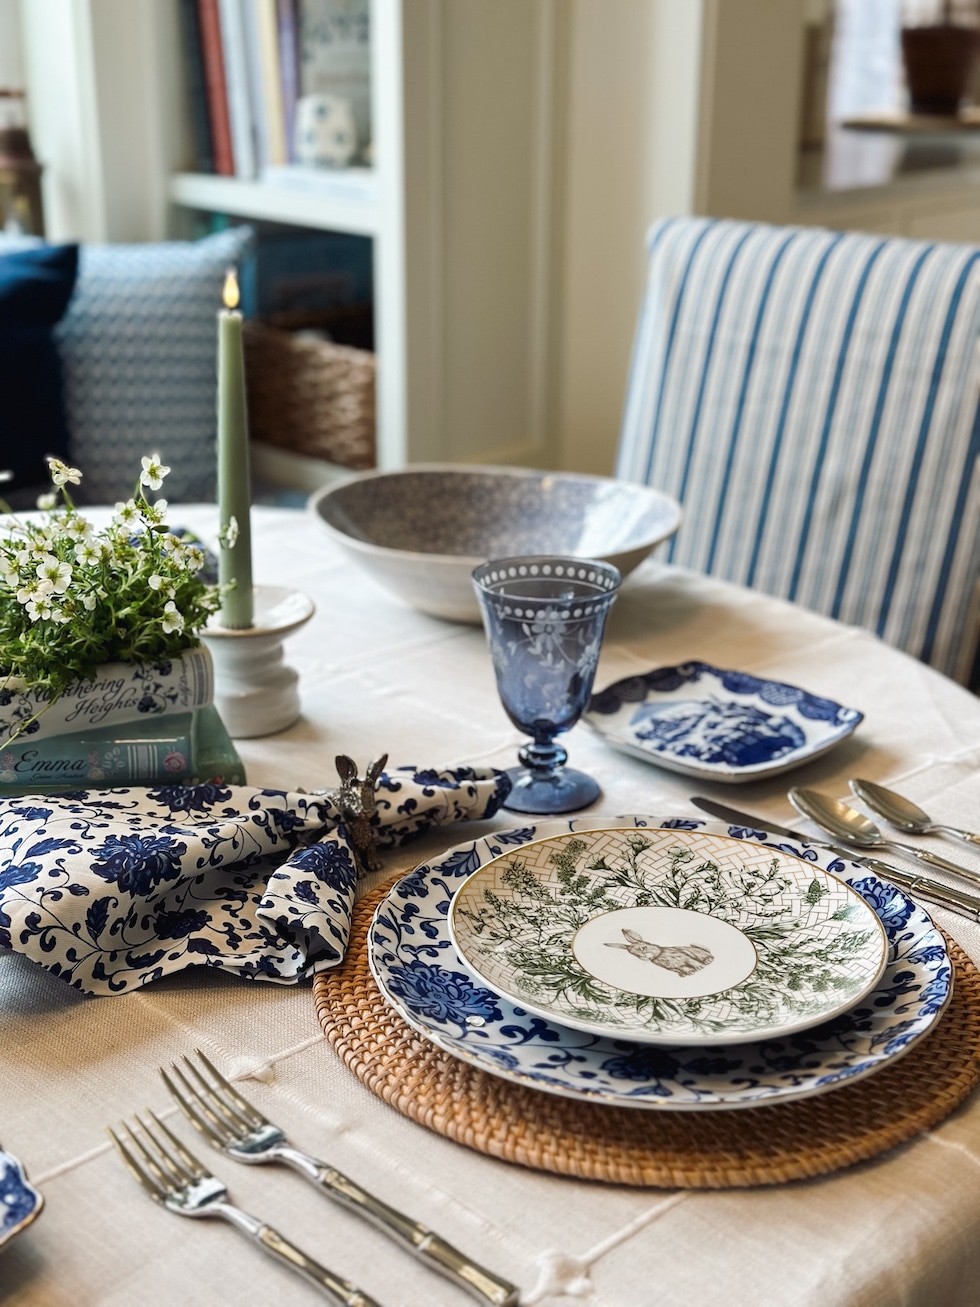
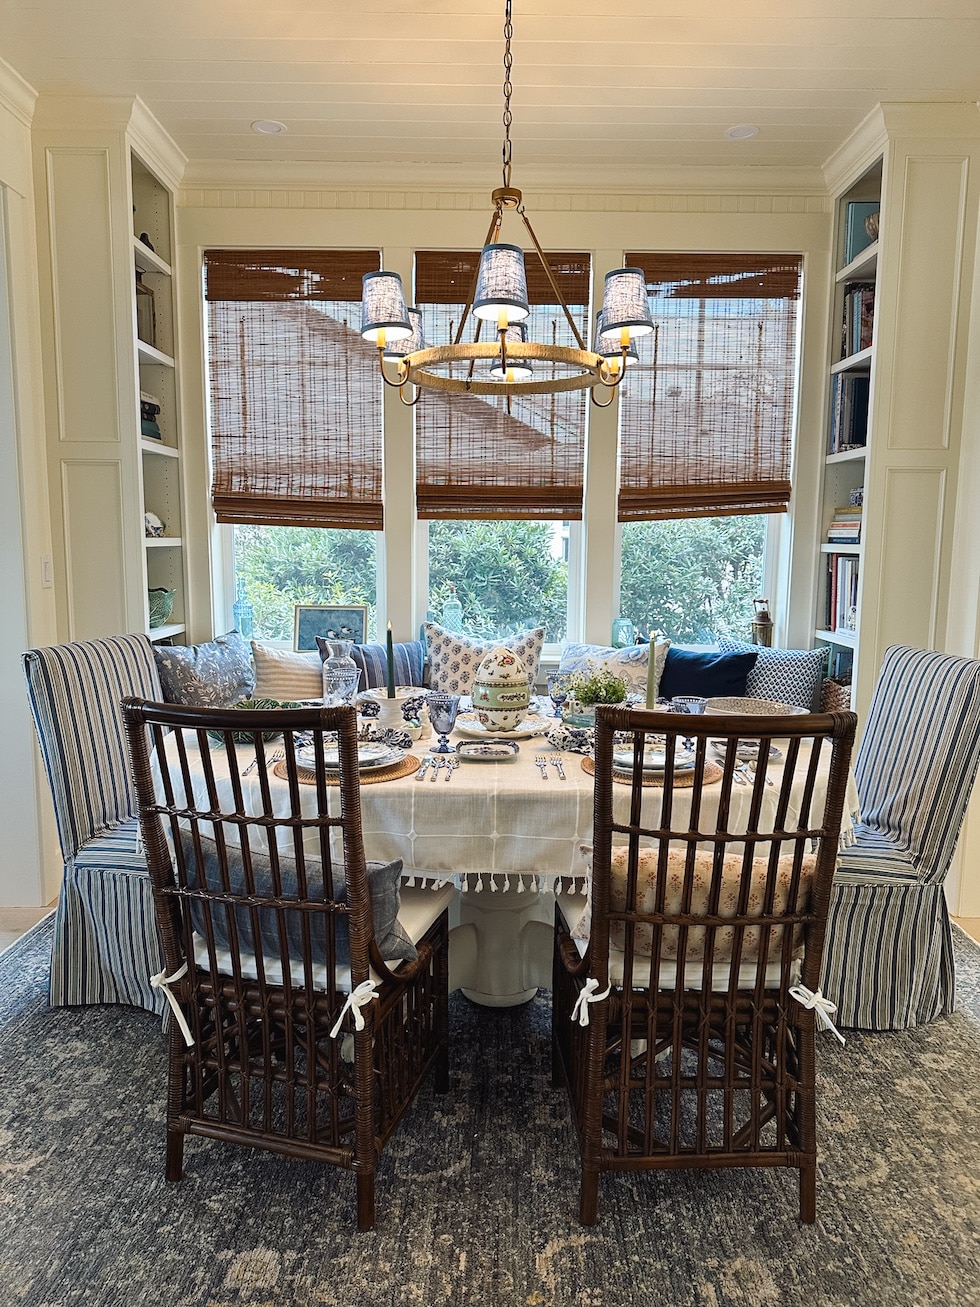
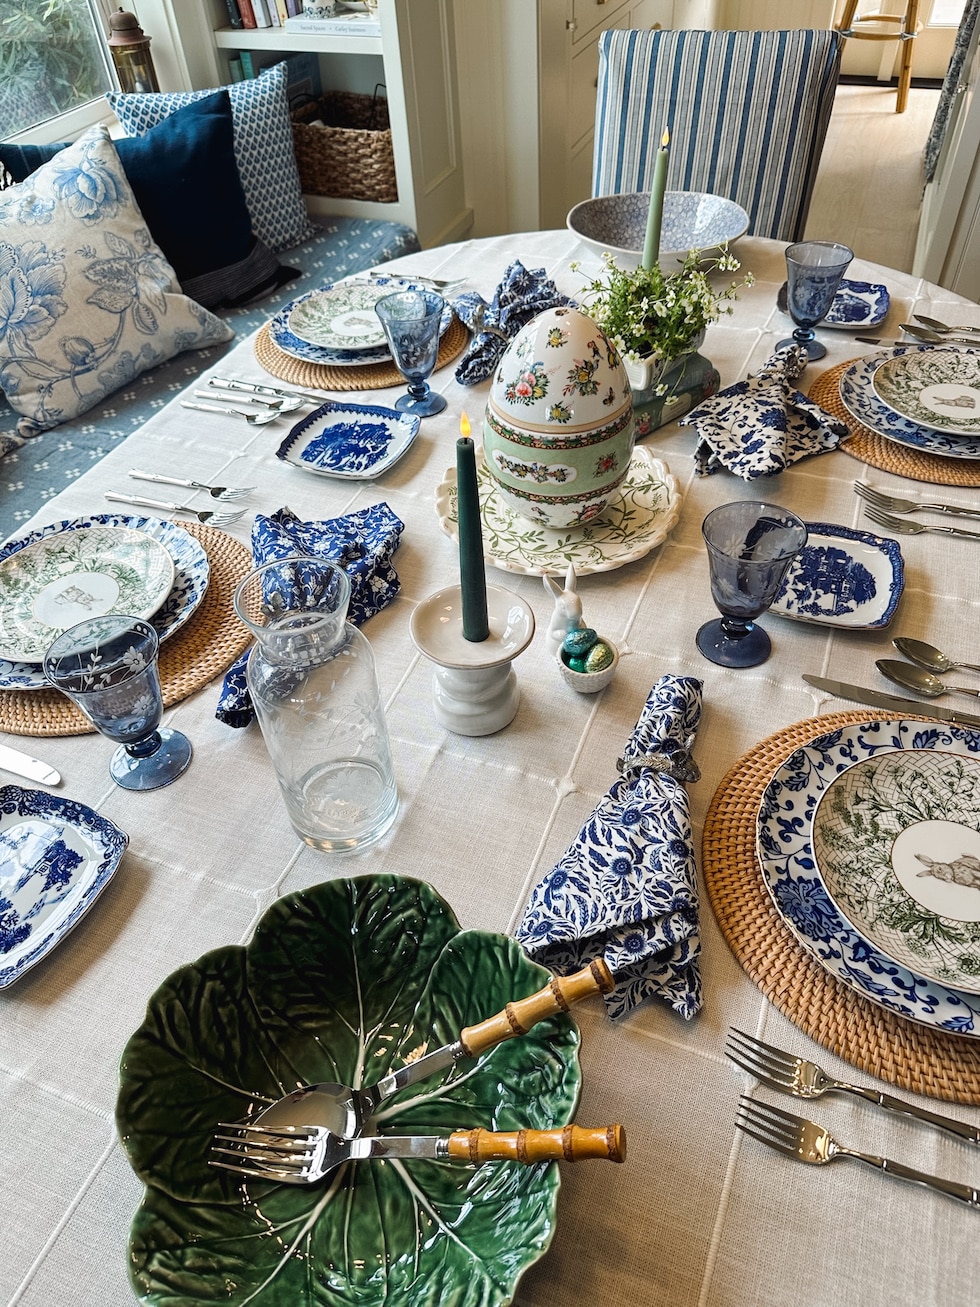
I decided to set up an Easter table for fun last week! We’re hosting Easter, so I’m looking forward to that. Sometimes I set the table early so I can think through what we want to use. Do you ever do that? It helps me to prepare so I know what to wash, which linens and centerpieces I might use or what I need to add to the mix. Other times I just wing it at the last minute! That works, too.
It’s fun to mix and match dishes, patterns and colors. That’s one of the reasons I made sure we had glass cabinets and shelves and even little nooks and crannies in our renovation. We don’t have a large home or storage areas to keep a lot of stuff, but I do love to see and use pretty things I’ve collected!
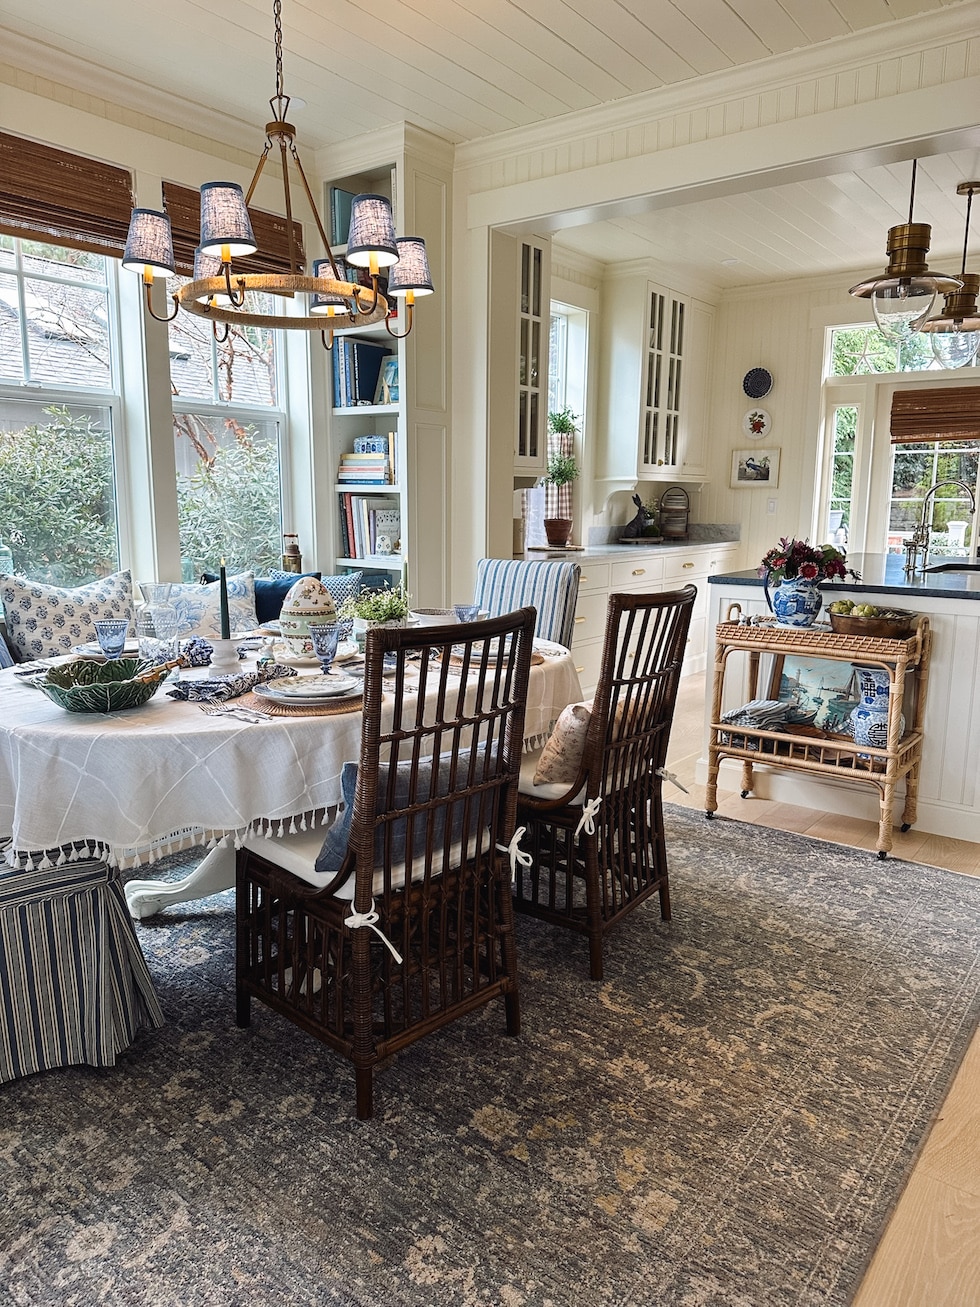
This time I think we may squeeze three more around this table, so I will have to adjust my place settings! For future holidays I am going to have a second table that we can set up when we have more family here. This is another reason we wanted the banquette, so we’d have more floor space to add an extra table!
Last year we set up an Easter table with these same dishes in our construction zone, so I’ve been looking forward to having a real dining area this year. You just make the best of what you have, right? It was fun but of course I was dreaming about the completed space when I set the table in the saw dust. 🙂
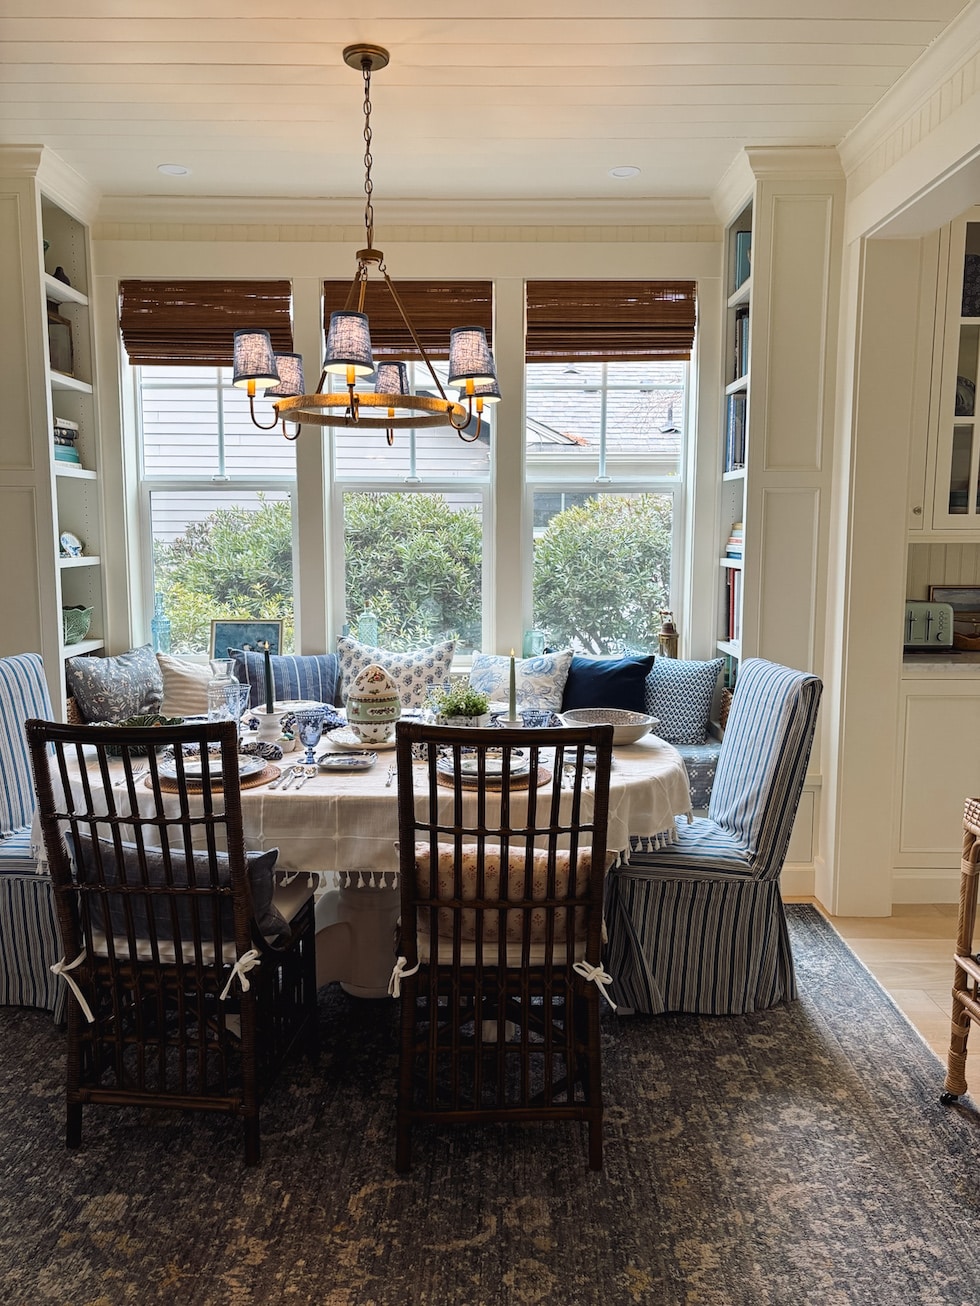
Now we have our little dining area to gather in and it will be so special to make new holiday memories in this home!
Are you hosting Easter this year?
I’ll share more photos below, and you’ll find a full source list at the end of the post!
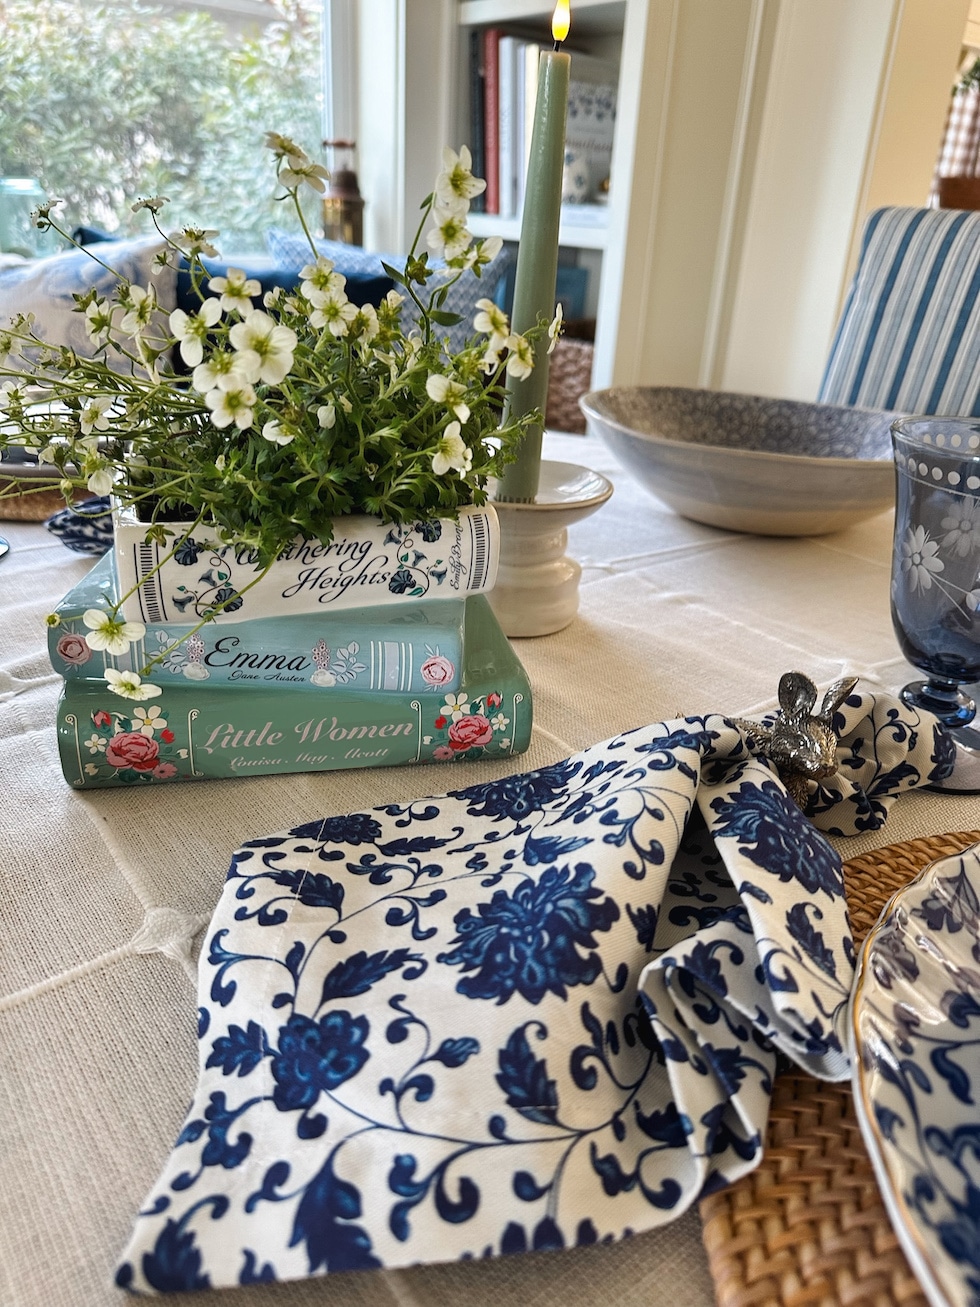
This book planter is so darling, I couldn’t pass it up. It has a drainage hole, too, if you want to plant in it. I thought it was a fun “non-traditional” springy addition to the table.